Wednesday, February 29, 2012

Follower Appreciation Giveaway!!!! - CLOSED


A giveaway? Yes it is! In appreciation of all you lovely followers I have three nail polishes to give to one lucky winner. I felt like I was cheating a bit announcing my intentions for a giveaway at 20 followers when I promised myself upon starting my blog that I wouldn't host a giveaway until I hit at least 25. Well, I feel much better now that I have 25 followers! (New followers welcome!)

What are these nail polishes you ask?

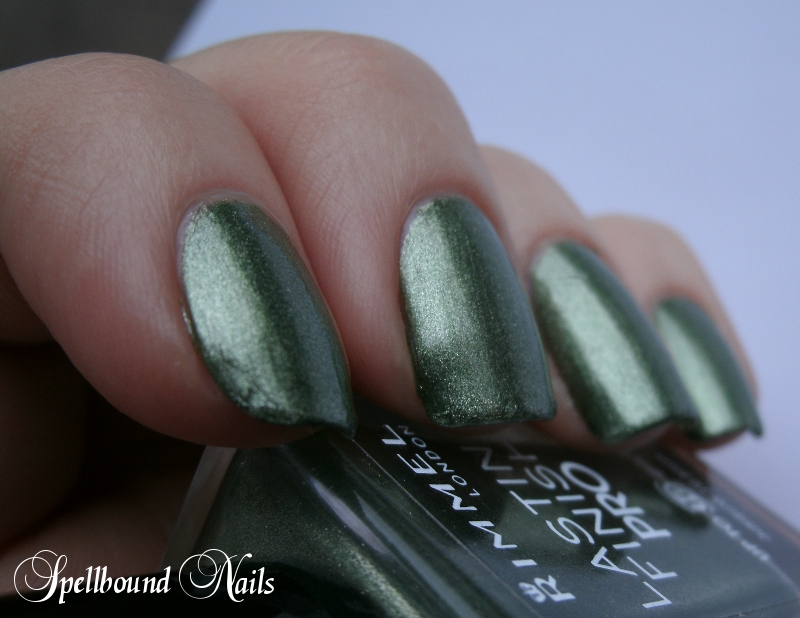
Sinful Colors Cha Cha Red


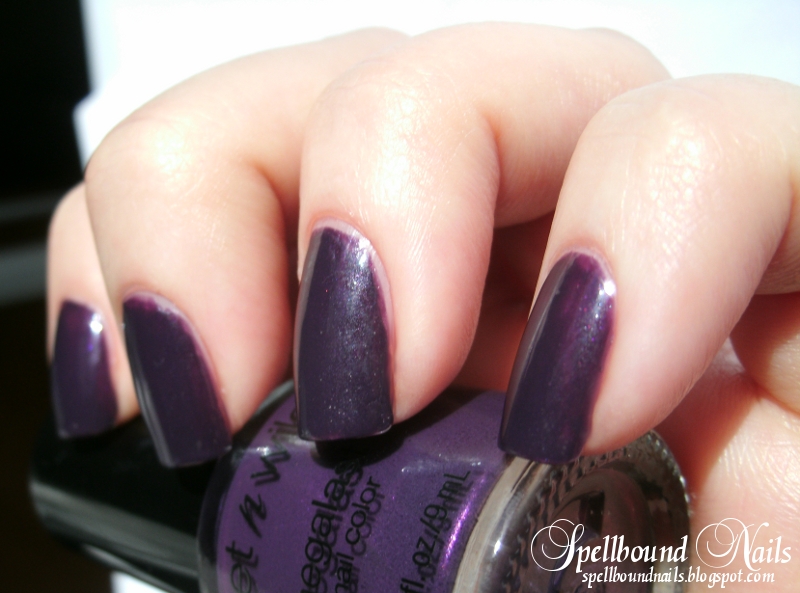
Sinful Colors Pearl Harbor. (This one almost didn't make it into the giveaway once I saw this bottle in the sunlight.)


And finally, one of my favorite nail polishes, Wet n Wild Disturbia. (You can find my post on this color here for color information and swatches.)


You've seen the prizes, now for the rules.

  • Must be a follower of my blog through either GFC or Hellocotton.
  • Must be 18 years of age or older (or have the consent of your legal guardian). Prizes don't just show up on your doorstep like magic; I'll need your mailing address. Don't enter if this will cause problems.
  • Must enter using the Rafflecopter widget and have valid entries. (Comments of 'enter me' or simply with your information do NOT count. Want to win? Use the widget.)
  • Open to United States residents only. Enter only if you have a United States address or know a friend/family member who lives in the US who wouldn't mind receiving the prize for you.
  • All three nail polishes were bought by me, are brand new, and will go to only ONE winner.
  • Giveaway opens March 1st, 2012
  • Giveaway ends April 1st, 2012.
  • Winner will have 48 hours to reply before I choose a new winner. (Be sure the email address you enter with is correct and one you check often. You don't want to miss out because you used an old email address.)

I think that's all the rules. Now onto the Rafflecopter. I've tried to give you many, many ways to enter so everyone has a good chance of winning—even if you don't have a blog. :) First giveaway so let's hope I got everything right. *Open post for Rafflecopter widget.

Wet n Wild - Disturbia

Pink may be my favorite color but purple is definitely my go to nail polish color. When I'm feeling down, can't decide on a polish, or am just feeling lazy I grab the closest purple and am perfectly content.


This time, the closest purple just happened to be Wet n Wild's Disturbia. I didn't even know I had this color! It was a gift but, while the Disturbia bottle isn't miniature, it is small and a bit short so it got lost in the chaos of my nail polish drawers.


I am so glad I grabbed it this time though because it was just what I was looking for. The polish is thick and creamy and goes on like a dream. Wet n Wild (recently?) switched their Megalast brushes over to their new ManiCurve Pro Brush. Their bottles have also gotten bigger, now holding .45 fl. oz compared to the smaller .30 fl oz bottle I own. However, the Disturbia I have is an older bottle—smaller and without the Pro Brush. That's not to say the brush is small though. It's a goodly sized brush, like a miniature Sally Hansen brush, that holds a lot of polish and smooths it on nicely. It took two coats for full opacity.


As for the polish itself, besides having a great formula, it looks absolutely gorgeous in my opinion. The color is somewhere between a deep purple and a plum that can look completely different in different lights (as seen in the vast differences in purple shown in the pictures). Much like the very pretty shimmer the polish carries. The shimmer is nearly unnoticeable in certain lights but when you can see it sparks with what looks like flecks of red-violet and indigo. You can't really see the indigo here but the red-violet certainly sticks out.


You know me though, I'm not usually one to leave a nail polish to stand alone. First, I gave Disturbia a coat of China Glaze Snow Globe. I will definitely use this combination again. It was absolutely stunning!


Still, that wasn't enough to satisfy me. I took it a step further and gave it one more coat of polish, this time with Hard Candy's Matte-ly in Love matte top coat. Glitter polishes look awesome when you turn them matte. The flakes of glitter don't subtly shift colors anymore but they still shine and pop from a dull background in the light.


The nails got a bit streaky when I was applying the glitter. I didn't want to swamp them in glitter as I have with some previous nails so I was extra careful—probably too careful since the clear got tacky before I was done layering the glitter. I just had to keep going though or there would be large glitter free gaps. The matte top coat smoothed the streaks out fine and I'm sure a regular top coat would do the same.


Disturbia has now taken it's place among my favorite purples and will be in the top three choices next time I'm feeling down, uncertain, or just plain lazy. :)


  • Now, just a reminder of the giveaway coming up very soon. There will be three nail polishes, all bought by me. I am unsure about international shipping at this time. I'm pretty sure US laws state that nail polish has to be sent through ground shipping due to it being labeled a hazardous materiel. With this in mind, this first giveaway will be open only to those US residents or those who have a US address they can have it shipped to. When I ship the prizes for this giveaway, I will ask about the laws at my local post office. Either way, I promise I will have a giveaway of something open to any international followers in the coming months. I won't forget about you guys!!

Tuesday, February 28, 2012

Rimmel - Rags to Riches

Hello again! Two posts in as many days? You guys will be sick of me before the end of the week!! :)


I mentioned in one of my previous posts that I snagged a major deal—$50 worth of polish for $10. I got 4 Borghese, 2 Sally Hansen, and a Rimmel. The Rimmel is the focus of my post today. It is 286, Rags to Riches, which is a lovely metallic moss green with a champagne shimmer.

Natural Light
I tried a new top coat after I finished painting these and it didn't dry as quickly as I'm used to. They were dry to the touch but must not have been dry through because the tips bunched while I was cooking dinner. There was no fixing it by the time I noticed. :( However, I'm very pleased to say they lasted much longer than I expected given how I practically invited chips and didn't touch up the top coat. I'm sure this is one polish that would live up to it's 10 day promise if I hadn't messed them up before they dried. Even then, they only began chipping on day 5 when I nicked my index nail while preparing dinner. It always happens at dinner for me. The others still looked nearly exact to when I took these pictures.


Natural Light
The Rimmel brush is big and wide and absolutely perfect! It's near an exact match to Sally Hansen Insta-Dri brushes—which I love!  This color actually reminds me of Sally Hansen's Celeb City, different in color but both metallic with a lovely shimmer. If you'll remember, I adored Celeb City so it's a very simple leap of logic to say I love Rags to Riches too. I think I'm turning into a metallic girl and I won't have a problem with it if they keep looking this great on my nails!


Flash
I would like to add that the Rimmel Lasting Finish Pro bottle is very handsome. Yes, I said handsome. It doesn't look very feminine so I'll use male descriptors. It's not so much heavy as solid (fits nicely in hand) and the silver crown on the black lid is simply charming.


Do you have a favorite Rimmel color?

Monday, February 27, 2012

Red Leopard

Hello my lovely readers! I feel like I'm really late with my posting. It's been such a busy week and I've gone through my polish pretty quickly. I have this post and two others, and the polish I have on now is starting to show wear on the tips. But that just means more posts for you to read!


That said, I'm so excited! This blog has hit 20 (+1) followers. I never expected so many of you!! In honor of that number I've decided to do a giveaway. I already have the prizes ... bought by me with my limited funds—I just hope they're good enough to show the depths of my appreciation. Now I just have to figure out how hosting a giveaway works. I'll have it put together and posted soon!! I have high hopes to one day have great prizes, random giveaways, and lots more for milestone follower numbers. Be on the lookout in the next few days for your chance to enter.


Now, onto the post. This was inspired by a Pinterest pin. I clicked the wrong thing before I could repin and the page reloaded. Sadly, I can't for the life of me find the picture again. I did a few searches but nothing. However, a google search brought up Reverse Rockabilly by The Daily Nail. The picture isn't the one I saw on Pinterest but the design is near exact. I feel I have to give credit somewhere so it goes to The Daily Nail. :)


I only managed to get one good picture of these nails completed. I have really got to finish making my light-box; I hate my pictures being at the mercy of Mother Nature. I did manage to get two pictures while I was working on them though that I'm willing to share.


Look at that mess! Not so pretty while I work on them, are they?


I was feeling extremely shaky the day I did these; so much so that I actually dropped my nail polish brush/cap and splattered gold all over my keyboard. That has certainly never happened before. I just didn't trust myself with a nail art brush; I was already imagining the absolute horror if I attempted it, so I just used my stamper and the leopard print image plate (Salon Express plate SE11). I'm really beginning to love stamping. I prefer to hand paint but it's great for those days when my hands are shaking too badly for detail work.


Here they are before I added the pearls. I went shopping with my sister that day and we got some sunlight while driving. Of course, I spent no time enjoying this little ray of sunshine. I used this break in cloud cover simply for picture taking. I have such a one track mind! Don't you love it? :)


Polish Used
Funky Fingers - Platinum Record
China Glaze - Poinsettia
LA Colors - BCC 585 (Black)


*Pearls bought from the Born Pretty Store. Definitely worth at least a browse through.


  • Also, check out the new additions I added today. There are now Facebook like buttons below every post and if you look to the top left you will now see buttons to both follow me on Twitter and one to like my Facebook page. You can also look up at the top and find the new page additions—About Me, Contact Me, and my Disclosure. Take a moment to read them if you have time. :)

Tuesday, February 21, 2012

Claire's - Magnetix

Hello, everyone! I've been told recently that I can sniff out a sale or a great deal on nail polish from a mile away. I'm beginning to think that's true since I recently snagged $50 worth of nail polish for $10, but that sale isn't what today's post is about.


I was in Claire's last week grabbing some things to send to my best friend for her birthday. I got her haul all picked out and was checking out when the wonderful woman behind the counter pointed out the container beside me that held their brand of magnetic polish, Claire's Magnetix. Now, I have seen tons of posts on magnetic polishes and I have never been very impressed. I remember asking what the big deal was.


Well, now I know what the big deal is! This woman popped open one of their display polishes and showed me right then and there how it worked. I was so impressed that I bought two at their buy one, get one half off price. Two awesome polishes at a great price? What could be better??


I haven't tried the gold on my own nails yet but it's the color that convinced me to buy the magnetic polish so that should say something about it. I also picked up their dark blue and I have to say I'm in love!! Check it out.


In direct sunlight. It's truly stunning, isn't it? I don't know if this has micro glitter or if it's just the iron powder but there are sparks of blue-ish purple and light blue that seem to be only visible in direct sunlight. Sadly, it doesn't seem to show up in pictures.

With flash. While the flash washed them out a bit the magnetic designs are still very visible.

Here is the actual magnet. It sits like a cap on the bottle, fitting over the actual screw on cap that holds the brush. There are resting places that sit comfortably against your finger as you hold the magnet over your nail. Yes, that is polish on my magnet. I sometimes let the magnet droop while using it and it settles onto the wet polish. It's something I'm learning not to do.

Pros, Cons, & Tips
(in no specific order)
  • The cap is slightly hard to open for me. It's short and stubby and I find my fingers slip a bit as well.
  • The brush is large and wide. Not as large or as wide as some of the Sally Hansen brushes, but the Claire's bottle is smaller so it fits that the brush would be smaller as well.
  • The polish is near the perfect consistency, not too runny nor is it goop-y.
  • To me, the polish also doesn't have an unpleasant, overpowering scent. I find it very light and what I can smell is slightly flowery to me. (Scents are all very personal though so don't quote me on this!)
  • Remember to shake the polish well. You need to reincorporate the iron powder for mega eye-catching designs.
  • Do two layers. One on all nails that you let dry and another on each nail individually that you use the magnet on.
  • Hold the magnet for shorter or longer times to find the design you like. I held mine for 15-20 seconds. Designs start to appear in about the first 5 seconds.
  • Hold the magnet for a few seconds and then roll it slightly for another few seconds to get the design over the entire nail.
  • Turn the magnet different ways to get different designs.
  • Remember not to let your magnet droop where it hangs over your nail! That polish is still wet and you're likely to ruin it!!
Well, that's that for this post. I hope you enjoyed. What do you think of magnetic polishes? Something you've tried? If so, which brand is your favorite?

Stay tuned until next time for my new, shorter nails!!

Saturday, February 18, 2012

From The Vault: Sally Hansen Navy Baby

I was browsing through old posts over at Emerald Sparkled the other day and have fallen in love with the idea of nails 'From The Vault'. I hope she doesn't mind if I use the idea.


This is another polish I picked up in the sale, and I gave it a try about two weeks ago. What is this polish you ask? It's Sally Hansen Complete Salon Manicure 'Navy Baby'. This is one of those colors that you can't judge by how it looks in the bottle. The Sally Hansen bottle itself is absolutely gorgeous. I don't know why I like this bottle better than any other Sally Hansen bottle, but I do. It's just one of those things, I guess, but I find it adorable.


The color in the bottle looks almost black in dim lighting and under the store lights turned almost purple. It was enough to make me wonder if the tags got switched by mistake. With my nails painted at the time, I turned into a sneaky ninja and stole one of my mom's nails for a color test. She hates when I do this, but she hardly ever paints her fingernails so I figure they're fair game for any wondering polish, right? The color was absolutely gorgeous. I have more than a few blues, but the ones I own are mostly light blues. I use these sparingly because even through my base coat they tend to leave stains. It's put me off using blue, but I just had to have Navy Baby. There were no ifs, ands, or buts about it. This was a color I could see on its own but also with glitter, a matte top coat, or even under a crackle polish. With so many uses how could I not want it?


Also, this is the Complete Salon Manicure which (according to the Sally Hansen website) means that it has the five steps of a salon mani in one bottle: base coat, strengthener, growth treatment, color, and top coat.


I never trust any built-in base coat, especially with a color this dark, so I used my own. However, Navy Baby certainly has a lovely top coat shine. The polish itself is lovely and thick, and it sat so well on my nails with one coat that I debated even putting on a second coat. This polish dried fairly quickly as well. I definitely recommend this line and with 42 shades you don't have to choose Navy Baby.


Cloud cover galore when this was taken so you don't get to see the truly stunning color it turns in direct sunlight. :( It has a beautiful shiny, glittery finish that really pops in sunlight that just can't be seen in this picture.

I put some China Glaze Snow Globe on top, and I think it looks really cool under my blue/white light.

The last picture I managed to get. This was taken the next day when the sun peeked partially through the clouds.

I felt like I was touching this polish up from the moment I put it on. However, the crazy chips likely weren't because of the polish itself. The weather has gotten cold and is wreaking havoc on my skin. I'm constantly slathering on lotion. The lotion I prefer is great for my hands and nails but doesn't go easy on my nail polish. Don't let my utter failure turn you off this polish.


The only real problem I've found so far is that many people mistake this color for black on my nails. In sunlight it is unmistakable but in shade or indoors it takes a moment or a really good eye to discern the true color. So, if you're looking for an unmistakable blue this probably isn't it, but if you're looking for a fun alternative to black or just prefer your blues darker you may have just found your color.

Tuesday, February 14, 2012

Adele Grammy Inspired

I totally missed the Grammys. I know, I know! After all the hype and my own personal excitement how could I miss it?? Life really gets in the way at times.


Well, I was on Facebook yesterday trolling through the hundreds of posts from groups I follow when I stumbled across Adele's Grammy nails. Can I just say gorgeous? If you haven't seen them do a search for them right now! I was inspired.


I went with pink for Valentine's Day, of course, but kept the design very simple. It left me wishing for some shiny metal studs instead of my dotting tool, but I work with what I have. :)

This is one of the polishes I picked up on sale. I'm very happy I did!!

The dots are like little arrows leading to a pop of red under the nail.

Last picture. I'm sorry for the blur, but I'm doing this all on my own. I had to set the timer and put the camera down just right. I lightened this picture a bit so you can truly see the light pink and the dark red.


This just might become a thing for me. It's so fun, and it looks so much more amazing than a camera can capture. I think I'll paint the underside of my nails white first to really pop the color next time.


What do you guys think of painting the undersides of your nails? Is it something you've tried before? Is it something you want to try?


Happy Valentine's Day!


Polish Used
Sally Hansen Double Duty
Sinful Colors Professional - Beautiful Girl
China Glaze - Poinsettia
Sally Hansen - White On
Sally Hansen Insta-Dri

Tuesday, February 7, 2012

Revlon - Cloud

I was so excited to waltz into my local Rite Aid and find a sale on nearly all their nail polish. Of course, this is a small speck on the map town so there aren't any of the amazing brands I see other nail bloggers are able to get in their Rite Aid. Still, I managed to snag 6 polishes that would total nearly $33 for just over $13. A steal for sure.


I decided to use one of the colors I was most excited about for today's post. It's Revlon Top Speed in Cloud. I've found this color looks very different to different people. I see it as a beautiful very light lavender that has a slight tint of blue. My mother sees it as an odd light blue while my grandmother saw a shade of dove grey. I've come to think of it as a dove grey with a lavender tint, but no matter the exact shade it's lovely. It makes me wish more than anything that this was a good color for me ... but it's not. Sadly, I was made for bright colors, bold prints, and full on overdone glam. I just can't seem to pull off the subtle elegance of Cloud no matter what I tried to spice it up with.


I had a slight disagreement with Cloud on how this polish should go on my nails. I've never had any trouble with Revlon before, and I've tried a few of the Top Speed variety as well. That leaves me with only three conclusions: it is either this color, this batch, or this bottle. The polish in my bottle is slightly runny and streaks so easily. That said, I certainly didn't expect to use only one coat of polish, so it was easy to fix the mess of the first coat by simply adding another coat.


I had no idea this color would be so hard to photograph. I tried many different places throughout my house hoping for a perfect picture. I didn't get a perfect picture, but I think I managed to get five okay pictures.


Two coats, natural light

Shade

Indirect Sunlight

Indoors with Flash

Artificial Blue/White Light

The thing about Revlon Top Speed is that it sets in 60 seconds ... or thereabouts; I can never stop myself from putting on thick coats that take longer to dry—it's a fault of mine. Another great thing? A built in top coat that rises to the surface. This is amazing for people who are on-the-go but don't want to let their nails fall to the wayside. Two coats of this and you're out the door with a beautiful new manicure that you can be proud to show off. Just remember not to be like me and put the coats on too thick or you'll likely mess them up on your way out the door ... or for sure while you're driving. You want to be able to show your nails off, not find inventive ways to hide them throughout the day.


I'm left wondering how well this will hold up to everyday wear with simply its own built in top coat.


Update Since Writing: Going into the second day with no top coat and there is only a very small amount of wear on the tips (thumb and index mostly with next to none on my middle while ring and pinky show no wear at all) and no signs of chipping.

Friday, February 3, 2012

Prisoner of Love Nails

I usually have these posts all typed up and edited of my usual rambles but today I'm writing by the seat of my pants. Forgive me for what I'm about to put you through. :)


Today's post is an anti-Valentine's Day nail design, or maybe just an unconventional Valentine's Day design depending on how you look upon both Valentine's Day and love. I'm really proud of this design and it is certainly one of my favorites. Of course, as my mother told me when I said this every nail design I do is my favorite at the time. :)


However, before I show the finished product I really want to show a shot I managed to grab of the in progress nails. I think this design is adorable and would be great as an anytime nail art.


This is a really easy design that I think anyone can do. Have a shaky hand and can't create straight or semi-straight stripes? Use the tape method. If you buy nail art tape or cut regular tape down it takes nearly no extra time at all. This way you don't have to wait for each stripe to dry before you do the next stripe and you get perfect lines every time. There is always the option of doing something unique to the ring finger as well—paint it a different color, add rhinestones, or metal studs. Be you and remember to have fun!

Now, onto the real reason for this post. Yay! I am so excited to share this with you, so I'll just jump right in.

Natural Light, Cloudy

Natural Light, Shade.

I was going to go with a stake through the heart but all I could think about as I sketched the design was Buffy the Vampire Slayer. So, I went with a spike or a nail. Still makes me think of Buffy, but not as much. Lol.

Well, that's it I suppose. I had such fun painting this design onto my nails as well as sketching it up and I hope you guys get as much enjoyment out of it as I am. :)

Happy (early, anti) Valentine's Day.

Polish Used
Sally Hansen - Double Duty
Sally Hansen - White On
L.A Colors - BCC 585 (Black)
China Glaze - Poinsettia
Sally Hansen - Celeb City
Sally Hansen - Insta-Dri (applied after pictures)