Monday, December 30, 2013

Last Spellbound Nails Sale of the Year

Hello my lovelies!! The last sale of the year is going on in both my Etsy and my Storenvy shops. Another bit of amazing news - you can now get to my Etsy shop using spellboundnails.com. Yes, I finally got around to buying my domain name!! So exciting. I will be working extra hard on building my own website to go along with that domain name in the new year. Fingers crossed as we head into the new year. :)


And for those of you that have trouble loading images. Use the code GOODBYE2013 for 13% off your entire order until 12:00am 1/1/14. There is no minimum purchase required and this code will work for sale polishes too. :)

Until next time,
-Ashley

Wednesday, December 25, 2013

Merry Christmas

Hello lovelies!! I'm a little late posting today, but right after finishing these this morning I had to immediately leave. How immediate? Immediate like I was terrified I was going to smudge them while getting dressed - thank goodness for my trusty Seche Vite top coat! The chance of smudging made me snap a few quick pics and then I was out the door. I just now settled down to watch some Christmas Doctor Who (goodbye, Doctor #11 ♥♥) and realized I never got around to taking the pics off my camera. So, here's my Christmas mani ... late but at least it's still Christmas. :)


I wanted a mani that I could wear after Christmas. Once Christmas is over I want Christmas over so I went simple - more winter than truly Christmas. I started with 3 coats of CQ Pearls and then topped it with 2 coats of Firefly from Hell.


If you'll remember Firefly from Hell was the glow-in-the-dark glitter topper from my Halloween collection. There are still a few of these glow polishes left if anyone wants one; you can get them on sale for $6 in my Storenvy shop. :) I adore how the stamped snowflakes still show up in the dark!!


I think I'm getting better at this whole stamping thing!! These snowflakes were done in mere moments (with China Glaze Blue Bells Ring) as I was in such a hurry and they're almost all there - only a few smudges and missing lines. And, as you can see, I also added a pearl to the center of the large snowflake on my ring fingernails. I think it added a slightly elegant, dressy touch.

So, how was your holiday? Do anything special? Wear anything special on your nails? How about gifts?? Did you get everything you asked Santa for? :)

Until next time,
-Ashley

Monday, December 23, 2013

Santa Came To Say - More Christmas Stamping

Yes, this is another attempt at Christmas stamping. I think I'm getting a little better. I'm still working on placement and which colors I can stamp over which polishes but not too horrible if I do say so myself.


This is Eight Tiny Reindeer with an accent nail of Holly Jolly. The main polishes used in this mani are from my Christmas collection and except for Holly Jolly, which was a freebie with select Christmas orders, you can now get them on sale here!!


I couldn't do a Christmas mani, especially one with a polish like Eight Tiny Reindeer and not use the reindeer stamp! And since this was inspired by Rudolph, this mani just wouldn't be complete without a bright red nose on at least one of the reindeer. :)


And since this didn't show up on the full mani shot I had to do a close-up of Holly Jolly. Just look at that sparkle! Holly Jolly is red, green, silver, and gold micro-glitter, and this is just two coats for full coverage! It also works wonderfully as a glitter topper - such a versatile little glitter.

Order 6 full-size Christmas sale polishes, and I will include a mini of Holly Jolly in your order completely free! :) This offer is only valid until the year's end, 12/31/13, so order quick!!

Until next time,
- Ashley

Sunday, December 22, 2013

Happy Christmas To All

Hello lovelies! Welcome to another very simple mani idea for Christmas.

I've said it before but OPI The Spy Who Loved Me is perfect for Christmas manis. However, if you don't have this you can use a really any shimmery red or even just a plain creme red. I believe my go-to polish last year was Orly Star Spangled. It's a little bit of a darker red from what I remember, but is just as, if not more, shimmery!


So, super simple! Two coats of OPI The Spy Who Loved Me and three coats of my own polish, Spellbound Nails Happy Christmas To All as an accent nail.


This mani looks so much better in person because you can really see the sparkle and shift of the glitter and this does seem to trick the eye into thinking Happy Christmas To All really does look like a Christmas tree especially with that star at the top of my nail. I admit I started this mani with a different design in mind; a bit of a tape mani to create a tree shape on the accent nail with a carefully placed star glitter, but once the star came out of the bottle (without my permissions lol) and refused to budge it all came together so much better in my opinion!

I plan to have at least another one or two designs before Christmas so keep an eye out for those.

Until next time,
- Ashley

Thursday, December 19, 2013

Candy Canes and Holly Berries - Holiday Christmas Nail Art

Hello lovelies! Can you believe it's already less than a week until Christmas?? I feel like it was just last week that it was months and months from Christmas. Still, the Christmas spirit seems to have hit me hard ... well, hit me with nail art ideas because my house still isn't decorated and I have done less than no Christmas shopping.

And speaking of nail art ideas ... I think I'm a little obsessed with candy cane stripes. I seriously just want to keep these on until after Christmas; I love them so much!


These are actually really simple to do but there's a lot of waiting involved because the stripes are done with tape and the white polish has to be completely dry before you can start. If you don't wait for it to dry it will dent if you're lucky or ruin all your work at worst.


I think I'm also developing an obsession with OPI The Spy Who Loved Me. It is such a lovely shade of shimmery red and has such wonderful coverage. It also makes perfect candy cane stripes ... and holly berries!

Well, I think that's just about it. I hope you enjoyed yet another of my Christmas manis. :)

Until next time,
- Ashley

*A huge congratulations to Ariel of Lacquer: The Best Medicine for winning my Season of Giving Giveaway!! Her prize is already in the mail. :)

Looking for more holiday manis? Take a look at these!!

Thursday, December 12, 2013

A Candy Cane Christmas with another Born Pretty Store Stamping Plate

Hello again!! First off, have you entered the giveaways I'm either hosting or a part of yet? If not you can enter here, here, and here. That's a lot of polish you could win; don't miss out! Go on. I'll wait. Done? Okay, onto the nail art!


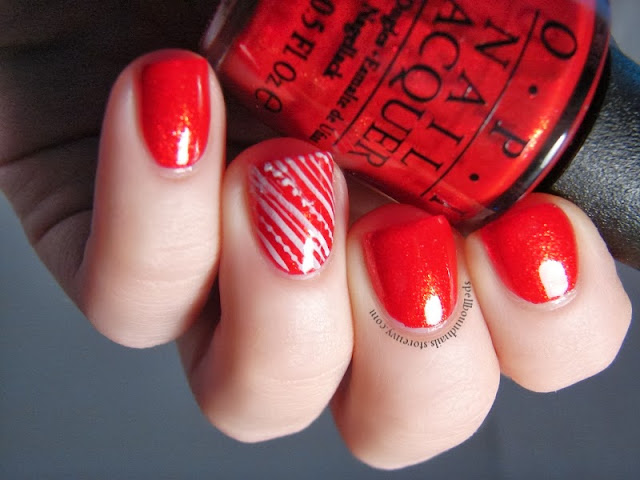
I really wanted something simple but eye-catching so I started with a base of OPI The Spy Who Loved Me. This polish was a Christmas gift last year but red is always in season around Christmas. What makes this polish even better is the gold shimmer.


In some lights the shimmer will just look red but as you can see here and in the next pic the gold will occasionally show itself. It can be a little shy. :)


This one is a little blurry but it really shows off the gold shimmer.


via BornPrettyStore
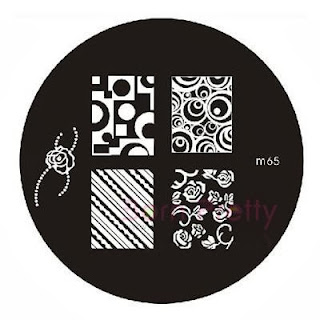
To complete this mani, and add just a little more of a Christmas-y touch, I used my new-found stamping skills and added some candy cane stripes in white. This was done using the Born Pretty Store stamping plate M65. If you'll remember I used this stamping plate before to create my Elegant Border Nails. You can buy this stamping plate right now for $2.99. As always feel free to use MLE10W21 for 10% off your BPS orders.

If you don't have and don't want to buy this stamping plate you can always draw the stripes on freehand, use a base coat of white and put down some striping tape before painting on your red, peeling up the striping tape after ... or just use the striping tape itself to create the stripes! All it takes is a little imagination!

Until next time
♥ Ashley

Tuesday, December 10, 2013

And To All A Good-Night featuring the Born Pretty Store Christmas stamping plate

I was busy mixing polish and filling orders last night when I was suddenly and inexplicably struck with inspiration for some nail art. Maybe it's the Christmas spirit finally kicking in? I'm not real fond of Christmas. Lemme explain! I loved it as a kid - the wonder of going out and picking/cutting/bringing home our own tree, decorating, going for long drives to see Christmas lights; the anticipation on Christmas eve, attempting to sneak out to the living room to see if Santa had come yet ... when finding anything under the tree was a surprise and a delight, but it's just not the same and hasn't been for a long while. And it's not just because I'm not a child anymore. Now-a-days, most kids (and adults are guilty of this too) are all about the receiving - how much their presents are worth and how many they can get ... and most are completely ungrateful. Where's the spirit of good will and charity gone?? So yeah, my reasons for wishing Christmas would come and go quickly.

But my Grinch-like behavior isn't what this post is about. This is about nail art inspiration and my very first truly successful attempt at stamping!


I used 2 coats of And To All A Good-Night from my 'Twas the Night Before Christmas Collection. I put down a layer of top coat and then sponged the tips with basic white. Another layer of top coat and then came the attempt at stamping. You've all seen my previous stamping disasters so I went into this with a cringe on my face. But I read somewhere that you should file the gel bit of your stamper before you use it the first time. Well, I never did this ... didn't know you should, but I figured why not? What's the worst that could happen? The filing could ruin it but it was of no use to me now so worth a shot right? I'm guessing since this attempt at stamping was a roaring success that this does help!


I used my Born Pretty Store stamping plate QA19. I'm pretty sure I received this free last year, just after Christmas, when they did a flash sale/giveaway thing. You can buy it right now for only $0.99! If you'd like to buy this stamping plate or anything else from their site you can always use my 10% off code: MLE10W21. I only had a small amount of trouble with the tree, and that was all my own fault ... I didn't roll the stamper enough on my nail and the tip of the tree didn't stamp. I had to attempt to line it up so it's just a little lopsided. And I did loose a line or two on the house; I don't think you can really tell though.

But overall, I really couldn't be happier. I'm already dreaming of buying some more stamping plates and seeing what other quick and easy designs I can come up with. I don't have time anymore for full out nail art, but I should have time for stamping. :)

Monday, December 9, 2013

The Season of Giving GIVEAWAY

December is supposed to be the season of giving right? Well, this year I'm embracing that wholeheartedly! I am part of 2 huge giveaways (here and here), and I took it one step further and am now hosting my own with some of my wonderful bloggers. You may or may not recognize their names but I'm sure you'll recognize their nails. They do almost all the lovely swatches you see when checking out my polishes. If it's not my swatch, it is more than likely one of theirs. How could I give away some polish as a thank you for all the support and love you've all given me and not include them?


First up, the thing I'm sure you're all eager to know - the prizes! The winner will have their choice of 6 mini bottles from my Christmas collection - 'Twas the Night Before Christmas.


I may even toss in a few other things I've been holding onto for a giveaway. Season of giving and all that. ;)

And now onto business - the rules. As I cannot ship internationally at this time this giveaway is only open to those in the US or Canada ... or those who have a friend in either country willing to risk shipping for them. Once the package is out of my hands however, I take no responsibility for it - especially during the holidays when customs is sure to be cracking down on shipping polishes. Or pass on the season of giving by shipping to a friend in the US or Canada as a present. :) The giveaway starts 12:00am EST 10th December and ends 12:00am EST 17th December. The winner will have 24 hours to reply and claim their prize. If I get no reply in 24 hours, I will be forced to choose another winner.

Onto the fun! Use the Rafflecopter app below to enter. :)

a Rafflecopter giveaway

Spread Possibilities with New Hershey's Spreads

*All products were sent to me for testing and review, completely complimentary, from Crowdtap. All thoughts and opinions are my own.

I was so excited to be one of only 1000 given the chance to try the new Hershey's Spreads. I'm not sure if others who were given this opportunity got anything different, but the spread I received was Chocolate with Hazelnut.

Chocolate with Hazelnut Hershey's Spreads

As part of this sample there were various challenges to complete. I could create a video, but I'm not good at those. I could be daring and try to pair my Hershey's Spreads with something unusual, but some of the options for this (such as pickles) turned my stomach a little. So I went with the challenge of coming up with 5 pairings that I'm going to share with you.

I've said this in every food post but I always feel the need to point it out again. I am not a food blogger. I don't have the time or patience to come up with new recipes and do some fancy set up for pictures. That said, I like food, I love sharing it with you, and I do try my best with the pictures. I really hope you enjoy my fumbling attempts; I know I enjoyed eating/drinking them. :)


The first pairing I tried was hot chocolate. I love making my own hot chocolate with Hershey's powdered chocolate so I hoped this would work just as well. And it did! Better in the case that there was no extra chalky powder at the end of the cup. Though, I was really sad not to have some mini marshmallows in my cupboard but the rich, chocolate-y taste with a slight nutty flavor sated my chocolate craving and warmed me up after a horrible ice storm.


This hot chocolate is very simple (and quick) to make. Simply whisk 3 tablespoons of Hershey's Spread into one cup of milk over low heat - you don't want to scald the milk or burn the chocolate. You can add a pinch of cinnamon (or your favorite hot chocolate spice) for a more Christmas-y drink or take a trip back to your childhood and toss in some mini marshmallows or a scoop of marshmallow fluff.


For my second pairing ... walking down the snack aisle I saw some yummy looking chocolate covered pretzels. However, they were fancy and expensive. Given that the bag had only a handful of pretzels inside it really wasn't worth the price, but it gave me a horrible craving for chocolate pretzels. So, I walked further down the aisle and picked up a much cheaper, very full bag of simple pretzel sticks and satisfied my new-found craving by dipping them into the Hershey's Spread. It was the perfect snack!


I thought and thought and thought about my next pairing. All that thinking made me hungry so I snooped through my cupboards and came up with this sandwich pairing. I love peanut butter and honey sandwiches, and I occasionally love peanut butter, honey, and banana sandwiches. It was really a no-brainer to substitute the peanut butter for Hershey's Spreads.


It was like eating chocolate covered bananas dipped in honey. It was really yummy! I'm also really eager to try just the Hershey's Spreads with honey, and I'm already dreaming of grilling up some Hershey's Spreads with jelly much like I do with pb&j sandwiches.


So, I did snacks, drinks, and lunch with my last pairing ... what about other meals? Say ... breakfast?? How about some chocolate pancakes? I apologize, but I never learned how to make pretty pancakes lol. I just pour some batter into a small skillet and spread to the edges of the pan as best as possible - cook, turn, cook and eat. For this just use your favorite basic pancake recipe (I prefer quick and easy with the least amount of ingredients possible so I use Jiffy mix) and add a spoonful or two of Hershey's Spreads. 

What I also never learned to do is leave well enough alone! I just had to spice these pancakes up a bit. I drizzled on some of my favorite syrup - dark Karo syrup and then I added a scoop of cherry preserves. Oh sweet pancake gods above (or maybe below with how absolutely sinful these are)!! It was like eating chocolate covered cherries for breakfast. Almost tooth-ache inducing but too good to put down! I'm almost hoping a food blogger sees this and runs with the idea because these pancakes really deserve to look pretty!!


But ya know what? All that thinking and mixing and eating ... my all time favorite way to eat Hershey's Spreads is just with a spoon.


Or, since this is my own personal Hershey's Spreads, with my fingers. I have been caught many times just like this.

Want to try some of my pairings for yourself? The new Hershey's Spreads hit shelves December 6th so if you can't find them in your local shop yet keep looking!

*All products were sent to me for testing and review, completely complimentary, from Crowdtap. All thoughts and opinions are my own.