Thursday, January 9, 2014

Spellbound Nails does Valentine's Day with the Victorian Romance Collection (PIC HEAVY)

Hello lovelies! I bring you Valentine's Day polishes!! Being a polish maker means I have to be thinking much further into the future than I ever wanted to ... I sometimes forget what month it is lol.

But right now I know it's January but when speaking in terms of mixing and shipping polish, Valentine's Day is just around the corner. So take a moment and look at the pretties!!

This collection will be available for pre-sales 1/10 - 1/17. This means you'll be able to buy this collection in full and mini bottles (at pre-sale discount prices) starting tomorrow. The full release, meaning the ability to buy singular bottles, will start 1/22. As always, you can buy all Spellbound Nails polishes from my Etsy shop or my Storenvy shop.


I love having some kind of inspiration for my collections; not only do my polishes turn out better but I love being able to point to something and say "look, look, that right there - that inspired me so much that I had to make something awesome!"

Vintage Valentine © Victorian Traditions
This time, that inspiration came from the old timey Victorian Valentine's Day cards and postcards. You know those ones that are all yellowing parchment, lace, and soft and bright watercolors.


First up is Cheeks Tinted Red. This is a stunning bright red holographic.


 This polish has double the amount of holo that I put in my normal holos however I quickly found red eats holo. It adds a lot of depth and shimmer and has more of a lightly scattered holo effect.


And a close up of the bottle in the little amount of sunlight we're getting around here right now.

*There has been a slight increase in the pricing of my holographics. I have started buying a much better holographic pigment, however this does mean an increase in price for me which I sadly have to pass on to you. Holographic polishes using this new pigment will now sell for $9 in my shops. Prices will change on already released holos (only those using this new pigment) February 1st. This was a very hard decision for me since I pride myself on being affordable, and I believe I have managed to keep to my brand even with the price increase.


Next up is Parchment and Lace. This was the base of this collection - the very first polish mixed up and the one everything else was built around. I think the name of this one says it all. It's everything this collection was inspired by. Yellowing parchment, lace, and beautiful watercolors.

I've been told that this is a very flexible polish and would also work well for Easter and summer too.


This is the only glitter topper of the collection. Love & Devotion is a wonderfully romantic glitter in my opinion with it's white, pink and red glitter with lots of rainbow shimmer.


I'm All Aflutter is a gorgeous baby blue with purple and pastel pink glitter.


And last but not least is My Own Sweet Valentine. This is a girly, pearly pink with a delicate golden shimmer that acts almost duo-chrome-y in person.


Did I mention My Own Sweet Valentine also glows in the dark?? There are three different glow pigments hidden behind this girly pink - blue, green, and peach. Together they combine to glow an icy white with just a hint of blue and green. The blue and green show up a lot better in pictures. In person it really is an icy white with just a hint of blue and green. And with so much glow pigment the glow is pretty insane!


You can see a few hints and specks of the peach glow in this picture along with the blue and green. This is a picture of Love & Devotion over My Own Sweet Valentine.

I hope you enjoy these polishes as much as I do and remember pre-sales start tomorrow! :)

Until next time,
- Ashley

Monday, December 30, 2013

Last Spellbound Nails Sale of the Year

Hello my lovelies!! The last sale of the year is going on in both my Etsy and my Storenvy shops. Another bit of amazing news - you can now get to my Etsy shop using spellboundnails.com. Yes, I finally got around to buying my domain name!! So exciting. I will be working extra hard on building my own website to go along with that domain name in the new year. Fingers crossed as we head into the new year. :)


And for those of you that have trouble loading images. Use the code GOODBYE2013 for 13% off your entire order until 12:00am 1/1/14. There is no minimum purchase required and this code will work for sale polishes too. :)

Until next time,
-Ashley

Wednesday, December 25, 2013

Merry Christmas

Hello lovelies!! I'm a little late posting today, but right after finishing these this morning I had to immediately leave. How immediate? Immediate like I was terrified I was going to smudge them while getting dressed - thank goodness for my trusty Seche Vite top coat! The chance of smudging made me snap a few quick pics and then I was out the door. I just now settled down to watch some Christmas Doctor Who (goodbye, Doctor #11 ♥♥) and realized I never got around to taking the pics off my camera. So, here's my Christmas mani ... late but at least it's still Christmas. :)


I wanted a mani that I could wear after Christmas. Once Christmas is over I want Christmas over so I went simple - more winter than truly Christmas. I started with 3 coats of CQ Pearls and then topped it with 2 coats of Firefly from Hell.


If you'll remember Firefly from Hell was the glow-in-the-dark glitter topper from my Halloween collection. There are still a few of these glow polishes left if anyone wants one; you can get them on sale for $6 in my Storenvy shop. :) I adore how the stamped snowflakes still show up in the dark!!


I think I'm getting better at this whole stamping thing!! These snowflakes were done in mere moments (with China Glaze Blue Bells Ring) as I was in such a hurry and they're almost all there - only a few smudges and missing lines. And, as you can see, I also added a pearl to the center of the large snowflake on my ring fingernails. I think it added a slightly elegant, dressy touch.

So, how was your holiday? Do anything special? Wear anything special on your nails? How about gifts?? Did you get everything you asked Santa for? :)

Until next time,
-Ashley

Monday, December 23, 2013

Santa Came To Say - More Christmas Stamping

Yes, this is another attempt at Christmas stamping. I think I'm getting a little better. I'm still working on placement and which colors I can stamp over which polishes but not too horrible if I do say so myself.


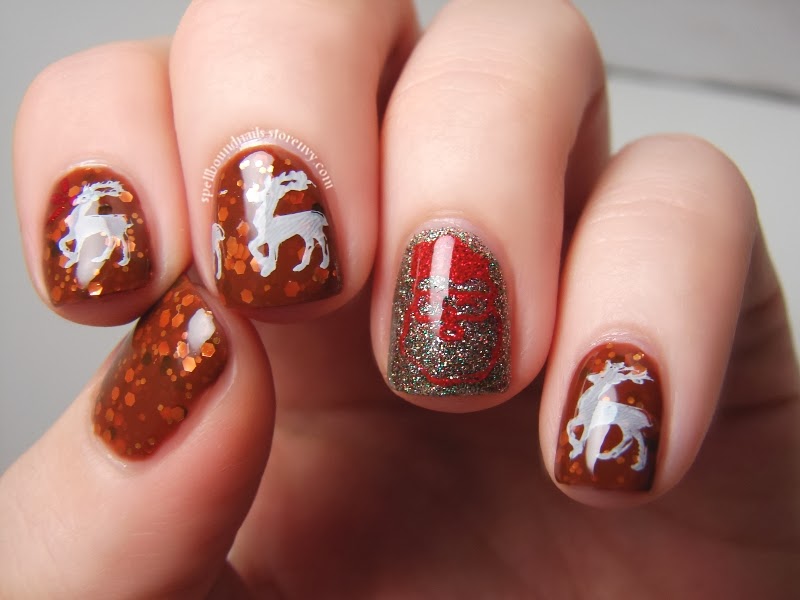
This is Eight Tiny Reindeer with an accent nail of Holly Jolly. The main polishes used in this mani are from my Christmas collection and except for Holly Jolly, which was a freebie with select Christmas orders, you can now get them on sale here!!


I couldn't do a Christmas mani, especially one with a polish like Eight Tiny Reindeer and not use the reindeer stamp! And since this was inspired by Rudolph, this mani just wouldn't be complete without a bright red nose on at least one of the reindeer. :)


And since this didn't show up on the full mani shot I had to do a close-up of Holly Jolly. Just look at that sparkle! Holly Jolly is red, green, silver, and gold micro-glitter, and this is just two coats for full coverage! It also works wonderfully as a glitter topper - such a versatile little glitter.

Order 6 full-size Christmas sale polishes, and I will include a mini of Holly Jolly in your order completely free! :) This offer is only valid until the year's end, 12/31/13, so order quick!!

Until next time,
- Ashley

Sunday, December 22, 2013

Happy Christmas To All

Hello lovelies! Welcome to another very simple mani idea for Christmas.

I've said it before but OPI The Spy Who Loved Me is perfect for Christmas manis. However, if you don't have this you can use a really any shimmery red or even just a plain creme red. I believe my go-to polish last year was Orly Star Spangled. It's a little bit of a darker red from what I remember, but is just as, if not more, shimmery!


So, super simple! Two coats of OPI The Spy Who Loved Me and three coats of my own polish, Spellbound Nails Happy Christmas To All as an accent nail.


This mani looks so much better in person because you can really see the sparkle and shift of the glitter and this does seem to trick the eye into thinking Happy Christmas To All really does look like a Christmas tree especially with that star at the top of my nail. I admit I started this mani with a different design in mind; a bit of a tape mani to create a tree shape on the accent nail with a carefully placed star glitter, but once the star came out of the bottle (without my permissions lol) and refused to budge it all came together so much better in my opinion!

I plan to have at least another one or two designs before Christmas so keep an eye out for those.

Until next time,
- Ashley

Thursday, December 19, 2013

Candy Canes and Holly Berries - Holiday Christmas Nail Art

Hello lovelies! Can you believe it's already less than a week until Christmas?? I feel like it was just last week that it was months and months from Christmas. Still, the Christmas spirit seems to have hit me hard ... well, hit me with nail art ideas because my house still isn't decorated and I have done less than no Christmas shopping.

And speaking of nail art ideas ... I think I'm a little obsessed with candy cane stripes. I seriously just want to keep these on until after Christmas; I love them so much!


These are actually really simple to do but there's a lot of waiting involved because the stripes are done with tape and the white polish has to be completely dry before you can start. If you don't wait for it to dry it will dent if you're lucky or ruin all your work at worst.


I think I'm also developing an obsession with OPI The Spy Who Loved Me. It is such a lovely shade of shimmery red and has such wonderful coverage. It also makes perfect candy cane stripes ... and holly berries!

Well, I think that's just about it. I hope you enjoyed yet another of my Christmas manis. :)

Until next time,
- Ashley

*A huge congratulations to Ariel of Lacquer: The Best Medicine for winning my Season of Giving Giveaway!! Her prize is already in the mail. :)

Looking for more holiday manis? Take a look at these!!

Thursday, December 12, 2013

A Candy Cane Christmas with another Born Pretty Store Stamping Plate

Hello again!! First off, have you entered the giveaways I'm either hosting or a part of yet? If not you can enter here, here, and here. That's a lot of polish you could win; don't miss out! Go on. I'll wait. Done? Okay, onto the nail art!


I really wanted something simple but eye-catching so I started with a base of OPI The Spy Who Loved Me. This polish was a Christmas gift last year but red is always in season around Christmas. What makes this polish even better is the gold shimmer.


In some lights the shimmer will just look red but as you can see here and in the next pic the gold will occasionally show itself. It can be a little shy. :)


This one is a little blurry but it really shows off the gold shimmer.


via BornPrettyStore
To complete this mani, and add just a little more of a Christmas-y touch, I used my new-found stamping skills and added some candy cane stripes in white. This was done using the Born Pretty Store stamping plate M65. If you'll remember I used this stamping plate before to create my Elegant Border Nails. You can buy this stamping plate right now for $2.99. As always feel free to use MLE10W21 for 10% off your BPS orders.

If you don't have and don't want to buy this stamping plate you can always draw the stripes on freehand, use a base coat of white and put down some striping tape before painting on your red, peeling up the striping tape after ... or just use the striping tape itself to create the stripes! All it takes is a little imagination!

Until next time
♥ Ashley