Hello everyone! I'm really excited about this post. I will be releasing SIX new polishes to my Etsy Shop tomorrow.
To make this really exciting: all orders placed this weekend will be put into a drawing. Winners of the drawing will be given randomly drawn prizes. Prizes could be free full sized polishes, 5% to 50% off your next order, and much, much more. Winners may even win the right to work with me to create a custom polish!! Valid orders are those placed from the moment the polishes post on Friday to 9am Monday morning. Why 9am? Getting out of bed is when I consider my weekend over!
Lollipop Guild is a bright and fun mix of rainbow glitter. Shown here over Sally Hansen Pink Blink. I almost wouldn't have believed this was Pink Blink if I hadn't consulted my notes. Lollipop Guild makes Pink Blink look very coral colored. :)
Marie is one of two polishes my niece chose the glitter for. It's a light and elegant polish filled with teal blue, light pink, and light purple glitter with a heap of holographic glitter to give it some bling. Shown over CQ Pearls.
Napalm Bomb is one fiery girl. A bomb in more ways than one. With a mix of flame colored glitters this is one huge glitter bomb. Shown over China Glaze Stone Cold. Doesn't look so cold now, does it??
Tangerine Tango is the other polish thought up by my niece. I might just have to hire that girl because she has a real knack for choosing just the right glitter to create something gorgeous. Or maybe I'm just biased, lol.
Dipstick got its name because it reminded one of my Facebook followers of the candy. I don't think they call it Dipstick anymore (did they ever or was that just the nickname we all gave it?), but it's what we called it when I was a kid. I loved this candy and thought naming a polish after it was pretty awesome! For those who don't remember the candy: you get a candy stick and some ultra sweet flavored powder that was lightly colored ... sometimes it was white and would change color when wet; I think this was my favorite kind! You were meant to lick the stick and then dip it into the powder which would then turn really brightly colored and was likely to dye your tongue said color for a few hours; using the dip stick as a tool to eat the powder and then finish by eating the stick. Shown over China Glaze First Mate.
Carnival Lights was another named by a follower on my Facebook Page. If you consider yourself awesome at coming up with polish names I would love to have you around my Page!! I'm pretty horrible at naming polishes. I'll have a few zingers here and there but usually my names are kind of ... ho-hum. For this polish I debated heavily over Carnival Lights and City Lights, but felt it more resembled the bright lights of a carnival lit up in the dark. Shown over Petites Night. This polish can also be worn alone in 2-4 coats depending on how thick your coats. I average 3 coats for full coverage, but could definitely see wearing 2 if I was in a hurry.
I placed an order through Amazon hoping to get a fan nail wheel in time for this release but wasn't warned about it coming from an international seller until my expected arrival date made my jaw drop so I'm having to improvise until the wheel arrives. Double-sided tape on mini bottles just doesn't have the same flair as a nail wheel. :(
This is 1, 2, and 3 coats of Carnival Lights respectively. As you can see three coats gets full coverage for me.
Share the news of this release in someway (FB, Twitter, blogpost, etc) this weekend and include a link in the comments of your order, and I will enter you into the drawing twice!!!
Showing posts with label Color Swatch. Show all posts
Thursday, March 21, 2013
Tuesday, March 19, 2013
Stripes and Dots
*The products in this post were purchased with my own money.
Today's mani came to me in a dream. No, seriously, I woke up with the idea so I must have dreamed it. And it looks really awesome in my opinion.
*The products in this post were purchased with my own money.
Today's mani came to me in a dream. No, seriously, I woke up with the idea so I must have dreamed it. And it looks really awesome in my opinion.
What do you think? I'm reminded slightly of Doctor Who Dalek. The stripes on the side don't fit a Dalek, but the resemblance is there.
I started with two coats of OPI Strawberry Margarita from the OPI Best of the Best mini collection. Strawberry Margarita is originally from the Beach Party Collection, and I can see why. It's such a yummy bright pink — perfect for the beach.
I used tape to create the thin lines up and down on either side and filled them in with Petites Black. Then I used a nail art brush to create the thicker stripes across. You could also do this with tape, but I found it faster, if less neat and precise, to freehand them.
I added a coat of Seche Vite and thought it looked bare. It needed something, so I dug out my Born Pretty Store studs. I vowed to use these more often and this was the perfect opportunity. I decided on the black studs. I've never found the perfect mani for these so I've never used them before! Exciting!!
The best way I've found to use these types of studs is to lay them on your nail over dry polish first so you can get the perfect spacing and positioning. Then pick them up one by one with tweezers and lightly dip the bottom in clear polish and set them back down. It gives you more leeway as you can decide you don't like the design and move them around. You can't do this if you just pick them up and slap them on wet polish. There's no changing your mind after that! I really hope this tip helps someone. :)
Monday, March 18, 2013
Lush Lacquer - Neon Lights
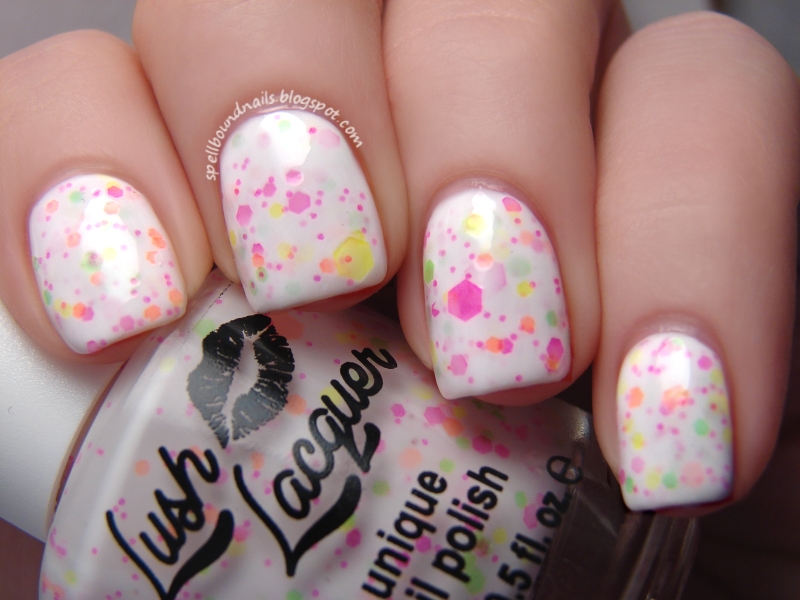
Hello everyone!! I am so psyched to show you the polish I wore all weekend. I was part of a group who recently won their choice of polish from Lush Lacquer's new Neon Collection. I knew immediately which one I would choose. I can't seem to resist neon glitter in a creamy white base.
And oooOO is Neon Lights made of creamy hotness! Seriously, the milky white base is so creamy and dreamy, and the neon glitter scattered throughout just makes it all the better. The glitter is awesomely chunky; I found my first coat was a bit streaky where the brush dragged some of the bigger glitters, but a small and simple side to side swish with your brushstrokes instead of a straight cuticle to tip drag does wonders! And as you can see, the second coat makes everything perfect even without the side to side motion. This is two coats of Neon Lights with two coats of Seche Vite.
The glitter in this so, soooo much brighter. I tried everything I could to get these pictures true to color, but nothing worked. :( Check out Crystal's Crazy Combos to really see the amazingness of this glitter and to see the other awesome neon polishes in this collection.
To purchase these polishes for yourself see the Lush Lacquer Etsy Shop. Each polish is $9. You can also find Lush Lacquer on Facebook.
*This polish was won in a giveaway. I was not asked to do a post on this polish, and all opinions are my own.
And oooOO is Neon Lights made of creamy hotness! Seriously, the milky white base is so creamy and dreamy, and the neon glitter scattered throughout just makes it all the better. The glitter is awesomely chunky; I found my first coat was a bit streaky where the brush dragged some of the bigger glitters, but a small and simple side to side swish with your brushstrokes instead of a straight cuticle to tip drag does wonders! And as you can see, the second coat makes everything perfect even without the side to side motion. This is two coats of Neon Lights with two coats of Seche Vite.
The glitter in this so, soooo much brighter. I tried everything I could to get these pictures true to color, but nothing worked. :( Check out Crystal's Crazy Combos to really see the amazingness of this glitter and to see the other awesome neon polishes in this collection.
To purchase these polishes for yourself see the Lush Lacquer Etsy Shop. Each polish is $9. You can also find Lush Lacquer on Facebook.
*This polish was won in a giveaway. I was not asked to do a post on this polish, and all opinions are my own.
Thursday, March 14, 2013
Shimmer Polish Swatches and Review
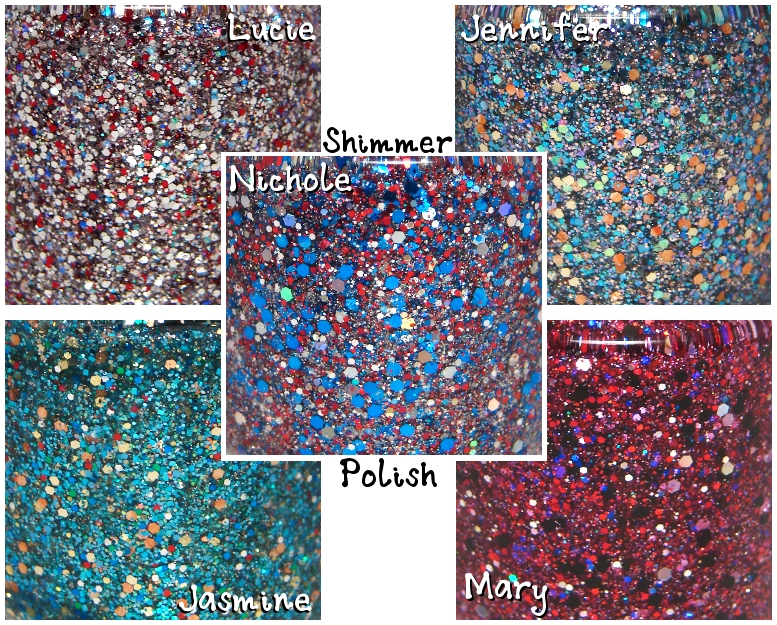
Hello everyone! I am so excited to show off these Shimmer Polish swatches. If you haven't found Shimmer Polish yet I say, "go, go now!" Or wait and see my swatches first so you're just as excited as I am!
Here are the polishes that came in my package. Aren't they lovely?? Yeah, I thought so too. You'll be able to tell by the amount of pictures I took. I'll save you all the loading time and put the rest of this post behind a cut. Continue through to the post because you do not want to miss these polishes!!
Wednesday, February 20, 2013
St. Patrick's Day Duo
Hello everyone! I'd like to introduce you to a cute little duo you can now buy in my Etsy shop.
This is the St. Patrick's Day Duo. I missed getting my Valentine's Day polish out so I'm jumping the gun on this collection. :) Meet Fool's Gold and Clover the Rainbow.
Fool's Gold has a clear base filled with small and medium matte green glitter and large gold glitter — all hex.
Here is Fool's Gold over Petites Black. I adore how this looks! Almost like a galaxy nail or a flakey ... maybe a combination of both. :)
I also tried Fool's Gold over CQ Pearls. I thought Fool's Gold would look better over the slightly shimmery, off-white color than it would over regular white.
The second half of this lucky duo is Clover the Rainbow, named by Lyssa over on my Facebook page. Clover the Rainbow is a green jelly with small matte green hex glitter and rainbow holographic hex glitter.
With three coats over bare nails you might not get full coverage, as is typical with a jelly, but you could certainly wear this out and show your Irish pride!
If you're looking for full coverage, you can wear one coat over white for a minty, lightly glittered nail.
Two coats over white will get you this look in sunlight. Clover the Rainbow is a very versatile polish. Change it up for different looks, wear it alone or with an undie.
Remember to follow and favorite my shop on Etsy to be the first to see new polishes. :)
This is the St. Patrick's Day Duo. I missed getting my Valentine's Day polish out so I'm jumping the gun on this collection. :) Meet Fool's Gold and Clover the Rainbow.
Fool's Gold has a clear base filled with small and medium matte green glitter and large gold glitter — all hex.
Here is Fool's Gold over Petites Black. I adore how this looks! Almost like a galaxy nail or a flakey ... maybe a combination of both. :)
I also tried Fool's Gold over CQ Pearls. I thought Fool's Gold would look better over the slightly shimmery, off-white color than it would over regular white.
The second half of this lucky duo is Clover the Rainbow, named by Lyssa over on my Facebook page. Clover the Rainbow is a green jelly with small matte green hex glitter and rainbow holographic hex glitter.
With three coats over bare nails you might not get full coverage, as is typical with a jelly, but you could certainly wear this out and show your Irish pride!
If you're looking for full coverage, you can wear one coat over white for a minty, lightly glittered nail.
Two coats over white will get you this look in sunlight. Clover the Rainbow is a very versatile polish. Change it up for different looks, wear it alone or with an undie.
Remember to follow and favorite my shop on Etsy to be the first to see new polishes. :)
Monday, February 11, 2013
Feeling Girly With Revlon
In my continuing attempt to be unique this Valentine's Day I decided to dig out my recent Revlon purchase. I've used the new Revlon Enchanting a few times, but I never got around to using their new glitter I was so excited about. So here is a shot of Girly over Enchanting.
I'm really fond of this combo. Girly is a light purple/pink sheer base with purple, light pink, and fuchsia glitter. There are also some small holographic pink and purple glitter tossed into the mix. Overall, it really does make for a soft and girly mani.
What wasn't girly was my hair yesterday. Some of you will remember my adoration of The Freckled Fox's Posh Faux Hawk in my Blogs to Love Friday #1 post. Well, I went and did it! I am nowhere near an expert at doing my hair. Usually it's either straight and down, up in a ponytail, or curled in the off chance I'm not feeling lazy. Like I said, I'm no expert. Far from it. But I don't think I did too bad for my first try. I dressed in the cute striped top you see with some black skinny jeans and gray heeled cowboy boots; I love how this new hairstyle added some edge to the outfit. I will definitely be trying this again.
I also took a picture once I took my hair down. I felt like a true child of the 80s. :)
Here's hoping Valentine's Day comes soon because I am running out of unique V-Day mani ideas. You should want Valentine's Day to be over too because I have some really awesome St. Patrick's Day polishes that will be for sale in my Etsy Shop next week. I will be posting swatches after V-Day. If you can't wait, you can get a preview (and help name one of them) on my Facebook Page.
I'm really fond of this combo. Girly is a light purple/pink sheer base with purple, light pink, and fuchsia glitter. There are also some small holographic pink and purple glitter tossed into the mix. Overall, it really does make for a soft and girly mani.
What wasn't girly was my hair yesterday. Some of you will remember my adoration of The Freckled Fox's Posh Faux Hawk in my Blogs to Love Friday #1 post. Well, I went and did it! I am nowhere near an expert at doing my hair. Usually it's either straight and down, up in a ponytail, or curled in the off chance I'm not feeling lazy. Like I said, I'm no expert. Far from it. But I don't think I did too bad for my first try. I dressed in the cute striped top you see with some black skinny jeans and gray heeled cowboy boots; I love how this new hairstyle added some edge to the outfit. I will definitely be trying this again.
I also took a picture once I took my hair down. I felt like a true child of the 80s. :)
Friday, February 8, 2013
The Candy Coated Collection is on Etsy
My Blogs to Love Friday post is coming later today, but I realized I never did a full post on my Candy Coated Collection. A one-stop place to see the polishes and swatches so you don't have to search out the previous swatch posts. Those swatch posts will likely hold a bit more info but if you're simply looking for the swatches and not the info behind the polish this is the place. :)
The entire Candy Coated Collection is now available in my Etsy shop.
Do you have a favorite?
I would be really grateful if you shared this post or favorited my shop or your favorite polish on Etsy. ♥
The entire Candy Coated Collection is now available in my Etsy shop.
| There are five polishes in this collection: Lollipop Princess, Plum out of Chocolate, Peppermint Pinwheels, Glitter Me Gumdrops, and Frosting Coated Sprinkles. |
| Lollipop Princess over Revlon Enchanting and LA Colors Black |
| Lollipop Princess over Revlon Enchanting and LA Colors Black with a coat of NYC Matte Me Crazy |
| Plum out of Chocolate over OPI Tickle My France-y |
| Peppermint Pinwheels over Sally Hansen Pink Blink |
| Glitter Me Gumdrops over Wet n Wild Candy-licious |
| Frosting Coated Sprinkles over naked nails |
| Frosting Coated Sprinkles over LA Colors White |
Do you have a favorite?
I would be really grateful if you shared this post or favorited my shop or your favorite polish on Etsy. ♥
Thursday, February 7, 2013
Sinful Colors Pinky Glitter Swatch
I can't resist a pretty glitter. I really can't! Who can? Sometimes I'm disappointed and other times I'm stunned. Can you guess which I am this time?
Sinful Colors Pinky Glitter is stunning in the bottle, but there really aren't many polishes that live up to what you see in the bottle once on your nails. They almost always leave you slightly disappointed. But not this one! I am amazed at how well it photographs as well.
Pinky Glitter looks like a very bright hot pink in the bottle. However, it goes on a very pretty light pink if it's not layered. I used two slightly thick coats — only thick because the polish had gone slightly gloppy. I've had this in my 'to swatch' pile for a few months so I did expect it; Sinful Colors doesn't seem to hold up long — but what can you expect from a polish on the lowest end of the price scale? Two thick coats got me full coverage and the lovely color you see above.
Pinky Glitter is filled with small holographic glitter and a fine, sandy holographic shimmer. These holographic glitters are those perfect holo glitters that flash rainbow with the slightest movement. Perfect! It has such a beautifully soft and sandy texture that I left it without any top coat.
Color: A bright hot pink in the bottle but over naked nails it is a fairly light, yet very pretty, pink. It is filled with small and fine, sandy holographic glitter.
Finish: Glitter suspended in a pink base that dries to a really nice textured finish.
Application: It actually went on pretty well for being thick. There was none of the patchiness that some glitters have where the glitter clings to the brush more than your nail. Overall, the application was pretty much perfect.
Coats to Opaque: 2
My Rating: 4.9 — The only negative I have is the thickness. Sinful Colors does turns thick quickly, and it was something I expected. You can't expect much more for the price. Other than that the color is perfect, the glitter is so gorgeous, and it works great on its own and as a layering glitter.
Sinful Colors Pinky Glitter is stunning in the bottle, but there really aren't many polishes that live up to what you see in the bottle once on your nails. They almost always leave you slightly disappointed. But not this one! I am amazed at how well it photographs as well.
Pinky Glitter looks like a very bright hot pink in the bottle. However, it goes on a very pretty light pink if it's not layered. I used two slightly thick coats — only thick because the polish had gone slightly gloppy. I've had this in my 'to swatch' pile for a few months so I did expect it; Sinful Colors doesn't seem to hold up long — but what can you expect from a polish on the lowest end of the price scale? Two thick coats got me full coverage and the lovely color you see above.
Pinky Glitter is filled with small holographic glitter and a fine, sandy holographic shimmer. These holographic glitters are those perfect holo glitters that flash rainbow with the slightest movement. Perfect! It has such a beautifully soft and sandy texture that I left it without any top coat.
Color: A bright hot pink in the bottle but over naked nails it is a fairly light, yet very pretty, pink. It is filled with small and fine, sandy holographic glitter.
Finish: Glitter suspended in a pink base that dries to a really nice textured finish.
Application: It actually went on pretty well for being thick. There was none of the patchiness that some glitters have where the glitter clings to the brush more than your nail. Overall, the application was pretty much perfect.
Coats to Opaque: 2
My Rating: 4.9 — The only negative I have is the thickness. Sinful Colors does turns thick quickly, and it was something I expected. You can't expect much more for the price. Other than that the color is perfect, the glitter is so gorgeous, and it works great on its own and as a layering glitter.
Tuesday, January 29, 2013
Candy Coated Collection — Frosting Coated Sprinkles
Welcome to the last swatch of my Candy Coated Collection.
Update: This polish and the rest of the collection are now up for sale in my Etsy shop.
This is two coats of Frosting Coated Sprinkles over bare nails. You can really see the shimmer contained in the polish in this picture. Both pictures were taken after I applied top coat. There is so much glitter in this polish that it does have a rough finish when dry ... top coat really is a must with this one.
Update: This polish and the rest of the collection are now up for sale in my Etsy shop.
This is Frosting Coated Sprinkles inspired by the Candy Castle. Depending on which version of Candyland you look at you'll find some of the Castles with frosting, some with ice cream, and some with both. This polish was mixed up to look like the bright pink frosting decorating the Castle.
Contained in this bright pink shimmery frosting is 'sprinkles' of various colors and sizes in squares and hexes. I think this polish is the essence of Candyland melted down and bottled. :)
This is two coats of Frosting Coated Sprinkles over white. You'll have no trouble getting glitter on your nails with this polish!
This is two coats of Frosting Coated Sprinkles over bare nails. You can really see the shimmer contained in the polish in this picture. Both pictures were taken after I applied top coat. There is so much glitter in this polish that it does have a rough finish when dry ... top coat really is a must with this one.
Saturday, January 26, 2013
Candy Coated Collection — Lollipop Princess
The only polish from this collection inspired by a character and not a location. Lollipop Princess was inspired by Princess Lolly, resident of the Lollipop Woods and princess of Candyland.
Update: This polish and the rest of the collection are now up for sale in my Etsy shop.
Lollipop Princess has pink, purple, and yellow hex glitters. And, since every princess needs some bling, small purple holo glitters.
Lollipop Princess over Wet n Wild I Need A Refresh-Mint.
In an effort to really showcase the holographic glitter I layered one coat of Lollipop Princess over Revlon Enchanting with a black accent nail. I think I caught the holo at just the right angle and light to make it flare. Mostly I caught the bright blue flares but it also turns a white/purple and a bright pink. You can see one small flash of pink on my pinky nail.
I have been dying to see this glitter matte since I first mixed it up so I decided to add a layer of NYC Matte Me Crazy. Wow! I don't ever want to take this off!!!
Update: This polish and the rest of the collection are now up for sale in my Etsy shop.
Lollipop Princess has pink, purple, and yellow hex glitters. And, since every princess needs some bling, small purple holo glitters.
I'm going to have to try to get some better pictures. The colors are slightly off in this close-up and in the bottle picture.
Lollipop Princess over Wet n Wild I Need A Refresh-Mint.
In an effort to really showcase the holographic glitter I layered one coat of Lollipop Princess over Revlon Enchanting with a black accent nail. I think I caught the holo at just the right angle and light to make it flare. Mostly I caught the bright blue flares but it also turns a white/purple and a bright pink. You can see one small flash of pink on my pinky nail.
I have been dying to see this glitter matte since I first mixed it up so I decided to add a layer of NYC Matte Me Crazy. Wow! I don't ever want to take this off!!!
Thursday, January 24, 2013
Candy Coated Collection — Plum out of Chocolate
Hello lovelies! I'm here with another swatch from my Candy Coated Collection. This seems to be the most popular of all my new polishes. Meet Plum out of Chocolate. :)
Update: This polish and the rest of the collection are now up for sale in my Etsy shop.
Forgot to get a picture before I slapped on the labels. :(
Plum out of Chocolate is filled with large bronze and gold hex glitters and bronze micro glitters. You'll also find gorgeous holographic purple micro glitters.
My very first swatch after mixing up this glitter was two thin coats over Wet n Wild I Red A Good Book.
My most recent swatch was one fairly thin coat over OPI Tickle My France-y. I tried everything to get a good picture of this stunning combo but nothing I tried put everything in a good light. I would either lose the large glitters, the base color, or the micro glitters. This was the closest I could get to showing everything.
One last picture. One of these bottles belongs to one lucky US winner of my 1st Blogiversary Giveaway. If you haven't entered yet, there's still time. You can't win if you don't enter!!
Subscribe to:
Posts (Atom)