Hello everyone! You'll notice a bit of a difference in my nails with this post. Three of my nails broke last week. I filed them down pretty short and found out the hard way a few hours later that they weren't filed enough. One of them caught and broke again! My nails had to be filed shorter than I've had them in a good long while — so short that the tips of my fingers actually hurt where the extra length of my nails usually protected them.
But enough about that. Here is my post for the Time Periods Challenge. Today is Ancient Egypt. I've seen so many hieroglyph nails and the rarer death mask inspired nails that I wanted more than anything to do something different. Here's my attempt to think outside the box.
I'm not an expert, but I've always been slightly fascinated with Ancient Egypt. The pharaohs, the Gods, their way of life — it's all so interesting to me. Did you know cats were highly revered by the Ancient Egyptians? Some cats of royalty were dressed in gold jewelry and allowed eat from their owners' plates!
What better way of thinking outside the box than to do a cat nail for Ancient Egypt? I used a saran wrap base of Color Show Bold Gold and Funky Fingers Platinum Record. The cat is a representation of Bast/Bastet — most often shown as a black cat with gold jewelry or a woman with the head of a black cat.
I couldn't find my nail art brush so the cat was done with a combo of dotting tool and sewing needle (for the ears, tail, and collar).
Showing posts with label Black. Show all posts
Wednesday, March 27, 2013
Tuesday, March 19, 2013
Stripes and Dots
*The products in this post were purchased with my own money.
Today's mani came to me in a dream. No, seriously, I woke up with the idea so I must have dreamed it. And it looks really awesome in my opinion.
*The products in this post were purchased with my own money.
Today's mani came to me in a dream. No, seriously, I woke up with the idea so I must have dreamed it. And it looks really awesome in my opinion.
What do you think? I'm reminded slightly of Doctor Who Dalek. The stripes on the side don't fit a Dalek, but the resemblance is there.
I started with two coats of OPI Strawberry Margarita from the OPI Best of the Best mini collection. Strawberry Margarita is originally from the Beach Party Collection, and I can see why. It's such a yummy bright pink — perfect for the beach.
I used tape to create the thin lines up and down on either side and filled them in with Petites Black. Then I used a nail art brush to create the thicker stripes across. You could also do this with tape, but I found it faster, if less neat and precise, to freehand them.
I added a coat of Seche Vite and thought it looked bare. It needed something, so I dug out my Born Pretty Store studs. I vowed to use these more often and this was the perfect opportunity. I decided on the black studs. I've never found the perfect mani for these so I've never used them before! Exciting!!
The best way I've found to use these types of studs is to lay them on your nail over dry polish first so you can get the perfect spacing and positioning. Then pick them up one by one with tweezers and lightly dip the bottom in clear polish and set them back down. It gives you more leeway as you can decide you don't like the design and move them around. You can't do this if you just pick them up and slap them on wet polish. There's no changing your mind after that! I really hope this tip helps someone. :)
Thursday, March 7, 2013
Z is for ...
And so ends the ABC Challenge. I am terribly sad to see this challenge over. I almost want to start all over again because there are so many letters that I had multiple nail art ideas for. Take Z for example. There's zebras, zombies, and zigzags and the one I went with:
Z is for ... Zippers
I did this design completely backwards. I was working on swatching Shimmer Polish (swatches coming next week) when I was hit with the idea of zippers opening up to reveal Mary in all it's glittery glory.
I think it turned out pretty great considering I had to draw everything around that small V of Mary you see. To learn how to do a traditional zipper nail and not my backwards version you should definitely check out this picture tutorial found on Beautylish.
Will any of you be joining me for the Inspired by Time Periods Challenge??
Z is for ... Zippers
I did this design completely backwards. I was working on swatching Shimmer Polish (swatches coming next week) when I was hit with the idea of zippers opening up to reveal Mary in all it's glittery glory.
I think it turned out pretty great considering I had to draw everything around that small V of Mary you see. To learn how to do a traditional zipper nail and not my backwards version you should definitely check out this picture tutorial found on Beautylish.
Will any of you be joining me for the Inspired by Time Periods Challenge??
Monday, March 4, 2013
X is for ...
I'm back!! My new computer arrived Saturday, and I spent the weekend getting it set up. The actual setup was easy and took minutes, but the little details of everyday use are a bit harder. You don't realize all the little things (like font, text size, saved passwords, desktop icons) about your computer you take for granted until they look almost right but are just wrong enough to really bug you. I'm still working on getting those little things fixed, but it feels so great to be back!! :)
Being back means I have some nail art to catch up on — like ABC Challenge posts. The challenge is coming to an end this Wednesday, and I still haven't posted my X mani.
X is for ... X-Men.
The uniforms were weird enough to catch my eye; bright yellow and black create an interesting contrast. I'm oddly reminded of Bumblebee from Transformers. The First Class uniforms have an odd black circle around the bellybutton area that has a yellow X cut straight through that I replaced on the chest area (or at least what I imagine is the chest area) with simple black letters to spell XMEN.
The hosts of the ABC Challenge have decided to start a new challenge once this one is over. It will be Inspired by Time Periods so be sure to check out the group if you'd like to join. It will certainly be challenging! :)
Also, what do you guys think of the new St. Patrick's Day layout? I went to change the header and buttons to something more festive like always and everything went wonky! I had to rearrange and recode almost everything. I think it looks much better though, neater and more organized ... at least for me. How's it look for everyone else? No overflow or anything weird like that?
Being back means I have some nail art to catch up on — like ABC Challenge posts. The challenge is coming to an end this Wednesday, and I still haven't posted my X mani.
X is for ... X-Men.
I knew immediately I wanted to use X-Men for X. I just wasn't exactly sure what kind of design I wanted to do for X-Men. I went searching and found the X-Men: First Class comics ... and the uniforms.
The uniforms were weird enough to catch my eye; bright yellow and black create an interesting contrast. I'm oddly reminded of Bumblebee from Transformers. The First Class uniforms have an odd black circle around the bellybutton area that has a yellow X cut straight through that I replaced on the chest area (or at least what I imagine is the chest area) with simple black letters to spell XMEN.
The hosts of the ABC Challenge have decided to start a new challenge once this one is over. It will be Inspired by Time Periods so be sure to check out the group if you'd like to join. It will certainly be challenging! :)
Also, what do you guys think of the new St. Patrick's Day layout? I went to change the header and buttons to something more festive like always and everything went wonky! I had to rearrange and recode almost everything. I think it looks much better though, neater and more organized ... at least for me. How's it look for everyone else? No overflow or anything weird like that?
Thursday, February 14, 2013
Write Me A Love Letter
Happy Valentine's Day!!! Welcome to the last Valentine's Day manicure of 2013 — Love Letters.
I started with a base of LA Colors Energy Source. This is the best white I've found to date. It can be bought in most Dollar Stores at a great price and it takes a really, really long time to turn thick in the bottle. I used a nail art brush and Petites Night to create the envelopes, sealed them with top coat, and topped with a red heart sticker. The accent nail is a simple newspaper nail. I used the wedding announcements section of the newspaper. :)
Here is what the mani looks like without the heart stickers. You could certainly keep them like this, use heart rhinestones, or even just draw the hearts on with polish if you don't have stickers or rhinestones.
Have trouble creating newspaper nails? Don't do them on completely dry nails. Wait until your nails are almost dry before dipping your nails or the newspaper into rubbing alcohol and applying to your nails. You want your nails to be at that point where they're dry to the touch but applying any pressure will leave fingerprints. This degree of 'wetness' will soak up the newspaper ink much better than dry nails. Be sure to apply even pressure across your entire nail or you'll end up with patchy newsprint. If you do have a place on your nail that is blank simply line up another piece of newspaper — being as exact in lining it up as possible, lightly dip a finger of the other hand in alcohol, and use it to hold the newspaper onto the blank spot.
I started with a base of LA Colors Energy Source. This is the best white I've found to date. It can be bought in most Dollar Stores at a great price and it takes a really, really long time to turn thick in the bottle. I used a nail art brush and Petites Night to create the envelopes, sealed them with top coat, and topped with a red heart sticker. The accent nail is a simple newspaper nail. I used the wedding announcements section of the newspaper. :)
Here is what the mani looks like without the heart stickers. You could certainly keep them like this, use heart rhinestones, or even just draw the hearts on with polish if you don't have stickers or rhinestones.
Have trouble creating newspaper nails? Don't do them on completely dry nails. Wait until your nails are almost dry before dipping your nails or the newspaper into rubbing alcohol and applying to your nails. You want your nails to be at that point where they're dry to the touch but applying any pressure will leave fingerprints. This degree of 'wetness' will soak up the newspaper ink much better than dry nails. Be sure to apply even pressure across your entire nail or you'll end up with patchy newsprint. If you do have a place on your nail that is blank simply line up another piece of newspaper — being as exact in lining it up as possible, lightly dip a finger of the other hand in alcohol, and use it to hold the newspaper onto the blank spot.
Wednesday, February 13, 2013
W is for ...
Hello everyone and welcome to another ABC Challenge post! This week we're up to the letter W. Coming up with words to use for each letter and then creating a nail art design for that word is harder than it sounds! My mind goes blank every week, so I usually scroll through dictionary sites to find my word of the week. I thought there was absolutely nothing to do this week that I could then link to Valentine's Day, but I finally came up with something. And it has no pink!!
W is for ... Wings of Love.
I have wanted to do a caged bird mani forever! And I completely and totally adore how this one turned out!! I started with 3 coats of LA Colors Energy Source. More coats than I usually use, but since so much of the white was going to show I didn't want any chance of this being sheer or patchy. The black is Petites Night. I tried to keep everything connected between nails. The open birdcage, the cursive love, and the bird all leading to the heart.
I love this mani so much that I couldn't seem to stop taking pictures. I tried to choose one from every angle so you can get the full effect.
I actually sacrificed an old nail art brush to do this mani. I couldn't get the lines small and delicate enough for the birdcage and the cursive love with the brushes I have, so I cut some bristles off an old brush to make it thinner! A great use for old brushes and cheaper than buying a thinner brush!!
It looks intricate and elegant, but is actually pretty simple when you break it down by nail. I found the hardest part is actually the birdcage, at least for me. Don't try to twist your hand around to do it right-side-up — this will just make your hands shaky and it's harder/messier to do an 'n' shape with nail polish; it's so much easier to leave your hand pointed straight away from you and just create a U on your nail. Create a smaller U inside that making sure the bottom of your u's touch/overlap and put a line down the middle. Add a line across the bottom, a handle at the top, and an open door on the side.
I really hope you enjoy this mani as much as I do. Check back tomorrow for the last Valentine's Day mani.
W is for ... Wings of Love.
I have wanted to do a caged bird mani forever! And I completely and totally adore how this one turned out!! I started with 3 coats of LA Colors Energy Source. More coats than I usually use, but since so much of the white was going to show I didn't want any chance of this being sheer or patchy. The black is Petites Night. I tried to keep everything connected between nails. The open birdcage, the cursive love, and the bird all leading to the heart.
I love this mani so much that I couldn't seem to stop taking pictures. I tried to choose one from every angle so you can get the full effect.
I actually sacrificed an old nail art brush to do this mani. I couldn't get the lines small and delicate enough for the birdcage and the cursive love with the brushes I have, so I cut some bristles off an old brush to make it thinner! A great use for old brushes and cheaper than buying a thinner brush!!
It looks intricate and elegant, but is actually pretty simple when you break it down by nail. I found the hardest part is actually the birdcage, at least for me. Don't try to twist your hand around to do it right-side-up — this will just make your hands shaky and it's harder/messier to do an 'n' shape with nail polish; it's so much easier to leave your hand pointed straight away from you and just create a U on your nail. Create a smaller U inside that making sure the bottom of your u's touch/overlap and put a line down the middle. Add a line across the bottom, a handle at the top, and an open door on the side.
I really hope you enjoy this mani as much as I do. Check back tomorrow for the last Valentine's Day mani.
Wednesday, February 6, 2013
V is for ...
Is it Wednesday already?? This week is going way too fast! Still, it is Wednesday and you know what that means: ABC Challenge nail art. Can you believe we're up to the letter V already?
V is for ... Vampire's Valentine.
I loved last year's Anti-Valentine's Day nails so much that I decided to use it as inspiration for this mani. Honestly, I really can't believe how far I've come in a year.
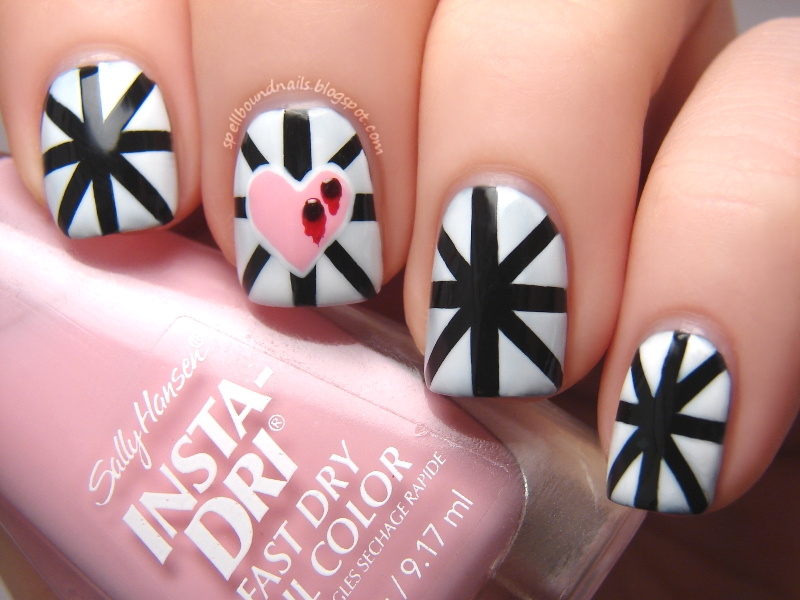
I loved the entire design of this mani, every step taken to create them, so I took many pictures! A base of black, some tape, and some white polish created this star-burst design.
I used white polish to create a heart on my index nail. The white creates a barrier over the black; this means you don't need to use a ton of pink to cover the black. It also creates a very pretty border around your pink heart if you make it slightly smaller than your white heart. This alone would make for a gorgeous Valentine's Day mani!! You could even create hearts on all your nails instead of just as an accent or use red for the heart to make it really stand out.
Since I was going to create bleeding fang marks on my heart I knew I couldn't use red. :) The bleeding marks add depth and give these nails a nearly 3-D look—all a pretty illusion of course. With the dark fang marks, the bright red blood, and the white outline, doesn't it look like the heart is really bleeding?
Finally, I created white outlined blood on the tips of my nails. I added a small amount of Venique Runway Sparkle over all of the blood. Sadly, I couldn't seem to get a good picture with the actual sparkle.
So, which are you this Valentine's Day: hearts and roses or vampire bites? Will you be rolling out the Anti-Valentine's Day red carpet?
V is for ... Vampire's Valentine.
I loved last year's Anti-Valentine's Day nails so much that I decided to use it as inspiration for this mani. Honestly, I really can't believe how far I've come in a year.
I loved the entire design of this mani, every step taken to create them, so I took many pictures! A base of black, some tape, and some white polish created this star-burst design.
I used white polish to create a heart on my index nail. The white creates a barrier over the black; this means you don't need to use a ton of pink to cover the black. It also creates a very pretty border around your pink heart if you make it slightly smaller than your white heart. This alone would make for a gorgeous Valentine's Day mani!! You could even create hearts on all your nails instead of just as an accent or use red for the heart to make it really stand out.
Since I was going to create bleeding fang marks on my heart I knew I couldn't use red. :) The bleeding marks add depth and give these nails a nearly 3-D look—all a pretty illusion of course. With the dark fang marks, the bright red blood, and the white outline, doesn't it look like the heart is really bleeding?
Finally, I created white outlined blood on the tips of my nails. I added a small amount of Venique Runway Sparkle over all of the blood. Sadly, I couldn't seem to get a good picture with the actual sparkle.
So, which are you this Valentine's Day: hearts and roses or vampire bites? Will you be rolling out the Anti-Valentine's Day red carpet?
Saturday, January 26, 2013
Candy Coated Collection — Lollipop Princess
The only polish from this collection inspired by a character and not a location. Lollipop Princess was inspired by Princess Lolly, resident of the Lollipop Woods and princess of Candyland.
Update: This polish and the rest of the collection are now up for sale in my Etsy shop.
Lollipop Princess has pink, purple, and yellow hex glitters. And, since every princess needs some bling, small purple holo glitters.
Lollipop Princess over Wet n Wild I Need A Refresh-Mint.
In an effort to really showcase the holographic glitter I layered one coat of Lollipop Princess over Revlon Enchanting with a black accent nail. I think I caught the holo at just the right angle and light to make it flare. Mostly I caught the bright blue flares but it also turns a white/purple and a bright pink. You can see one small flash of pink on my pinky nail.
I have been dying to see this glitter matte since I first mixed it up so I decided to add a layer of NYC Matte Me Crazy. Wow! I don't ever want to take this off!!!
Update: This polish and the rest of the collection are now up for sale in my Etsy shop.
Lollipop Princess has pink, purple, and yellow hex glitters. And, since every princess needs some bling, small purple holo glitters.
I'm going to have to try to get some better pictures. The colors are slightly off in this close-up and in the bottle picture.
Lollipop Princess over Wet n Wild I Need A Refresh-Mint.
In an effort to really showcase the holographic glitter I layered one coat of Lollipop Princess over Revlon Enchanting with a black accent nail. I think I caught the holo at just the right angle and light to make it flare. Mostly I caught the bright blue flares but it also turns a white/purple and a bright pink. You can see one small flash of pink on my pinky nail.
I have been dying to see this glitter matte since I first mixed it up so I decided to add a layer of NYC Matte Me Crazy. Wow! I don't ever want to take this off!!!
Tuesday, January 22, 2013
Gradient Fail
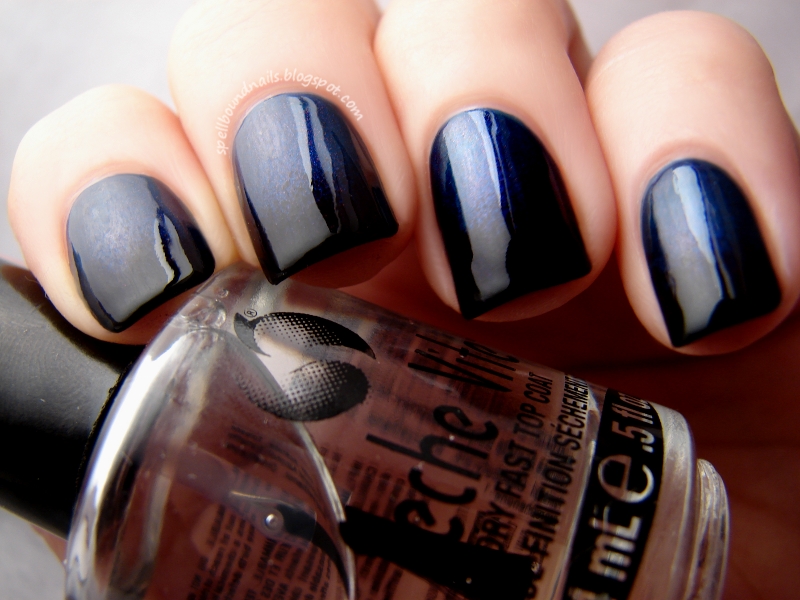
Welcome to my gradient fail. This isn't a full fail, but under any light except very direct sunlight and my lightbox these colors are just too dark to show the gorgeous fade between them.
Even with my lightbox I had a very hard time capturing this gradient. I used two polishes from the OPI Best of the Best mini collection. I got this collection as a gift Christmas 2011, and I love it to pieces.
The first polish I used, and the base of my gradient, is Russian Navy. Wow! I can see why this was one of the Best of the Best. Originally from the OPI Russian Collection, Russian Navy is now an OPI Classic shade. From the outside, Russian Navy looks purple. However, once you untwist that cap you're in for a shock! This polish is a deep indigo blue and all that purple you saw from the outside fades into a subtle shimmer.
Even with my lightbox I had a very hard time capturing this gradient. I used two polishes from the OPI Best of the Best mini collection. I got this collection as a gift Christmas 2011, and I love it to pieces.
The first polish I used, and the base of my gradient, is Russian Navy. Wow! I can see why this was one of the Best of the Best. Originally from the OPI Russian Collection, Russian Navy is now an OPI Classic shade. From the outside, Russian Navy looks purple. However, once you untwist that cap you're in for a shock! This polish is a deep indigo blue and all that purple you saw from the outside fades into a subtle shimmer.
Next, I used Lincoln Park After Dark, originally from the Chicago Collection. Alone this polish is a very deep, dark purple, but turned black when layered over Russian Navy. I was hoping once I got it sponged on and added a top coat that the beauty of this purple would shine through but I couldn't get a hint of purple on my nails no matter the light I put it under ... though some of the purple color did show in the bottle.
Lastly, I added a small amount of black to the very tips, reminiscent of a French tip.
One coat of Seche Vite Dry Fast Top Coat sealed the colors together and gave my nails an amazing amount of shine. This is my very first bottle of Seche Vite, bought and paid for with a free gift card I earned with my Swagbucks account. Sign up for an account of your own and use the code JANTASTIC (before 11:59 PT tonight) and you'll start with 100 Swag Bucks. Hint: A $5 Amazon gift card is 450 Swag Bucks.
So, overall, if I was going to walk around with my hands in a lightbox this would be a perfect gradient. I don't think that idea would work very well though and, sadly, neither does this mani anywhere except these pictures. :(
Wednesday, January 2, 2013
P is for ...
Hello everyone. Welcome to 2013!! :) Today's post was supposed to be for the letter Q in the ABC Challenge but, after the Christmas rush, I felt like doing nothing, so I'm a little behind in my posts. I don't feel right moving onto Q before posting P so ...
P is for ... Phoenix.
I cringe a little looking at this design. I was cleaning my usual nail art brush and the bristles came out. I was stunned because I was cleaning it like I always clean my brushes. I wasn't any more or less rough/gentle or pulling on the bristles excessively. I'm really not pleased because I pay an outrageous price for these brushes—4 brushes for about $15! I think I'll be ordering my brushes online from now on; for my usual price I can probably get a full set.
So, all brush rants aside, this design is a little messier than my usual since I had to use a thicker brush for the line work. Still, I felt very Harry Potter creating this phoenix ... though it's not as stunning as Fawkes. :)
P is for ... Phoenix.
I cringe a little looking at this design. I was cleaning my usual nail art brush and the bristles came out. I was stunned because I was cleaning it like I always clean my brushes. I wasn't any more or less rough/gentle or pulling on the bristles excessively. I'm really not pleased because I pay an outrageous price for these brushes—4 brushes for about $15! I think I'll be ordering my brushes online from now on; for my usual price I can probably get a full set.
So, all brush rants aside, this design is a little messier than my usual since I had to use a thicker brush for the line work. Still, I felt very Harry Potter creating this phoenix ... though it's not as stunning as Fawkes. :)
Monday, November 19, 2012
Heels of Dazzle
So many nail polish brands are coming out with some really lovely holiday collections. It leaves me wanting to buy and swatch them all for you. Sadly, I don't have the money to buy them all ... but I did buy a few. Today's post is Heels of Dazzle, which is another from the Venique 2012 Holiday Collection.
Heels of Dazzle is a shiny red sequin style hex glitter in a thick and clear base. I was drawn to this glitter because it is just so different from the other holiday glitters this year since a lot of brands went with ultra-fine glitters.
Shown above is one coat of Heels of Dazzle layered over L.A. Colors Black. At first, I was just using the black base to really pull attention to the red, but I came to really love this decision. As you can see, in some light the red really pops and in others it's a hidden mystery. It's like opening that one present on Christmas that you didn't manage to find hidden around the house (yes, I was one of those kid!) and being completely and totally surprised—but in a good way.
Adding a second layer of glitter gave me another surprise. Adding more glitter on top of the first coat caused it to begin reflecting the light off of each other. This caused fiery glints of color. The flares of fire really aren't this prevalent in all lights. It's more something you'll catch out of the corner of your eye or with a motion of your hand. It will capture your attention but will disappear when you look closer. I was really lucky to capture this with my lightbox and such direct lighting.
I added a top coat to seal the polish and give this mani a perfectly smooth finish. I was pretty darn impressed with how flat this glitter sat on my nail. There was only one problem piece and it was simply a defective bit of glitter that had gotten cut in half leaving it with a rough edge. It was easy to remove and the top coat filled in the gap.
A tip to distributing the glitter without large patches: give your brush a side to side swish as you drag it up your nail. It's not a perfect solution and you'll likely still end up digging for glitter to fill a spot or two but not as much. You can also try the dabbing method with your brush. A dab here and there can really distribute the glitter. :)
Heels of Dazzle is a shiny red sequin style hex glitter in a thick and clear base. I was drawn to this glitter because it is just so different from the other holiday glitters this year since a lot of brands went with ultra-fine glitters.
Shown above is one coat of Heels of Dazzle layered over L.A. Colors Black. At first, I was just using the black base to really pull attention to the red, but I came to really love this decision. As you can see, in some light the red really pops and in others it's a hidden mystery. It's like opening that one present on Christmas that you didn't manage to find hidden around the house (yes, I was one of those kid!) and being completely and totally surprised—but in a good way.
A tip to distributing the glitter without large patches: give your brush a side to side swish as you drag it up your nail. It's not a perfect solution and you'll likely still end up digging for glitter to fill a spot or two but not as much. You can also try the dabbing method with your brush. A dab here and there can really distribute the glitter. :)
Wednesday, November 14, 2012
J is for ...
I'm pretty excited to share today's post with you. This is for the letter J in the ABC Challenge. J is for ... Jester.
I was inspired by Harley Quinn from Batman. Harley has always been one of my favorite Batman characters even though I don't read the comics or watch the animated series. Harley Quinn, as suggested by the play with her name, is clad in a traditional harlequin jester outfit. I used L.A. Colors Black and White with Wet n Wild I Red a Good Book to create this look. No tape was used in the making of this mani. You're stunned, I know. ;)
You can look to the Wikipedia article on Harley Quinn if you'd like to see my inspiration.
I was inspired by Harley Quinn from Batman. Harley has always been one of my favorite Batman characters even though I don't read the comics or watch the animated series. Harley Quinn, as suggested by the play with her name, is clad in a traditional harlequin jester outfit. I used L.A. Colors Black and White with Wet n Wild I Red a Good Book to create this look. No tape was used in the making of this mani. You're stunned, I know. ;)
You can look to the Wikipedia article on Harley Quinn if you'd like to see my inspiration.
Monday, October 15, 2012
Elegant Border Nails
Hello everyone. I'm in the midst of a cold and debated even doing a post today, but thanks to some help from the lovely women on my Facebook Page I was able to beat the sore throat and tone down the other symptoms of my cold. You can totally thank them for this post!
I've been waiting to post these nails for a while but there were always other posts that needed posted first. Well, I'm making today the right day. Lustrous Lacquer wanted to see border nails and this is what I came up with.
Start out with a base color. This will be the color of your borders. I used two coats of L.A. Colors Black. The next step is to paint your nails again, but leave a border around the edges. I found it easier to simply use the nail polish brush and be a little more careful around the edges, but you could use a nail art brush or a dotting tool to lay down an outline first if you don't feel comfortable jumping right in. You'll go back later and create a tip so don't worry if the tips look messy or the black shows on the edges. This picture shows one coat of L.A. Colors White. I used three coats to completely cover the black.
Here's where you complete the border by repainting the tips with your border color. Remember to round the edges of this tip to give a nice oval shape to the borders. I let this part of the mani dry completely and then put on a layer of top coat to give myself a nice stamping surface.
I used the rose image on m65 of my Born Pretty stamping plates. This is the one and only time I got such perfect images on all my nails. I'm sure it has something to do with the L.A. Colors polish I used. It's a very slow to dry polish, and I worked extra fast. Be sure to let your nails dry completely before stamping and be sure it's completely dry before using any top coat. With the black and white even the smallest amount of smudging or running will be immediately visible!
I've been waiting to post these nails for a while but there were always other posts that needed posted first. Well, I'm making today the right day. Lustrous Lacquer wanted to see border nails and this is what I came up with.
Start out with a base color. This will be the color of your borders. I used two coats of L.A. Colors Black. The next step is to paint your nails again, but leave a border around the edges. I found it easier to simply use the nail polish brush and be a little more careful around the edges, but you could use a nail art brush or a dotting tool to lay down an outline first if you don't feel comfortable jumping right in. You'll go back later and create a tip so don't worry if the tips look messy or the black shows on the edges. This picture shows one coat of L.A. Colors White. I used three coats to completely cover the black.
Here's where you complete the border by repainting the tips with your border color. Remember to round the edges of this tip to give a nice oval shape to the borders. I let this part of the mani dry completely and then put on a layer of top coat to give myself a nice stamping surface.
I used the rose image on m65 of my Born Pretty stamping plates. This is the one and only time I got such perfect images on all my nails. I'm sure it has something to do with the L.A. Colors polish I used. It's a very slow to dry polish, and I worked extra fast. Be sure to let your nails dry completely before stamping and be sure it's completely dry before using any top coat. With the black and white even the smallest amount of smudging or running will be immediately visible!
Tuesday, October 2, 2012
Nail-Aween Water Marble
Hello everyone!! Since Halloween is my favorite holiday I decided to make October the best month yet. Or at least, I hope you guys will like my posts. What do you have to look forward to?
My usual Wednesday posts have been taken over by the ABC Challenge nail art so you should be seeing some pretty creative designs coming from that. I try to think outside the box with every letter.
I've also decided to take part in the Nail-Aween Nail Art Challenge. There are some really great designs, some I haven't tried before, that are part of this challenge. It's going to be awesome!
What does all this mean for you? More posts!!! What does this mean for me? A really busy month. :)
The first design asked for in the Nail-Aween Challenge is water marble. I really dislike water marble. Don't get me wrong. The look of a finished water marble is really pretty (if you don't look too closely) but the time it takes is really not worth it, in my opinion. With this in mind, I debated doing a pin drag mani instead and calling it a 'without water-water marble', but I just couldn't do it. It would have felt like cheating.
My usual Wednesday posts have been taken over by the ABC Challenge nail art so you should be seeing some pretty creative designs coming from that. I try to think outside the box with every letter.
I've also decided to take part in the Nail-Aween Nail Art Challenge. There are some really great designs, some I haven't tried before, that are part of this challenge. It's going to be awesome!
What does all this mean for you? More posts!!! What does this mean for me? A really busy month. :)
The first design asked for in the Nail-Aween Challenge is water marble. I really dislike water marble. Don't get me wrong. The look of a finished water marble is really pretty (if you don't look too closely) but the time it takes is really not worth it, in my opinion. With this in mind, I debated doing a pin drag mani instead and calling it a 'without water-water marble', but I just couldn't do it. It would have felt like cheating.
Water Marble is actually pretty simple, but it is also very time consuming. You start out by painting your nails with a base color. I used white. Next, you need a bowl of water. This water has to be filtered or bottled and it must be room temperature. I filled an old butter dish with bottled water and left it sit out overnight. By the time I was ready to start, it was the perfect temperature. What wasn't perfect was thinking I could use a butter dish. The inside was too glossy and the polish wouldn't attach to the sides. You think this would be a good thing but you need to stabilize the outer edge of your polish rings before you can start swirling designs. I finally managed to rig up this. I lined the butter dish with saran wrap and poured the water back in. The saran wrap held the polish perfectly and I had no problems creating swirls.
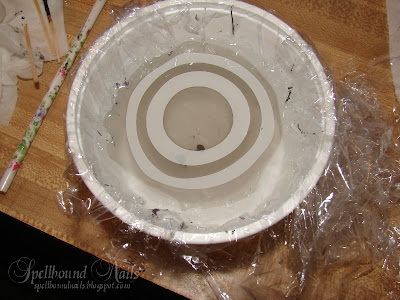
After you set up your water, make sure you have all your supplies on hand. You want to be able to move from one step to the next without having to leave your work space. Work one finger at a time. Tape around your nail but don't get too close. Taping too close to the nail may stop the polish in the water from settling correctly. It's easier to clean up than to start all over. Once your nail is taped, start dropping your polish into your dish one drop at a time. Be careful not to overload the brush with polish. You only need one drop and an overload brush may drop two or three before you can control it. Keep dropping polish into the water until you get a tight bulls-eye pattern. If your polish isn't spreading you can give the dish a few quick taps against the side. Don't do this too harshly or you'll make a mess by splashing water and polish or create bubbles in your bulls-eye. How do I know? I did both.
Once you decide you have enough rings you'll need to attach them to your dish if they aren't already attached. Don't touch the outer ring! This ring will already be dry and touching it can ruin everything! Work from at least two rings in just to be safe. To create your swirls you can use almost anything sharp: a pin, a toothpick, the sharp end of a pencil (just know that the graphite may cause discoloration in the polish). I used an old nail art brush and found this worked even better than my attempts with a pin or a toothpick. You'll need to keep a napkin or paper towel on hand to keep your sharp object clean as you create swirls. Creating the swirls is up to you. Jump right in or spend a few moments trying to plan them out.
Find a swirl you like and carefully sink your finger (nail down) through the polish and into the water. Keep your finger in the water! You need to clean the water of polish first or you'll ruin your design. I used my nail art brush and rolled it through my fingers while I moved it around the water. This rolling motion will gather the polish better than simply swishing it through the water. Rolling will literally roll the polish around the tip of your brush (or pin/toothpick/pencil). This is what you'll need your napkin for. Carefully remove your finger from the water. Don't blow on your nail or flail your hand through the air. Remove the tape around your nail. Carefully! You don't want to bump your nail and you also need to be aware that you'll be flinging water everywhere because there is certainly water caught in and around the tape. After that, pull your brush through the napkin/paper towel and move onto your other nails, repeating the process again and again. :)
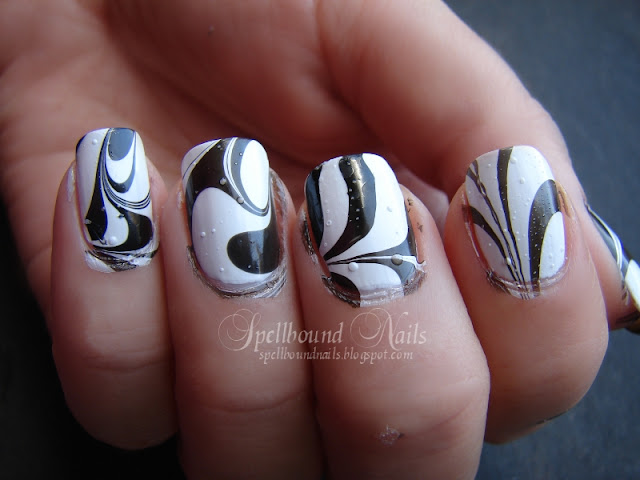
You'll come out with something like this and you'll quickly realize a few other reasons I dislike water marbling besides it being time consuming and a waste of polish. The first thing you'll notice are the bubbles you'll surly have. I'm sure more seasoned water marblers have learned tricks on how to prevent this, but I've found nothing I tried so far worked. Some things I tried made it bubble less and other just caused more bubbles. The other big reason? Polish has settled everywhere that wasn't taped. This means there is polish all over my cuticle and worse still, settled around my nail and under it too! No amount of cleaning will fix all of this. Some will be cleaned and the rest will flake off in a day or so, usually with a little help from some tweezers.
You can see here that I cleaned them as best I could. I also added a layer of top coat. This top coat swiped the bubbles right off and left behind blank spots in the black and dents in the white. While I feel really accomplished for doing this for the Nail-Aween Challenge, and I love the swirls on my pinky and my thumb nails I think this is nail art best viewed from further away ... or just not done at all.
What do you think of water marbling? Have you mastered this art? Or, like me, do you find it a waste of time and polish?
Friday, September 28, 2012
Neon Pink Stripes
I thought I should get all the neon out of my system before I have to pull out the Fall colors. So here goes ...
I am ashamed to say I have absolutely no idea what the name of this pink is. It is my sister's nail polish that accidentally got mixed in with mine. I couldn't resist using it before I gave it back to her. For some reason, she took the name sticker off the bottom. Seriously? Who does that??? Though looking at swatches it may or may not be either Sinful Colors Fusion Neon or 24/7.
The name of this color aside it is a beautifully bright pink. What better use for a pink this bright than doing stripes with China Glaze White on White?
How about taking it one step further? This was done with the help of some weird cut scissors. I put a piece of tape on some wax paper and cut it down the middle with ragged cut scissors. Cutting the tape down the middle let me have enough tape for two nails. I angled the tape just slightly on my nails and painted over with black. I think this created a really awesome pattern. It almost looks like the black is running down my nails in some spots. I can already see a few more uses for these scissors.
How do you feel about using weird cut scissors as part of a tape mani?
I am ashamed to say I have absolutely no idea what the name of this pink is. It is my sister's nail polish that accidentally got mixed in with mine. I couldn't resist using it before I gave it back to her. For some reason, she took the name sticker off the bottom. Seriously? Who does that??? Though looking at swatches it may or may not be either Sinful Colors Fusion Neon or 24/7.
The name of this color aside it is a beautifully bright pink. What better use for a pink this bright than doing stripes with China Glaze White on White?
How about taking it one step further? This was done with the help of some weird cut scissors. I put a piece of tape on some wax paper and cut it down the middle with ragged cut scissors. Cutting the tape down the middle let me have enough tape for two nails. I angled the tape just slightly on my nails and painted over with black. I think this created a really awesome pattern. It almost looks like the black is running down my nails in some spots. I can already see a few more uses for these scissors.
How do you feel about using weird cut scissors as part of a tape mani?
Friday, September 14, 2012
Resident Evil: Retribution
Hello girlies! I'm sorry for the long wait between posts. There's been some super huge 'end of spring' cleaning happening in my house and I managed to cut my finger. I wanted to let it heal a bit before risking nail polish remover. That said, I should have enough room for another nail polish drawer before I know it!! ♥
However, I could't let the theater debut of the new Resident Evil movie (Resident Evil: Retribution) pass without some nail art!! I apologize for the extreme brightness of this picture. I had to take it with flash since the sunlight made the red disappear completely into the black.
I knew immediately what I wanted to do for this design. It was getting it onto my nails that was nearly impossible. I decided to create my own nail stickers in hopes of making the completion of this design easier. The Umbrella symbol was made so much easier with this method. It gave me a flat surface to work on, one that I could twist and turn to get the best angle. A dot in the middle, triangles in alternating red and white around this dot, and curved tops. I did blood splatter as I always do, but I loved the way nail stickers gave me the option of choosing the splatter pattern I wanted instead of having to go with what came out of the straw.
The hardest part by far was the bloody fingerprint. It had me almost giving up a few times before I came up with a design I liked. While this idea came from a tutorial I found on deviantART, I had to adapt it so that it would work for me and this design. I painted the pad of my index finger with black and stamped a fingerprint onto my homemade sticker. I left my finger on the sticker until it was almost permanently stuck so that it would leave an imprint on the sticker just in case the black polish didn't get left behind right. With a small brush I traced an approximation of my fingerprint over the black. It wasn't exact but it came through well enough to get the idea across.
So, what's your favorite horror movie? While I used to be a huge horror movie buff The Resident Evil series and the Bride of Chucky are just about the only horror movies I'll watch anymore unless I'm feeling nostalgic.
However, I could't let the theater debut of the new Resident Evil movie (Resident Evil: Retribution) pass without some nail art!! I apologize for the extreme brightness of this picture. I had to take it with flash since the sunlight made the red disappear completely into the black.
I knew immediately what I wanted to do for this design. It was getting it onto my nails that was nearly impossible. I decided to create my own nail stickers in hopes of making the completion of this design easier. The Umbrella symbol was made so much easier with this method. It gave me a flat surface to work on, one that I could twist and turn to get the best angle. A dot in the middle, triangles in alternating red and white around this dot, and curved tops. I did blood splatter as I always do, but I loved the way nail stickers gave me the option of choosing the splatter pattern I wanted instead of having to go with what came out of the straw.
The hardest part by far was the bloody fingerprint. It had me almost giving up a few times before I came up with a design I liked. While this idea came from a tutorial I found on deviantART, I had to adapt it so that it would work for me and this design. I painted the pad of my index finger with black and stamped a fingerprint onto my homemade sticker. I left my finger on the sticker until it was almost permanently stuck so that it would leave an imprint on the sticker just in case the black polish didn't get left behind right. With a small brush I traced an approximation of my fingerprint over the black. It wasn't exact but it came through well enough to get the idea across.
So, what's your favorite horror movie? While I used to be a huge horror movie buff The Resident Evil series and the Bride of Chucky are just about the only horror movies I'll watch anymore unless I'm feeling nostalgic.
Subscribe to:
Posts (Atom)