Welcome to another Disney Challenge post. We've hit the mid-way point in the movie inspired portion of this challenge. Another 5 manis and it will be time to start the princesses.
Today's mani is Bambi inspired. Bambi is my mom's Fox and the Hound. She refuses to watch this movie, so I've probably only watched it once or twice. I went with a pure green background using my watercolor effect. Then I created flowers along the tips of my nails and finally drew in Bambi's nose with a butterfly resting on it.
I seem to slowly but surely be falling behind in these challenges. I am really starting to hate the rush to finish a mani the day it's supposed to be posted!
Up next in this challenge: The Lion King
Up next: Medieval for the Time Periods Challenge.
Until next time!
Showing posts with label Character Nails. Show all posts
Monday, April 22, 2013
Thursday, April 11, 2013
Disney Challenge: The Fox and The Hound
I think this is probably the only Disney movie I don't like. Well, okay, it's not that I don't like it, it's just that I can't watch it because it sends me to the safety of my bed sobbing!! It's a horrible, horrible movie, lol!!
I looked for inspiration everywhere, and finally decided to do like everyone else who has tried to find inspiration in The Fox and The Hound — do their faces.
I started with an almost watercolor background. This is two coats of white that I used saran wrap to dab blue, mint, purple, pink, and yellow over. I loved the old Disney books as a kid; when the images in the books weren't digitally created. Kind of like how it is with the old movies too! This watercolor effect reminds of those, and I love it for this challenge!!
It might have also had something to do with this scene. These are screencaps from the movie that I turned into a collage. See the awesome watercolor effect of the background and the water? You just don't get that with movies now!!
Before starting these nails, I used my morning to create nail art stickers for Tod and Copper. Their faces are all hand-painted, but creating stickers allows me much more freedom since I don't have to keep my hand turned to point of breaking thus allowing for a more precise image.
To create nail art stickers you use a Ziploc bag and put a layer of clear polish down slightly larger than your nail. Let it dry completely! And then you just draw your design over the clear polish and again let it dry completely!! If the image isn't completely dry it will stick to the Ziploc bag and tear, ruining your image.
I thought it was missing something. The sadness of The Fox and The Hound maybe. So I added footprints going in opposite directions. There's so much meaning behind that, but it all boils down to the separation of Tod and Copper. It shows them going in opposite directions, leaving their friendship behind.
Next up: The Little Mermaid. :)
I looked for inspiration everywhere, and finally decided to do like everyone else who has tried to find inspiration in The Fox and The Hound — do their faces.
I started with an almost watercolor background. This is two coats of white that I used saran wrap to dab blue, mint, purple, pink, and yellow over. I loved the old Disney books as a kid; when the images in the books weren't digitally created. Kind of like how it is with the old movies too! This watercolor effect reminds of those, and I love it for this challenge!!
It might have also had something to do with this scene. These are screencaps from the movie that I turned into a collage. See the awesome watercolor effect of the background and the water? You just don't get that with movies now!!
Before starting these nails, I used my morning to create nail art stickers for Tod and Copper. Their faces are all hand-painted, but creating stickers allows me much more freedom since I don't have to keep my hand turned to point of breaking thus allowing for a more precise image.
To create nail art stickers you use a Ziploc bag and put a layer of clear polish down slightly larger than your nail. Let it dry completely! And then you just draw your design over the clear polish and again let it dry completely!! If the image isn't completely dry it will stick to the Ziploc bag and tear, ruining your image.
I thought it was missing something. The sadness of The Fox and The Hound maybe. So I added footprints going in opposite directions. There's so much meaning behind that, but it all boils down to the separation of Tod and Copper. It shows them going in opposite directions, leaving their friendship behind.
Next up: The Little Mermaid. :)
Monday, April 8, 2013
Disney Challenge: The Jungle Book
Another mani for the Disney Challenge being hosted by Rambles of a Polish Addict. I'm extra excited about this mani. I was utterly stumped — not because it's anything truly stunning, but because I had not a clue what I was going to do for The Jungle Book. Finally, I decided.
I hate the ending of The Jungle Book and am only slightly appeased by The Jungle Book 2. In my memory, this is how Mowgli and Baloo will stay. They will forever be together, dancing and happy, best friends until the end ... and no human village or girl will ever come between their friendship, lol.
Next up in this challenge: The Fox and the Hound. Even at 27 years old, I stillsob like a little baby get teary at this movie.
Until then, check out the other awesome artists taking part in this challenge.
I hate the ending of The Jungle Book and am only slightly appeased by The Jungle Book 2. In my memory, this is how Mowgli and Baloo will stay. They will forever be together, dancing and happy, best friends until the end ... and no human village or girl will ever come between their friendship, lol.
Next up in this challenge: The Fox and the Hound. Even at 27 years old, I still
Until then, check out the other awesome artists taking part in this challenge.
Thursday, April 4, 2013
Disney Challenge: Alice in Wonderland
I am so excited! I saw a post about this challenge last month, and I immediately knew I wanted in! I love, love, love Disney!! What could possibly be better for a Disney lover than a Disney Challenge?
This challenge is being hosted by Rambles of a Polish Addict and you can see the details here. If you don't have a blog you can post on her Facebook Page. Posts go up twice a week. With the way things are lately, here's hoping I can keep up!!
Here are my Alice in Wonderland nails. I have had this design forever!! I have filled sketchbooks with nail art designs and this was one of my very first nail ideas, way before I even thought of starting this blog. I'm actually really glad I didn't try it before, because I think I finally have the skill to do this design some justice.
Here is a close-up of the thumb. I really love this! I started with two coats of white and then drew lines up and down and then side to side, filling them in to create the checkerboard pattern. Then I created a half circle for the pocket watch, filling it in with white and adding the gold beads around the outside. Last was the numbers and the one clock hand shown. I wish I had some thin chain; I think that would have looked wonderful coiled around in the open space beside the clock.
Here is a little bit of a closer look at the other nails. I've done a bit of a combination between the animated Alice and the Tim Burton Alice with these designs. The index nail is a bit of a combo between Alice and the tea party tablecloth with lace overlay. Not bad for a bit of quick freehand lace. The middle finger is the Queen of Hearts of course. The heart in the center is actually one of the heart glitters that I put in my polish. The ring is the Mad Hatter's top hat taken from Tim Burton's Alice in Wonderland. And since there was so much surprise over the Cheshire Cat inspired polish in my upcoming Down the Rabbit Hole collection I decided to do the original Cheshire Cat for my pinky nail.
Seriously? Between this challenge and the fact that Tim Burton's Alice in Wonderland was on television last night I think it's fate's way of telling me to hurry up and release Down the Rabbit Hole. So I have moved up the release from later in the week to Monday, April 8th! Who's excited???
This challenge is being hosted by Rambles of a Polish Addict and you can see the details here. If you don't have a blog you can post on her Facebook Page. Posts go up twice a week. With the way things are lately, here's hoping I can keep up!!
Here are my Alice in Wonderland nails. I have had this design forever!! I have filled sketchbooks with nail art designs and this was one of my very first nail ideas, way before I even thought of starting this blog. I'm actually really glad I didn't try it before, because I think I finally have the skill to do this design some justice.
Here is a close-up of the thumb. I really love this! I started with two coats of white and then drew lines up and down and then side to side, filling them in to create the checkerboard pattern. Then I created a half circle for the pocket watch, filling it in with white and adding the gold beads around the outside. Last was the numbers and the one clock hand shown. I wish I had some thin chain; I think that would have looked wonderful coiled around in the open space beside the clock.
Here is a little bit of a closer look at the other nails. I've done a bit of a combination between the animated Alice and the Tim Burton Alice with these designs. The index nail is a bit of a combo between Alice and the tea party tablecloth with lace overlay. Not bad for a bit of quick freehand lace. The middle finger is the Queen of Hearts of course. The heart in the center is actually one of the heart glitters that I put in my polish. The ring is the Mad Hatter's top hat taken from Tim Burton's Alice in Wonderland. And since there was so much surprise over the Cheshire Cat inspired polish in my upcoming Down the Rabbit Hole collection I decided to do the original Cheshire Cat for my pinky nail.
Seriously? Between this challenge and the fact that Tim Burton's Alice in Wonderland was on television last night I think it's fate's way of telling me to hurry up and release Down the Rabbit Hole. So I have moved up the release from later in the week to Monday, April 8th! Who's excited???
Wednesday, March 20, 2013
Time Periods Challenge: The Modern Stone Age Family
Since we are now on the Stone Age in the Time Periods Challenge I couldn't think of a better nail art idea than the modern stone age family! If you don't know who they are, what rock have you been living under all your life??
It's the Flintstones and the Rubbles: Betty and Barney Rubble and Fred and Wilma Flintstone! I adore the Fred nail. I never realized this shade of blue and orange went together so well.
For the nude polish lovers out there I definitely recommend trying to find Color Fever Seashell. I had someone tell me they also found it in the CQ bottles with the same name and number. Seashell is nearly a perfect match for my skin tone. It's a really beautiful nude that has slightly more than a hint of pink. This is one coat!! There is still a small amount of visible nail line and that's not usually my thing, but I love it with this color.
I think I finally figured out the whole inlinkz thing so check out the other manis by some really lovely artists for this part of the challenge. Hopefully I'll remember to add the coding to each post for the challenge. :)
It's the Flintstones and the Rubbles: Betty and Barney Rubble and Fred and Wilma Flintstone! I adore the Fred nail. I never realized this shade of blue and orange went together so well.
For the nude polish lovers out there I definitely recommend trying to find Color Fever Seashell. I had someone tell me they also found it in the CQ bottles with the same name and number. Seashell is nearly a perfect match for my skin tone. It's a really beautiful nude that has slightly more than a hint of pink. This is one coat!! There is still a small amount of visible nail line and that's not usually my thing, but I love it with this color.
I think I finally figured out the whole inlinkz thing so check out the other manis by some really lovely artists for this part of the challenge. Hopefully I'll remember to add the coding to each post for the challenge. :)
Monday, March 4, 2013
X is for ...
I'm back!! My new computer arrived Saturday, and I spent the weekend getting it set up. The actual setup was easy and took minutes, but the little details of everyday use are a bit harder. You don't realize all the little things (like font, text size, saved passwords, desktop icons) about your computer you take for granted until they look almost right but are just wrong enough to really bug you. I'm still working on getting those little things fixed, but it feels so great to be back!! :)
Being back means I have some nail art to catch up on — like ABC Challenge posts. The challenge is coming to an end this Wednesday, and I still haven't posted my X mani.
X is for ... X-Men.
The uniforms were weird enough to catch my eye; bright yellow and black create an interesting contrast. I'm oddly reminded of Bumblebee from Transformers. The First Class uniforms have an odd black circle around the bellybutton area that has a yellow X cut straight through that I replaced on the chest area (or at least what I imagine is the chest area) with simple black letters to spell XMEN.
The hosts of the ABC Challenge have decided to start a new challenge once this one is over. It will be Inspired by Time Periods so be sure to check out the group if you'd like to join. It will certainly be challenging! :)
Also, what do you guys think of the new St. Patrick's Day layout? I went to change the header and buttons to something more festive like always and everything went wonky! I had to rearrange and recode almost everything. I think it looks much better though, neater and more organized ... at least for me. How's it look for everyone else? No overflow or anything weird like that?
Being back means I have some nail art to catch up on — like ABC Challenge posts. The challenge is coming to an end this Wednesday, and I still haven't posted my X mani.
X is for ... X-Men.
I knew immediately I wanted to use X-Men for X. I just wasn't exactly sure what kind of design I wanted to do for X-Men. I went searching and found the X-Men: First Class comics ... and the uniforms.
The uniforms were weird enough to catch my eye; bright yellow and black create an interesting contrast. I'm oddly reminded of Bumblebee from Transformers. The First Class uniforms have an odd black circle around the bellybutton area that has a yellow X cut straight through that I replaced on the chest area (or at least what I imagine is the chest area) with simple black letters to spell XMEN.
The hosts of the ABC Challenge have decided to start a new challenge once this one is over. It will be Inspired by Time Periods so be sure to check out the group if you'd like to join. It will certainly be challenging! :)
Also, what do you guys think of the new St. Patrick's Day layout? I went to change the header and buttons to something more festive like always and everything went wonky! I had to rearrange and recode almost everything. I think it looks much better though, neater and more organized ... at least for me. How's it look for everyone else? No overflow or anything weird like that?
Wednesday, December 12, 2012
Happy Hanukkah
Two posts in one day?? Yes!! There has been an influx of Hanukkah nail art, but I still come up with very little in search engines. I'm not Jewish, but I don't think there can ever be enough nail art for holidays, any holiday. So I felt it was my nail artist duty to contribute. :)
This is based around a really beautiful menorah I saw in one of my Hanukkah searches. There were, of course, four candle holders on each side and rising up from the middle was a Star of David candle holder. There were no candles in the holders in the picture but I could just imagine how stunning it would look all lit up. I just had to use that Star of David and put a candle on top.
As for the other nails, I thought this all deserved a beautiful and simple background to draw attention to the accent nail. After two disasters with tape, I finally just free-handed the stripes using China Glaze Blue Bells Ring over Pure Ice Silver Mercedes.
If there is ever a holiday coming up that you want to see nail art for let me know. I barely follow US holidays let alone those internationally, but I would love the chance to attempt nail art for your favorite holiday. Leave me a comment or Contact Me so I can mark them on my calendar. :)
This is based around a really beautiful menorah I saw in one of my Hanukkah searches. There were, of course, four candle holders on each side and rising up from the middle was a Star of David candle holder. There were no candles in the holders in the picture but I could just imagine how stunning it would look all lit up. I just had to use that Star of David and put a candle on top.
As for the other nails, I thought this all deserved a beautiful and simple background to draw attention to the accent nail. After two disasters with tape, I finally just free-handed the stripes using China Glaze Blue Bells Ring over Pure Ice Silver Mercedes.
If there is ever a holiday coming up that you want to see nail art for let me know. I barely follow US holidays let alone those internationally, but I would love the chance to attempt nail art for your favorite holiday. Leave me a comment or Contact Me so I can mark them on my calendar. :)
Wednesday, November 14, 2012
J is for ...
I'm pretty excited to share today's post with you. This is for the letter J in the ABC Challenge. J is for ... Jester.
I was inspired by Harley Quinn from Batman. Harley has always been one of my favorite Batman characters even though I don't read the comics or watch the animated series. Harley Quinn, as suggested by the play with her name, is clad in a traditional harlequin jester outfit. I used L.A. Colors Black and White with Wet n Wild I Red a Good Book to create this look. No tape was used in the making of this mani. You're stunned, I know. ;)
You can look to the Wikipedia article on Harley Quinn if you'd like to see my inspiration.
I was inspired by Harley Quinn from Batman. Harley has always been one of my favorite Batman characters even though I don't read the comics or watch the animated series. Harley Quinn, as suggested by the play with her name, is clad in a traditional harlequin jester outfit. I used L.A. Colors Black and White with Wet n Wild I Red a Good Book to create this look. No tape was used in the making of this mani. You're stunned, I know. ;)
You can look to the Wikipedia article on Harley Quinn if you'd like to see my inspiration.
Tuesday, October 23, 2012
Nail-Aween Frankenstein
I can't believe we are on Day 6 of the Nail-Aween Challenge already. With only 10 'days' in this challenge this means we are also coming closer and closer to the end. I plan to finish this challenge on Halloween.
Today's challenge was Frankenstein nails. I decided to do the basic green, stitched Frankenstein nail and added a Bride of Frankenstein accent nail. These are very simple but simple can be good too, and I think these turned out pretty great.
I'm going to be so sad when this challenge is over. I've really come to like them and would love to be part of another. They do have to be flexible enough that I don't have to post daily though. If anyone knows of any upcoming challenges that will let me work on a flexible schedule let me know please.
Also, check out the other wonderful artists doing this challenge with me. They have come up with some really great nails!!
Today's challenge was Frankenstein nails. I decided to do the basic green, stitched Frankenstein nail and added a Bride of Frankenstein accent nail. These are very simple but simple can be good too, and I think these turned out pretty great.
I'm going to be so sad when this challenge is over. I've really come to like them and would love to be part of another. They do have to be flexible enough that I don't have to post daily though. If anyone knows of any upcoming challenges that will let me work on a flexible schedule let me know please.
Also, check out the other wonderful artists doing this challenge with me. They have come up with some really great nails!!
(List includes blogs and FB pages)
Friday, October 19, 2012
Nail-Aween Ghosts
The next in the Nail-Aween Challenge was a choice between ghost or goblin. I chose to do ghost, but I wanted to do something a bit different than simple ghosts on my nails.
With this in mind I did Casper and the Ghostly Trio: Stretch, Fatso and Stinky. What I couldn't manage to get in the picture is the glitter. I used a glow in the dark glitter on the Ghostly Trio, not for the glow, but for the slightly green tinge and the small bits of glitter to give them a ghostly sparkle. I used Sinful Colors Pearl Harbor for Casper.
The other Sinful Colors I used is Snow Me White. I just picked this up in my last shopping trip since my China Glaze White on White has run out. I never seem to be able to get to Sally Beauty to pick up more, so I had to settle. However, settling really isn't a bad thing. I like the texture of China Glaze better but Sinful Colors is a really awesome one coat white. I used two coats just to be extra sure it was perfect since I was just doing lines, but one coat would have worked perfectly. If you are looking for a one coat white, Snow Me White is definitely it.
With this in mind I did Casper and the Ghostly Trio: Stretch, Fatso and Stinky. What I couldn't manage to get in the picture is the glitter. I used a glow in the dark glitter on the Ghostly Trio, not for the glow, but for the slightly green tinge and the small bits of glitter to give them a ghostly sparkle. I used Sinful Colors Pearl Harbor for Casper.
The other Sinful Colors I used is Snow Me White. I just picked this up in my last shopping trip since my China Glaze White on White has run out. I never seem to be able to get to Sally Beauty to pick up more, so I had to settle. However, settling really isn't a bad thing. I like the texture of China Glaze better but Sinful Colors is a really awesome one coat white. I used two coats just to be extra sure it was perfect since I was just doing lines, but one coat would have worked perfectly. If you are looking for a one coat white, Snow Me White is definitely it.
Wednesday, October 10, 2012
E is for ...
I had so many ideas on what to do for E in the ABC Challenge. I may still attempt some of them after Halloween. But, in the end E is for ... Eeyore!!
There's really not much to say about this mani. I'm pretty disappointed in my freehand Eeyore. It's not up to my usual standards. He started out so well too, and I have no idea where he went wrong. Still, I love Sinful Colors Beautiful Girl, and I love the cloud pattern on this pink! That and Eeyore's tail really saved this mani, in my opinion.
Check in tomorrow for my favorite Nail-Aween mani yet. I don't think anything else I come up with for this Halloween inspired challenge could beat it.
There's really not much to say about this mani. I'm pretty disappointed in my freehand Eeyore. It's not up to my usual standards. He started out so well too, and I have no idea where he went wrong. Still, I love Sinful Colors Beautiful Girl, and I love the cloud pattern on this pink! That and Eeyore's tail really saved this mani, in my opinion.
Check in tomorrow for my favorite Nail-Aween mani yet. I don't think anything else I come up with for this Halloween inspired challenge could beat it.
Thursday, October 4, 2012
The Best Kind of Potatoes
Last Saturday my mom, my niece and I went to a local festival called PotatoFest. It's one of my favorite fall festivals, second only to the Fall Foliage Festival happening this weekend. The city that holds the festival is the second largest supplier of potatoes in the state so it's kind of a big deal. PotatoFest is, naturally, all about potatoes and the people who grow them. The festival has food, crafts, and live bands that take up a few blocks of the city for just one day every year. My mom goes for the crafts but I go for the potatoes! Sweet potato fries to be specific. Also love the potato candy and the maple syrup booth with some of the most amazing lollipops in existence—maple lollipops!!
I couldn't let this day pass without some equally amazing nail art.
What else could I possibly do for PotatoFest besides Mr. Potato Head nails? I used China Glaze Desert Sun as my base color. I wanted to give these nails more of a sweet potato coloring than the more brown color of regular potatoes. I added hearts to show my utter love of potatoes, especially sweet potatoes and sweet potato fries.
This is my rarely seen right hand with Mrs. Potato Head and more hearts. I'm sorry for the poor lighting and the awkward angle of this picture. I was racing against the setting sun and my camera just wasn't made to be used by a left hand.
I couldn't let this day pass without some equally amazing nail art.
What else could I possibly do for PotatoFest besides Mr. Potato Head nails? I used China Glaze Desert Sun as my base color. I wanted to give these nails more of a sweet potato coloring than the more brown color of regular potatoes. I added hearts to show my utter love of potatoes, especially sweet potatoes and sweet potato fries.
This is my rarely seen right hand with Mrs. Potato Head and more hearts. I'm sorry for the poor lighting and the awkward angle of this picture. I was racing against the setting sun and my camera just wasn't made to be used by a left hand.
Wednesday, September 26, 2012
C is for ...
Here is my mani for C in the ABC Challenge. I had so many ideas for C. The classic caged bird flying away design, cats, checkered, color blocking. However, I finally decided C is for ...
Chucky complete with blood drips. The Bride of Chucky movie is definitely one of my favorite 'horror' movies, right up there with Seed of Chucky. The only horror movies I like more are the Resident Evil movies.
I love the blood drips over white in this mani. These come from a tutorial over at Nails by Kayla Shevonne. I was left slightly disappointed at my Chucky. He came together so well but the overall effect just doesn't scream Chucky at me. I don't think I managed to capture that essential craziness he does so well.
However, this mani is chilling no matter if it looks completely like Chucky. So, if I must, C can also be for chilling.
Chucky complete with blood drips. The Bride of Chucky movie is definitely one of my favorite 'horror' movies, right up there with Seed of Chucky. The only horror movies I like more are the Resident Evil movies.
I love the blood drips over white in this mani. These come from a tutorial over at Nails by Kayla Shevonne. I was left slightly disappointed at my Chucky. He came together so well but the overall effect just doesn't scream Chucky at me. I don't think I managed to capture that essential craziness he does so well.
However, this mani is chilling no matter if it looks completely like Chucky. So, if I must, C can also be for chilling.
Friday, September 14, 2012
Resident Evil: Retribution
Hello girlies! I'm sorry for the long wait between posts. There's been some super huge 'end of spring' cleaning happening in my house and I managed to cut my finger. I wanted to let it heal a bit before risking nail polish remover. That said, I should have enough room for another nail polish drawer before I know it!! ♥
However, I could't let the theater debut of the new Resident Evil movie (Resident Evil: Retribution) pass without some nail art!! I apologize for the extreme brightness of this picture. I had to take it with flash since the sunlight made the red disappear completely into the black.
I knew immediately what I wanted to do for this design. It was getting it onto my nails that was nearly impossible. I decided to create my own nail stickers in hopes of making the completion of this design easier. The Umbrella symbol was made so much easier with this method. It gave me a flat surface to work on, one that I could twist and turn to get the best angle. A dot in the middle, triangles in alternating red and white around this dot, and curved tops. I did blood splatter as I always do, but I loved the way nail stickers gave me the option of choosing the splatter pattern I wanted instead of having to go with what came out of the straw.
The hardest part by far was the bloody fingerprint. It had me almost giving up a few times before I came up with a design I liked. While this idea came from a tutorial I found on deviantART, I had to adapt it so that it would work for me and this design. I painted the pad of my index finger with black and stamped a fingerprint onto my homemade sticker. I left my finger on the sticker until it was almost permanently stuck so that it would leave an imprint on the sticker just in case the black polish didn't get left behind right. With a small brush I traced an approximation of my fingerprint over the black. It wasn't exact but it came through well enough to get the idea across.
So, what's your favorite horror movie? While I used to be a huge horror movie buff The Resident Evil series and the Bride of Chucky are just about the only horror movies I'll watch anymore unless I'm feeling nostalgic.
However, I could't let the theater debut of the new Resident Evil movie (Resident Evil: Retribution) pass without some nail art!! I apologize for the extreme brightness of this picture. I had to take it with flash since the sunlight made the red disappear completely into the black.
I knew immediately what I wanted to do for this design. It was getting it onto my nails that was nearly impossible. I decided to create my own nail stickers in hopes of making the completion of this design easier. The Umbrella symbol was made so much easier with this method. It gave me a flat surface to work on, one that I could twist and turn to get the best angle. A dot in the middle, triangles in alternating red and white around this dot, and curved tops. I did blood splatter as I always do, but I loved the way nail stickers gave me the option of choosing the splatter pattern I wanted instead of having to go with what came out of the straw.
The hardest part by far was the bloody fingerprint. It had me almost giving up a few times before I came up with a design I liked. While this idea came from a tutorial I found on deviantART, I had to adapt it so that it would work for me and this design. I painted the pad of my index finger with black and stamped a fingerprint onto my homemade sticker. I left my finger on the sticker until it was almost permanently stuck so that it would leave an imprint on the sticker just in case the black polish didn't get left behind right. With a small brush I traced an approximation of my fingerprint over the black. It wasn't exact but it came through well enough to get the idea across.
So, what's your favorite horror movie? While I used to be a huge horror movie buff The Resident Evil series and the Bride of Chucky are just about the only horror movies I'll watch anymore unless I'm feeling nostalgic.
Saturday, September 1, 2012
Doctor Who Season Premiere
'ello girlies! I don't know about anyone else, but I am so excited about the new season of Doctor Who that premieres tonight!! I was just brimming with Doctor Who nail art ideas. In my mind, I just have to have Doctor Who nails to watch the premiere. :)
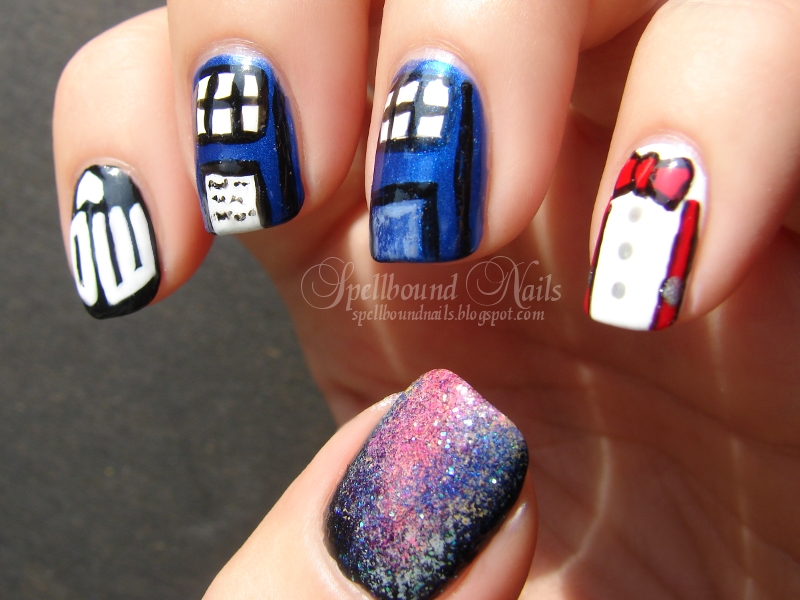
On my pinky nail is the Doctor's bow tie and suspenders. The middle and ring finger each have a Tardis door complete with the sign on the middle finger. I thought it was a cute and clever idea, almost like being able to open the doors if I could just move my fingers right. The index finger has the Doctor Who, DW, logo.
And what Doctor Who design is complete without at least one galaxy nail??
On my pinky nail is the Doctor's bow tie and suspenders. The middle and ring finger each have a Tardis door complete with the sign on the middle finger. I thought it was a cute and clever idea, almost like being able to open the doors if I could just move my fingers right. The index finger has the Doctor Who, DW, logo.
And what Doctor Who design is complete without at least one galaxy nail??
Thursday, June 7, 2012
The Dalek Rule This Galaxy
I mentioned on my Facebook page last week that I was doing my first galaxy nail. I also mentioned that I had to put my own spin on them. I left you all in the dark on just what kind of spin. Well, it's a Doctor Who spin. Most of you probably won't recognize the Doctor Who reference, but I hope you enjoy the nails anway. I thought of using the Tardis but I decided to go the road less traveled and do a Dalek ... or maybe just Dalek inspired since it's not a perfect replica.
What galaxy is complete without a Dalek or two? None, I tell you, none! The Dalek nails aren't something just anyone would recognize, but it's a nice in-joke among fans. I'm just curious, how many of you recognized the nail right away or got excited when you read the title?
Some of you may recognize this gold nail from last post's Golden Twilight nails. Not only is the color Bold Gold ... it's the same nail! I took off the Twilight Rays color but kept Bold Gold. It has held up very nicely, hasn't it? I just added the Born Pretty gold nail studs and a few layers of top coat to keep them in place. The nail studs are a great match in color for Bold Gold and make for a near perfect Dalek!
I was utterly terrified of doing galaxy nails after hearing all the horror stories, but I think these turned out really well being my first try and all.
I decided to use a creme black for space but stuck to shimmer polishes for the galaxies. The stars dotted on are a white creme. I also used this white for the galaxy base. The galaxies are made up of shimmer yellow, orange, and peach for the lighter shades and a deep shimmer metallic purple and a shimmer blue for the darker shades. I used a purple glitter, a blue holo glitter, a silver holo glitter, and a simple fine glitter for the stars not dotted on. It was all very shiny and glittery!
I couldn't resist bringing out my blue/white light and seeing what they looked like under that. I think it was one of my better ideas to use only shimmer and glitter polishes.
For those looking for simpler solution to using a sponge, whether for galaxy nails or gradients or any other nail where a sponge would come in handy, use an eyeshadow applicator. I found this worked so much better for me than any kind of sponge. Not only did I pick up a pack of 12 (60mm) applicators for cheap at my local dollar store, I had better control while using them. They are made to fit in your hand so they keep a wet mani intact while you do the opposite hand and are small enough to move around your entire nail easily. I can also use and reuse these. For these nails, I only used one side of an applicator! Not even the front and back of one side, just one side.
So, what do you guys think of galaxy nails? I know I will definitely be doing these again!
Polish Used
LA Colors - Black
Sally Hansen - White On
Pure Ice - Unzip Me
Pure Ice - Twinkle
Revlon - Tangerine
Funky Fingers - Power Chord
China Glaze - Blue Year's Eve
L.A Girl Glitter Addict - Eutopia
Funky Fingers - Flashing Lights
Wet n Wild - Kaleidoscope
LA Colors - Glitter
I mentioned on my Facebook page last week that I was doing my first galaxy nail. I also mentioned that I had to put my own spin on them. I left you all in the dark on just what kind of spin. Well, it's a Doctor Who spin. Most of you probably won't recognize the Doctor Who reference, but I hope you enjoy the nails anway. I thought of using the Tardis but I decided to go the road less traveled and do a Dalek ... or maybe just Dalek inspired since it's not a perfect replica.
What galaxy is complete without a Dalek or two? None, I tell you, none! The Dalek nails aren't something just anyone would recognize, but it's a nice in-joke among fans. I'm just curious, how many of you recognized the nail right away or got excited when you read the title?
Some of you may recognize this gold nail from last post's Golden Twilight nails. Not only is the color Bold Gold ... it's the same nail! I took off the Twilight Rays color but kept Bold Gold. It has held up very nicely, hasn't it? I just added the Born Pretty gold nail studs and a few layers of top coat to keep them in place. The nail studs are a great match in color for Bold Gold and make for a near perfect Dalek!
I was utterly terrified of doing galaxy nails after hearing all the horror stories, but I think these turned out really well being my first try and all.
I decided to use a creme black for space but stuck to shimmer polishes for the galaxies. The stars dotted on are a white creme. I also used this white for the galaxy base. The galaxies are made up of shimmer yellow, orange, and peach for the lighter shades and a deep shimmer metallic purple and a shimmer blue for the darker shades. I used a purple glitter, a blue holo glitter, a silver holo glitter, and a simple fine glitter for the stars not dotted on. It was all very shiny and glittery!
Image from Alibaba.com
For those looking for simpler solution to using a sponge, whether for galaxy nails or gradients or any other nail where a sponge would come in handy, use an eyeshadow applicator. I found this worked so much better for me than any kind of sponge. Not only did I pick up a pack of 12 (60mm) applicators for cheap at my local dollar store, I had better control while using them. They are made to fit in your hand so they keep a wet mani intact while you do the opposite hand and are small enough to move around your entire nail easily. I can also use and reuse these. For these nails, I only used one side of an applicator! Not even the front and back of one side, just one side.
So, what do you guys think of galaxy nails? I know I will definitely be doing these again!
Polish Used
LA Colors - Black
Sally Hansen - White On
Pure Ice - Unzip Me
Pure Ice - Twinkle
Revlon - Tangerine
Funky Fingers - Power Chord
China Glaze - Blue Year's Eve
L.A Girl Glitter Addict - Eutopia
Funky Fingers - Flashing Lights
Wet n Wild - Kaleidoscope
LA Colors - Glitter
Thursday, April 19, 2012
Chessur Disaster
Not all my nail designs work out. I, like everyone else, have off days and disasters. I call today's post the 'Chessur Disaster'.
For those who don't know, Chessur is the Cheshire Cat of Tim Burton's, Alice in Wonderland. This is one of my favorite movies and I dream of one day having a Cheshire tattoo complete with the Mad Hatter's top hat. I love any Alice in Wonderland but Burton always adds a certain flair to everything he touches that I simply adore.
In addition to being a simple tribute to such a wonderful movie, it is National Pet Month. I have my own pets that I adore, but I would love a Cheshire Cat of my own. Who wouldn't??
As you can see, this isn't my best mani. I tried something a bit different and it didn't work out. It happens to all of us. The thing to remember is: don't dwell. Seriously! Pick yourself back up, mop up those tears (if there are any), and move on. Thankfully, I realized what a disaster this was before I completed more than this hand. Yes, this turned into a one-handed design! The polish stayed on only long enough to take these pictures and then I moved on. C'est la vie!
Polish Used
For those who don't know, Chessur is the Cheshire Cat of Tim Burton's, Alice in Wonderland. This is one of my favorite movies and I dream of one day having a Cheshire tattoo complete with the Mad Hatter's top hat. I love any Alice in Wonderland but Burton always adds a certain flair to everything he touches that I simply adore.
In addition to being a simple tribute to such a wonderful movie, it is National Pet Month. I have my own pets that I adore, but I would love a Cheshire Cat of my own. Who wouldn't??
As you can see, this isn't my best mani. I tried something a bit different and it didn't work out. It happens to all of us. The thing to remember is: don't dwell. Seriously! Pick yourself back up, mop up those tears (if there are any), and move on. Thankfully, I realized what a disaster this was before I completed more than this hand. Yes, this turned into a one-handed design! The polish stayed on only long enough to take these pictures and then I moved on. C'est la vie!
Polish Used
- Borghese - Brilliante
- New York Color - Sidewalkers
- New York Color - East Village
- LA Colors - Black
- LA Colors - White
- Sally Hansen HD - Resolution
- Sally Hansen - Fuchsia Power
Subscribe to:
Posts (Atom)