Showing posts with label Sally Hansen. Show all posts

Wednesday, May 14, 2014

Aloha Baby - Sally Hansen #iHeartNailArt Contest

Hello lovelies! I have nail art to share!! It's been awhile, I know, but I'm really trying to do my nails more often. I call this one Aloha Baby and it is entered in Sally Hansen's #iHeartNailArt contest. This month's theme is Color Destinations, and I really think this saran wrap mani with birds, a palm tree, and Aloha on the thumb really fits the theme. If you like this design, think it fits the theme, and have a few minutes I would really appreciate a vote on the Sally Hansen website. Just follow this link and click the vote button at the top of the picture.


To do this mani I started with a base of 2 coats white. Once that was completely dry I used crumpled saran wrap to dab Sally Hansen Blue-Away across all my nails. While it was still wet I used another piece of crumpled saran wrap to dab my nails with Sally Hansen Snappy Sorbet; this made sure that the colors blended in places. It's not necessary but I went back over my nails again with both colors to get the coverage I wanted. I added a top coat and allowed them to dry completely before using the black Sally Hansen nail art pen to draw the birds, palm tree, and to write Aloha across my thumb. I had a little trouble on the palm tree; the polish came out of the pen a little too quickly so the tree ended up thicker than I would have liked (but is at least still shaped like a palm tree) but was perfect for the other designs. This was seriously the easiest time I've ever had writing on my nails!! Just remember to keep the pressure light and if you start to see things getting too thick swipe the tip of the pen across a piece of paper to get the excess polish off and continue drawing.

Until next time,
♥ Ashley

Monday, July 15, 2013

Sally Splatter and Real Life Love

Hello everyone!! I have a bit of nail art for you and some real life love. :)

I'll start with the nail art since I figure that's what you're here for.

nail art Sally Hansen Splatter Spellbound Nails Fuchsia Power Lacey Lilac Blue Me Away

I've been calling this one Sally Splatter in my head and it's been sitting in my nail art folder for a few weeks at least. I started with my own white base and used Sally Hansen Fuchsia Power, Lacey Lilac, and Blue Me Away! It uses only Sally Hansen nail polish and is a splatter mani hence the name. Very original, right? ;)

Ready for some real life love?

rain clouds real life

There's been a lot of rain and nasty storms this summer. Dark storm clouds like this just roll in suddenly and let loose floods of rain water. Not fun when vacation is barely weeks away and I'm still working on my tan!

sunset real life

sunset real life

Still, all that rain (if it stops before nightfall) does create the most stunningly gorgeous sunsets. And if you're wondering, yes, the rain and the sunset pics were taken on the same day. :)

moon macro close up detailed

And leaves the moon so bright and clear! Like, with the rest of the world around me, it was washed clean in the rain water.

While I want more than anything for some hot summer days I wouldn't give up these beautiful nights for anything!

Thursday, April 18, 2013

Disney Challenge: Beauty and the Beast

I'm almost embarrassed about this one, but here it is. My Beauty and the Beast mani for the Disney Challenge.


Disney nail art Challenge Beauty and the Beast yellow Sally Hansen Lightening music notes white rose magic magical wilting Princess nails Spellbound

Nothing went right with this design. I realized quickly that I need new yellow polish because the Sally Hansen Lightening was insanely hard to work with! Then I knocked over TWO bottles of polish, one of them almost ending up in  my lap (while I was wearing my favorite pants). My nail art brush is in major need of a good clean ... or maybe I just need a new brush. Yikes!

So yeah, a bit embarrassed about this mani. I used yellow to match Belle's infamous dress, drew random music notes across my nails, and then finished with the magical wilting rose.


Up next: Bambi. Thankfully, I think I have an idea for this one!

A small update on my polish. I am working like a crazy person for a huge release of new polish and a restock of old. :)

Tuesday, March 26, 2013

Weekend Haul

*All products in this post were purchased by me.

Hello everyone! I picked up a few things this weekend at some really awesome prices so I thought I'd do a haul post. :)


First up: L.A. Colors neons. I adore these!! I stopped in at the local Dollar Store to pick up some rolls for Sunday dinner and couldn't resist taking a browse through the nail polish. I found Mint, Hottie, Pink Bubbles, In A Flash, and Tangerine. I was in a hurry or I would have dug out the neon purple I'm sure I saw at the bottom of the bin too. See Pink Bubbles on my toes in the picture collage below. Having a neon polish on my toes is a must for spring and summer!


Saturday, I picked up these pretties from the Rite Aid sale bin ... well, all but the NYC polish; it, and a few other products, were marked at 75% off!! The sale bin seems to be drying up sadly, but I hold out hope that more polishes will be moved there soon. From left to right: Battery Park Purple, Tahitian Green, Strength of Pink, Figi, and Corduroy.


Also on for 75% off was this gorgeous NYC Lip Plumper in Plum Tart. I got this for $0.99!!! I didn't get it for the plumper ... okay, I didn't get it only for the plumper. The color is just so pretty! It's actually much lighter in person. I think of a nude gloss with a drop of plum color mixed in to give your lips a very natural shimmery flush of color. I didn't notice any real plump to my lips but it did have a slightly minty scent and did cause some tingling to my lips. Almost like getting toothpaste on your lips while brushing your teeth; I found it causes nearly the same amount of tingling for me. I found it almost refreshing to be honest.


Also on Saturday I found some really awesome sale items in Boscov's. This white sweater was an amazing find. It is so very, very comfy and is light enough to last in my wardrobe through Spring. And was a steal at $5.99! I also picked up a lovely gray blazer (no pics yet). I love blazers!! They are an essential part of my wardrobe! To find one for $9.99 was brilliant, but to get up to the checkout and have the sale's women scan it up as $5.99 was stunningly brilliant!

The one thing I didn't get on sale was the shoes. I saw them two weeks ago and fell in love — which is odd because I can't stand flats. I've been told many times that I must have been born with my heels because the only time I'm without them is when I'm not wearing any shoes at all. When I saw them this weekend I couldn't let them go again. Especially after trying them on and seeing how comfortable they are. I honestly expected to try them on and have them fit like all the other flats. They would surely feel weird and hurt the backs of my feet, but these lovelies didn't hurt at all and they fit perfectly! They are so me. An oddly fitting combo of nude and neon color with an awesome spiked toe. They were about $17 — which is a steal in and of itself for a pair of shoes today!

And my new shoes match my new neon pink nail polish! I hate feet, abhor them really, but I wanted to show off my neon toes too much. I kept the picture small and hope it doesn't make anyone cringe too badly. And yes, that is snow between the gaps of my porch. Yes, yes I did stand outside in my bare feet to get this picture. Dedication to my blog at its best ... or worst?

*All products in this post were purchased by me.

Monday, March 11, 2013

Pastel Gradient with Born Pretty Store Studs

Hello again! Gradients seem to be the thing for me lately. I think it's the coming of Spring and Summer; I'm just preparing! So I dug out the most pastel colors I own for a pretty and feminine spring gradient — a little early, but it would be perfect for Easter.

nails nailart nail art polish mani manicure Spellbound Lacquer pastel gradient Born Pretty Store metal studs rhinestones Revlon Enchanting Sally Hansen Pink Blink Petites Color Fever Creme Blue Spring Summer feminine elegant

Those most pastel colors I own just happened to be Sally Hansen Pink Blink, Petites Color Fever Creme Blue, and Revlon Enchanting. I decided to try a makeup sponge with this gradient instead of my usual eyeshadow applicator. I like the smooth fade between colors, but I didn't like the extra work it took to get the colors built up. I also thought it was beyond time to break out my Born Pretty Store gold metal studs. I received these by mistake with an old order and they were nice enough to let me keep them while also shipping out the ones I did order. It's been too long since I played with these studs. ;)

I'm thinking it's also been too long since I ordered anything from the Born Pretty Store. I forgot how awesome their nail decorations are! And they've come out with so much more since my last order. I'm dying for the hearts ... and the squares ... and the stars ... and ... well, I think you get the idea! I'll definitely be ordering something. 


You can use the code MLE10W21 at checkout for 10% off your order if you decide to purchase something from the Born Pretty Store too!

Wednesday, March 6, 2013

Y is for ...

I am so sad to see the ABC Challenge end. Especially since I am running behind. Still, I'm looking forward to the start of the new nail art challenge: Inspired by Time Periods. This challenge will be hosted in the same group as the ABC Challenge so don't think you're in the wrong place when you click the link! Still, until then, I have Y and Z left to do. Thankfully, this post takes care of Y.

Y is for ... Cracked Eggs and Dripping Yolk.

nails nailart nail art polish mani manicure Spellboud Lacquer ABC Challenge Y is for Cracked Eggs and Dripping Yolk texture sponge L.A. LA Colors White NYC New York Color Matte Me Crazy Sally Hansen Lightening Sun Kissed Seche Vite

I really wanted to finish this challenge the way I started ... by doing the unusual and being different. So I went with yolk.

nails nailart nail art polish mani manicure Spellbound Lacquer ABC Challenge Y is for Cracked Eggs and Dripping Yolk texture sponge L.A. LA Colors White NYC New York Color Matte Me Crazy Sally Hansen Lightening Sun Kissed Seche Vite

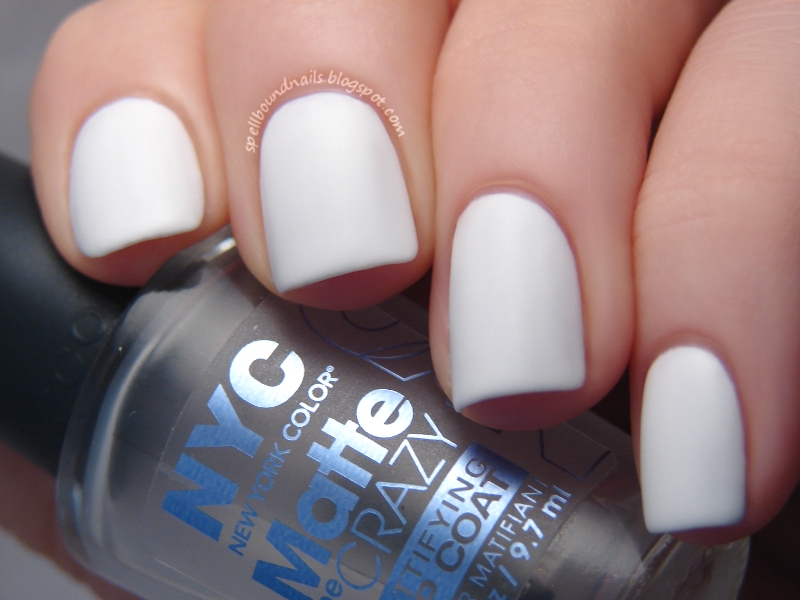
I started with two coats of L.A. Colors Energy Source and put a coat of NYC Matte Me Crazy over it to give it a very awesome smoothly matte look. I think this alone would be a totally wearable look!

nails nailart nail art polish mani manicure Spellbound Lacquer ABC Challenge Y is for Cracked Eggs and Dripping Yolk texture sponge L.A. LA Colors White NYC New York Color Matte Me Crazy Sally Hansen Lightening Sun Kissed Seche Vite

Still, we all know eggs aren't really smooth. They're kind of speckled and dimpled if you look close enough. So I took a piece of makeup sponge and dabbed on a bit more white. I know! So much different from my usual eyeshadow applicator.

nails nailart nail art polish mani manicure Spellbound Lacquer ABC Challenge Y is for Cracked Eggs and Dripping Yolk texture sponge L.A. LA Colors White NYC New York Color Matte Me Crazy Sally Hansen Lightening Sun Kissed Seche Vite

After that, I drew on the egg yolk drips with Sally Hansen Lightening and outlined them with a mix of Lightening and Sally Hansen Sun Kissed. I kinda wish I had added a bit of fake light reflection with this mixture too, but I really like the finished look. To make the yolk really shiny and keep the matte look of the egg I actually used a nail art brush to put Seche Vite on just the drips.

Monday, March 4, 2013

X is for ...

I'm back!! My new computer arrived Saturday, and I spent the weekend getting it set up. The actual setup was easy and took minutes, but the little details of everyday use are a bit harder. You don't realize all the little things (like font, text size, saved passwords, desktop icons) about your computer you take for granted until they look almost right but are just wrong enough to really bug you. I'm still working on getting those little things fixed, but it feels so great to be back!! :)

Being back means I have some nail art to catch up on — like ABC Challenge posts. The challenge is coming to an end this Wednesday, and I still haven't posted my X mani.

X is for ... X-Men.


nails nailart nail art mani manicure polish Spellbound Lacquer design freehand ABC Challenge X-Men character First Class uniform costume black yellow L.A. LA Colors Sally Hansen Lightening comic comics Marvel

I knew immediately I wanted to use X-Men for X. I just wasn't exactly sure what kind of design I wanted to do for X-Men. I went searching and found the X-Men: First Class comics ... and the uniforms.

nails nailart nail art mani manicure polish Spellbound Lacquer design freehand ABC Challenge X-Men character First Class uniform costume black yellow L.A. LA Colors Sally Hansen Lightening comic comics Marvel

The uniforms were weird enough to catch my eye; bright yellow and black create an interesting contrast. I'm oddly reminded of Bumblebee from Transformers. The First Class uniforms have an odd black circle around the bellybutton area that has a yellow X cut straight through that I replaced on the chest area (or at least what I imagine is the chest area) with simple black letters to spell XMEN.


Challenge Inspired by Time Periods Jurassic Era Neanderthal Stone Age Ancient Egypt Mayan Greece Rome Medieval Imperial China Renaissance Victorian Industrial Roaring 20s 1950s 1960s 1970s 1980s 1990s Futuristic

The hosts of the ABC Challenge have decided to start a new challenge once this one is over. It will be Inspired by Time Periods so be sure to check out the group if you'd like to join. It will certainly be challenging! :)

Also, what do you guys think of the new St. Patrick's Day layout? I went to change the header and buttons to something more festive like always and everything went wonky! I had to rearrange and recode almost everything. I think it looks much better though, neater and more organized ... at least for me. How's it look for everyone else? No overflow or anything weird like that?

Wednesday, February 20, 2013

Rainbow Gradient

Today is supposed to be my X nail art for the ABC Challenge, but I'm stumped on what to do for this letter. I'll think of something by next challenge ... hopefully. For now, check out the rainbow gradient I wore last weekend.

nails nailart nail art polish mani manicure Spellbound Lacquer fun cute sweet rainbow gradient eyeshadow applicator sponge sponged sponging red orange yellow green blue purple colorful Rimmel English Rose Sinful Colors Hazard Sally Hansen Lightening Green with Envy Wet n Wild I Need a Refresh-Mint On a Trip

I hate the claw, but it's pretty much the only position in nails that need to include the thumb. Some of you may remember the sideways rainbow gradient from my NOH8 nails. I wanted to try something different this time so I did them as a normal gradient. I found the lightest rainbow colors from my collection to use for this.

nails nailart nail art polish mani manicure Spellbound Lacquer fun cute sweet rainbow gradient eyeshadow applicator sponge sponged sponging red orange yellow green blue purple colorful

Here are my nails before clean-up. So messy!!! I usually tape around my nails before doing something this messy, but I forget. Isn't that the way things usually go? You only forget something that would speed things up when you're in a hurry!

nails nailart nail art polish mani manicure Spellbound Lacquer fun cute sweet rainbow gradient eyeshadow applicator sponge sponged sponging red orange yellow green blue purple colorful Rimmel English Rose Sinful Colors Hazard Sally Hansen Lightening Green with Envy Wet n Wild I Need a Refresh-Mint On a Trip Rimmel English Rose Sinful Colors Hazard Sally Hansen Lightening Green with Envy Wet n Wild I Need a Refresh-Mint On a Trip

I took this picture in the car. It was snowing so hard and then a little bit of sunlight peeked through, and I couldn't resist snapping a few pics. It's not up to my usual standard, but there's something I really like about this picture.

 Rimmel English Rose Sinful Colors Hazard Sally Hansen Lightening Green with Envy Wet n Wild I Need a Refresh-Mint On a Trip

I couldn't resist getting a picture of my cotton ball after I removed the gradient. I'm reminded of a clown's wig, lol.

Colors Used: Rimmel English Rose, Sinful Colors Hazard, Sally Hansen Lightening, Sally Hansen Green with Envy, Wet n Wild I Need A Refresh-Mint, Wet n Wild On a Trip

Tuesday, February 12, 2013

I'm Having Mixed Feelings

Hello everyone!! Today's post is a very simple Valentine's Day mani since I've been hard at work on the really awesome nail art coming tomorrow and Thursday.

nails nailart nail art polish mani manicure Spellbound Lacquer glitter bars squares hearts red pink grey gray saran wrap Mixed Feelings indie holiday V-Day Valentine's Valentines Day Sally Hansen Pink Blink NYC New York Color Sidewalkers

I started with a saran wrap mani using Sally Hansen Pink Blink and New York Color Sidewalkers. I admit deciding to change my original idea of stripes to a saran wrap mani wasn't the best choice; I'm not perfect! Still, topping it all with Mixed Feelings was the right choice. And I guess with a name like Mixed Feelings the pink and grey kind of fits.

Mixed Feelings is an unreleased Valentine's Day polish of mine. If there's enough interest I may decide to release it later on though so definitely let me know if you want it. It's perfect for Valentine's Day, but would make a good every day polish. Also, don't forget to check out my Etsy shop next week for new polishes!!

Tuesday, February 5, 2013

I Give You My Hearts

Continuing with the Valentine's Day theme, the mani I bring you today is another of my attempts to use colors other than the standard red, white, and pink ... though I do seem to be using a lot of pink with my recent manis. :)


When I first started with Sally Hansen Pink Blink and Revlon Enchanting, I was told this looked like an Easter mani. I lost some of my confidence at that, but I rallied and finished this mani as I had planned: with a line of hearts down the middle of each nail using the opposite color. Personally, I think it turned out really well for trying something slightly nontraditional!

If you're not comfortable using colors other than red, white and pink for Valentine's Day, this mani will work just as great with any combination of those colors! You could even use them all if you want, using pink and red on opposite nails and finishing with white hearts or use pink and white on your nails with red hearts. Maybe even spice it up with your own color combo! Be traditional or be daring, but whatever you choose: have fun!

A bit of real life news: I entered my adorable pup, Shiloh, in the World Spay Day 2013 Pet Pageant. The pageant runs until March 15th, and you can vote once per day in each category. I would love it if you would give Shiloh's entry a look and give her a vote if you think she deserves one. It will ask you to login or create an account to vote. If you click 'create an account to vote' you can then select to vote with Facebook. Thanks!!

Thursday, January 31, 2013

Saran Wrap Valentine's Day Nail Art Tutorial

Hello again everyone! I missed my post yesterday, but I have a really great excuse! It was mentioned in an answer to one of the 1st Blogiversary Giveaway entries that one of you wanted to see a Saran Wrap tutorial. There were more than a few of you who wanted to see video tutorials. So, I was spending all day yesterday editing my first real nail art video. I have a whole new level of respect for video bloggers!

nails nailart nail art polish mani manicure Spellbound Lacquer holiday Valentine's Day Valentine Valentines tutorial Sally Hansen Pink Blink white saran wrap tutorial video

Here are the nails I'll be showing you how to create in the video. This is a very easy mani to do, and with pink and white polish it is perfect for Valentine's Day!


I don't really have the set up or the best software/know-how for this, but I gave it my best shot. Enjoy!

Tuesday, January 29, 2013

Spun Sugar Gradient

Hey everyone! Sorry about the non-nail art related posts yesterday. There was a bit of an emergency Sunday that left me with no time to edit and type up posts. So, I went with what I did have. I do really hope to see a few of you joining me in the Blogs to Love Friday linkup. That said, today's post really is nail art!!


nails nailart nail art polish mani manicure Spellbound holiday Valentine's Day Sugar Spun Gradient Sally Hansen Pink Blink Fuchsia Power Wet n Wild I Red A Good Book Sinful Colors Beautiful Girl L.A. Colors white red Energy Source

I have a few ideas for Valentine's Day nails and this was one of the first I thought of — spun sugar Valentine's Day nails done as a gradient.


nails nailart nail art polish mani manicure Spellbound holiday Valentine's Day Sugar Spun Gradient Sally Hansen Pink Blink Fuchsia Power Wet n Wild I Red A Good Book Sinful Colors Beautiful Girl L.A. Colors white red Energy Source

Spun sugar nails are really easy. They are a bit messy but the wispy strings make it easy to clean up. I started with a base of two coats L.A. Colors white. This is Energy Source now that L.A. Colors started naming their polishes. The next step is probably the hardest and it's not hard at all! It just takes a bit of patience. I started at the tips of my nails and worked up using Sally Hansen Pink Blink first. Put a drop or two of your first color on a piece of paper, using a pin or a dotting tool mix the polish until it's thick. You can speed this along by blowing on it as you stir. You can start as soon as it's thick enough to start forming strings when you lift the pin out of the polish. I didn't wait long enough with my red polish and got some drips instead of strings, so make sure it's thick enough not to drip.

Once strings start to form you'll need to get your nail very close to the thick polish. Lay your finger on it's side angled towards the polish if you're having trouble getting the strings on your nail. Use your pin or dotting tool to quickly but smoothly pull strings across your nails, doing one nail at a time.


nails nailart nail art polish mani manicure Spellbound holiday Valentine's Day Sugar Spun Gradient Sally Hansen Pink Blink Fuchsia Power Wet n Wild I Red A Good Book Sinful Colors Beautiful Girl L.A. Colors white red Energy Source

Continue doing the tips of each nail with Pink Blink. You may need to thicken more polish if you didn't start with enough or if it thickened too quickly. I used Sinful Colors Beautiful Girl next. I placed some of my strings over some of the Pink Blink strings to create a seamless fade of color. After Beautiful Girl, I used Sally Hansen Fuchsia Power and then finished with Wet n Wild I Red A Good Book.

Let the polish dry. It shouldn't take long! Then do a quick cleanup. I pinched off some of the wispy strings that were flying around my nails and then used some nail polish remover and a Nail Tee (a fancy pointed Q-tip) to clean up the rest.


nails nailart nail art polish mani manicure Spellbound holiday Valentine's Day Sugar Spun Gradient Sally Hansen Pink Blink Fuchsia Power Wet n Wild I Red A Good Book Sinful Colors Beautiful Girl L.A. Colors white red Energy Source

Add top coat if you like and admire your new mani. Take into consideration when deciding whether to use top coat or not that, while it will make your mani last longer, it will smooth all those strings you just worked so hard on. It will likely take more than one coat as this is a very thick mani. It may also cause some bubbling if you're not careful applying your top coat.

That said, I did use top coat, two coats ... and I did get one large bubble that popped while the top coat dried and left behind a spot bare of top coat. It's really not noticeable though, even in my close-up pictures. I did kind of miss the stringed look though.

Friday, January 25, 2013

Candy Coated Collection — Peppermint Pinwheels

I've been reading through the new giveaway entries for the 'what do you want to see on my blog this year' question and there were a few who wanted Valentine's Day nail art and a few who wanted holiday nail art so I decided to tie a V-Day mani into one of my swatches.

Update: This polish and the rest of the collection are now up for sale in my Etsy shop.


nails nailart nail art polish mani manicure Spellbound Lacquer Candy Coated Collection Candyland Candy Land Peppermint Pinwheels red white hex square glitter indie Sally Hansen Pink Blink Emerald City pink green Valentine's Day holiday Christmas

Peppermint Pinwheels was inspired by the Peppermint Forests of Candyland and their mesmerizing swirls of red and white.

nails nailart nail art polish mani manicure Spellbound Lacquer Candy Coated Collection Candyland Candy Land Peppermint Pinwheels red white hex square glitter indie Sally Hansen Pink Blink Emerald City pink green Valentine's Day holiday Christmas

With its red squares and white hexes, Peppermint Pinwheels is perfect for everyday wear. But, layer it over the right color and it works great for holidays like Christmas and Valentine's Day. :)

nails nailart nail art polish mani manicure Spellbound Lacquer Candy Coated Collection Candyland Candy Land Peppermint Pinwheels red white hex square glitter indie Sally Hansen Pink Blink Emerald City pink green Valentine's Day holiday Christmas

I layered two very thin coats of Peppermint Pinwheels over Sally Hansen Emerald City for a festive Christmas look (I did actually do this around Christmas). Sadly, I added a layer of top coat over Emerald City too soon and caused some pretty bad streaking.


nails nailart nail art polish mani manicure Spellbound Lacquer Candy Coated Collection Candyland Candy Land Peppermint Pinwheels red white hex square glitter indie Sally Hansen Pink Blink Emerald City pink green Valentine's Day holiday Christmas

For a simple Valentine's Day mani, I used a base of Sally Hansen Pink Blink and a thin coat of Peppermint Pinwheels. You may remember Pink Blink from my recent haul. I couldn't ask for a better color. I think this is the most perfect V-Day pink ... actually, I think this is the most perfect pink EVER!! This is definitely the color of pink I think of when I think of my favorite color. :)


nails nailart nail art polish mani manicure Spellbound Lacquer Candy Coated Collection Candyland Candy Land Peppermint Pinwheels red white hex square glitter indie Sally Hansen Pink Blink Emerald City pink green Valentine's Day holiday Christmas

Here is a second, thicker coat of Peppermint Pinwheels.

More Valentine's Day manis will be coming soon. There are definitely a few I have sketched up that I want to try. :)

So, what do you gals think of the Candy Coated Collection so far? Have a favorite?

Wednesday, January 23, 2013

S is for ...

I was really inspired this weekend; I've really missed doing nail art! This is actually a design I sketched up and then realized that it worked perfectly for S in the ABC Challenge.

S is for ... Spring Scene.

nails nailart nail art polish mani manicure Spellbound ABC Challenge S is for Spring Scene flowers roses texture green leaf leafy white picket fence pink yellow LA Colors Wet n Wild Candy-licious Sinful Colors Exotic Green Revlon Garden eyeshadow applicator sponge sponged sponging

You should be expecting this by now, but I used my eyeshadow applicators and Revlon Garden and Sinful Colors Exotic Green to create a leafy texture as a base. The white picket fence came next, hand drawn with a nail art brush, and the flowers were started with a dotting tool and finished with a nail art brush.

nails nailart nail art polish mani manicure Spellbound ABC Challenge S is for Spring Scene flowers roses texture green leaf leafy white picket fence pink yellow LA Colors Wet n Wild Candy-licious Sinful Colors Exotic Green Revlon Garden eyeshadow applicator sponge sponged sponging

With recent temperatures reaching into the single digits, I'm really longing for some flowers!

Be on the lookout tonight for another ABC Challenge mani as I finally get caught up. :)

Monday, January 21, 2013

Rite Aid Haul

I was very lucky to visit Rite Aid yesterday as I was told they were switching out their stock, trading old polishes for new ones. The old stock took a huge drop in price and were placed in a clearance bin! I seriously cannot resist a sale, and I grabbed nearly every polish I could get my hands on.

nails nail art nailart polish mani manicure Spellbound Rite Aid haul Sally Hansen Breezy Blue Pink Blink Revlon Bubble Gum Days Urban Nights glitter Girly purple Enchanting Color Fever petites Peach Blush Vintage Gray Creme Blue Periwinkle Potion Raspberry Ice Seashell CQ Pearls Silver Taupe Scherer Chameleon Tiny Dancer Fandango green forest ivy Mist

Here is my complete haul. On top of the sale polishes I grabbed four others.

nails nail art nailart polish mani manicure Spellbound Rite Aid haul Sally Hansen Breezy Blue Pink Blink Revlon Bubble Gum Days Urban Nights glitter Girly purple Enchanting Color Fever petites Peach Blush Vintage Gray Creme Blue Periwinkle Potion Raspberry Ice Seashell CQ Pearls Silver Taupe Scherer Chameleon Tiny Dancer Fandango green forest ivy Mist

Here are all the clearance polishes.

nails nail art nailart polish mani manicure Spellbound Rite Aid haul Sally Hansen Breezy Blue Pink Blink Revlon Bubble Gum Days Urban Nights glitter Girly purple Enchanting Color Fever petites Peach Blush Vintage Gray Creme Blue Periwinkle Potion Raspberry Ice Seashell CQ Pearls Silver Taupe Scherer Chameleon Tiny Dancer Fandango green forest ivy Mist

First up are the polishes I paid full price for. In the center is Sally Hansen Breezy Blue and Pink Blink. On the ends are Revlon Girly and Enchanting.

nails nail art nailart polish mani manicure Spellbound Rite Aid haul Sally Hansen Breezy Blue Pink Blink Revlon Bubble Gum Days Urban Nights glitter Girly purple Enchanting Color Fever petites Peach Blush Vintage Gray Creme Blue Periwinkle Potion Raspberry Ice Seashell CQ Pearls Silver Taupe Scherer Chameleon Tiny Dancer Fandango green forest ivy Mist

Girly and Enchanting are new shades from Revlon. I vow to buy more of these new shades because they are so, so pretty. I chose Girly first because I'm a sucker for glitter, especially glitter suspended in a pinky purple-ish base. Being a fairly sheer base though I knew this glitter would need some undies. That's why I picked up Enchanting and Pink Blink. I think Girly will look gorgeous over both!!

nails nail art nailart polish mani manicure Spellbound Rite Aid haul Sally Hansen Breezy Blue Pink Blink Revlon Bubble Gum Days Urban Nights glitter Girly purple Enchanting Color Fever petites Peach Blush Vintage Gray Creme Blue Periwinkle Potion Raspberry Ice Seashell CQ Pearls Silver Taupe Scherer Chameleon Tiny Dancer Fandango green forest ivy Mist

Seriously, look at that glitter!! How can you possibly resist??

nails nail art nailart polish mani manicure Spellbound Rite Aid haul Sally Hansen Breezy Blue Pink Blink Revlon Bubble Gum Days Urban Nights glitter Girly purple Enchanting Color Fever petites Peach Blush Vintage Gray Creme Blue Periwinkle Potion Raspberry Ice Seashell CQ Pearls Silver Taupe Scherer Chameleon Tiny Dancer Fandango green forest ivy Mist

The first things I found in the clearance bin were $0.74 Color Fever petites in their rounded bottles. I had color fever and picked out all of these! Peach Blush, Periwinkle, Creme Blue, and Vintage Gray.

nails nail art nailart polish mani manicure Spellbound Rite Aid haul Sally Hansen Breezy Blue Pink Blink Revlon Bubble Gum Days Urban Nights glitter Girly purple Enchanting Color Fever petites Peach Blush Vintage Gray Creme Blue Periwinkle Potion Raspberry Ice Seashell CQ Pearls Silver Taupe Scherer Chameleon Tiny Dancer Fandango green forest ivy Mist

I also picked out the three square bottles of Color Fever. These ones in Potion, Seashell, and Raspberry Ice. I'm loving Raspberry Ice in the bottle, but am unsure just how great it will look on my nails.

nails nail art nailart polish mani manicure Spellbound Rite Aid haul Sally Hansen Breezy Blue Pink Blink Revlon Bubble Gum Days Urban Nights glitter Girly purple Enchanting Color Fever petites Peach Blush Vintage Gray Creme Blue Periwinkle Potion Raspberry Ice Seashell CQ Pearls Silver Taupe Scherer Chameleon Tiny Dancer Fandango green forest ivy Mist

I found two CQ next. I removed the original $3.99 price tags since they covered the front of the bottle. Silver Taupe looks a good deal lighter in person and seems to be an actual shade of taupe when not placed next to such a light color as Pearls.

nails nail art nailart polish mani manicure Spellbound Rite Aid haul Sally Hansen Breezy Blue Pink Blink Revlon Bubble Gum Days Urban Nights glitter Girly purple Enchanting Color Fever petites Peach Blush Vintage Gray Creme Blue Periwinkle Potion Raspberry Ice Seashell CQ Pearls Silver Taupe Scherer Chameleon Tiny Dancer Fandango green forest ivy Mist

Last but not least are these three Scherer Chameleon polishes in Tiny Dancer, Fandango, and Mist. They are all so very, very pretty!!

What do you think of my haul? I think I'm going to need a bin for all my untried polishes soon. The list just keeps getting longer.

Monday, January 7, 2013

Tinsel Town — Read My Palm

Hey everyone! I hope you had a great first 2013 weekend. As for me, I've been doing some swatching. I eyed, hemming and hawing, over the Sephora by OPI Tinsel Town Collection for weeks and weeks before I finally broke down and bought it. This collection was actually part of a Christmas gift for myself, and I'm happy to finally be able to start swatching.


nails nailart nail art polish mani manicure Spellbound Sephora OPI Tinsel Town Collection Read My Palm mint light jade green swatch swatched swatching Sally Hansen Mint Sorbet chocolate chip ice cream creme Wet n Wild I Need A Refresh-Mint ombre comparison mints bubblegum wintergreen haul

I started with the one that caught my eye first, a gorgeous mint named Read My Palm. I love mint polish!!


nails nailart nail art polish mani manicure Spellbound Sephora OPI Tinsel Town Collection Read My Palm mint light jade green swatch swatched swatching Sally Hansen Mint Sorbet chocolate chip ice cream creme Wet n Wild I Need A Refresh-Mint ombre comparison mints bubblegum wintergreen haul

As far as mint polishes go this is one of the better ones I've found. It went on fairly smoothly, though I did find the formula a smidgen too watery. You can see one coat of Read My Palm here. It's slightly streaky and patchy, but covers well for only one coat.


nails nailart nail art polish mani manicure Spellbound Sephora OPI Tinsel Town Collection Read My Palm mint light jade green swatch swatched swatching Sally Hansen Mint Sorbet chocolate chip ice cream creme Wet n Wild I Need A Refresh-Mint ombre comparison mints bubblegum wintergreen haul

Two coats fills everything in and leaves behind a nice finish.


nails nailart nail art polish mani manicure Spellbound Sephora OPI Tinsel Town Collection Read My Palm mint light jade green swatch swatched swatching Sally Hansen Mint Sorbet chocolate chip ice cream creme Wet n Wild I Need A Refresh-Mint ombre comparison mints bubblegum wintergreen haul

Look how smooth and shiny this polish is with two coats and no top coat!


nails nailart nail art polish mani manicure Spellbound Sephora OPI Tinsel Town Collection Read My Palm mint light jade green swatch swatched swatching Sally Hansen Mint Sorbet chocolate chip ice cream creme Wet n Wild I Need A Refresh-Mint ombre comparison mints bubblegum wintergreen haul

Want to know how Read My Palm holds up to my two favorite mints? Read My Palm is on my index and pinky nail while my middle nail has Sally Hansen Mint Sorbet and my ring nail is painted with Wet n Wild I Need A Refresh-Mint.


nails nailart nail art polish mani manicure Spellbound Sephora OPI Tinsel Town Collection Read My Palm mint light jade green swatch swatched swatching Sally Hansen Mint Sorbet chocolate chip ice cream creme Wet n Wild I Need A Refresh-Mint ombre comparison mints bubblegum wintergreen haul

Sally Hansen Mint Sorbet is what I think of when I think mint. It reminds me of mint chocolate chip ice cream and is the perfect mint green in my opinion. Wet n Wild I Need A Refresh-Mint is the complete opposite. It's the perfect cool and refreshing minty blue of wintergreen gum. It's also the color I turn to when I need a sky blue color. As you can see, Read My Palm is leaning heavily on green and is a much darker shade than Mint Sorbet. It's been labeled a light jade green, and I can definitely see that. I think I might just have the perfect ombre shades here.


Color: Mint green with a definite lean towards green. A light jade green.
Finish: Creme
Application: I found the formula slightly watery. One coat went on streaky and patchy but built up nicely with no streaking. The dry time was amazing!
Coats to Opaque: 2
My Rating: 4.5 — if it lost the slightly watery quality it might just have tipped into a 5. I love mint shades and this is the perfect addition to my collection.