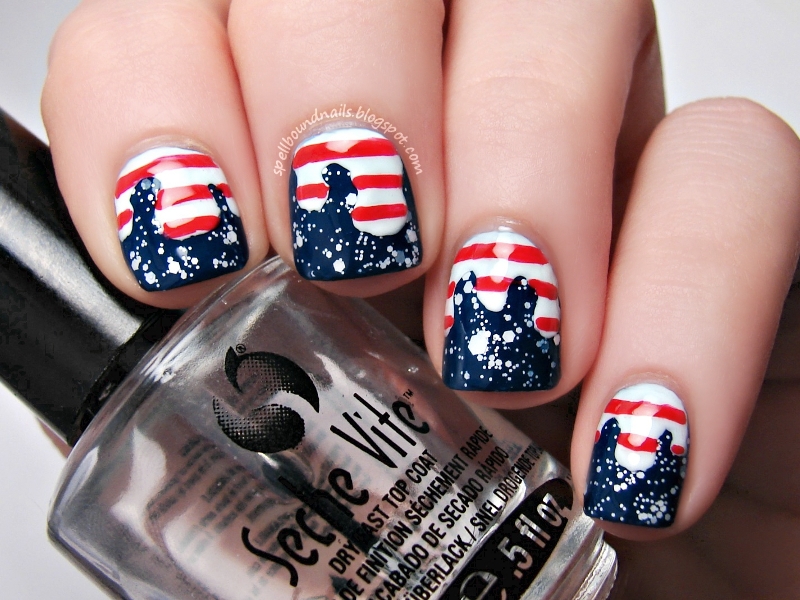
Hello everyone!! It's been forever since I posted anything. I knew running a nail polish business was going to take time, but I guess I never realized just how much of my blogging time it would eat into. I'm working really hard to keep up with orders, restocks, and developing new releases. Any free time I manage to grasp is spent storing up nail art and swatches so I can start posting again - hopefully within the next few months.
My patriotic nail art has been getting a ton of stardom lately. My nails can even be found in the July issue of People StyleWatch magazine! If you don't have a subscription to this magazine I recommend getting one. It's one of the best magazines I've read in a long time! I didn't have to search and skim, skipping large portions of the magazine, because every page had something interesting to me.
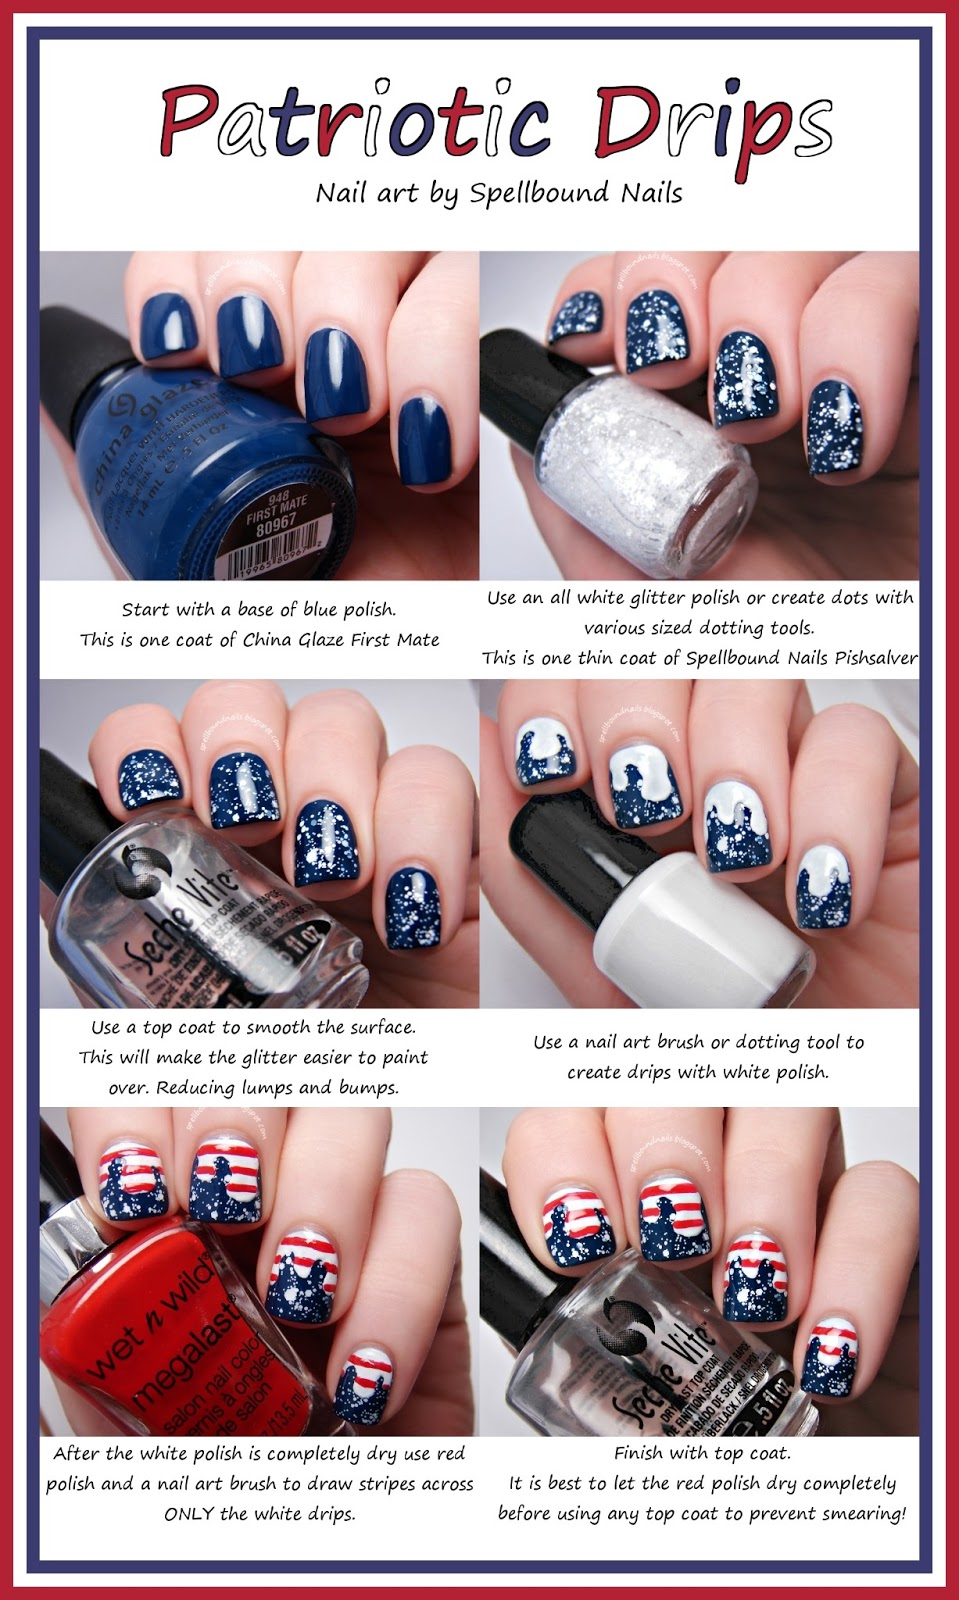
Now, onto the nails!!! With all that interest for my patriotic nails I decided to try something different. I won't claim that I created this - someone, somewhere has probably done this before - but I will say it is something I have never seen before! I would love to see your nails if you decide to try the tutorial, so don't be scared to send them to me. I don't bite. Promise!! :)
Right click and open in a new tab if you're having trouble reading the tutorial.
That's it for now. For those who don't follow me on Facebook but enjoy my polish I will be having a big restock, complete with a ton of NEW polishes and the return of those sold out polishes some of you may be waiting for! Head over to my Etsy shop tomorrow to see what I've come up with. Hope to see ya there. :)
Showing posts with label Tutorial. Show all posts
Wednesday, July 3, 2013
Thursday, January 31, 2013
Saran Wrap Valentine's Day Nail Art Tutorial
Hello again everyone! I missed my post yesterday, but I have a really great excuse! It was mentioned in an answer to one of the 1st Blogiversary Giveaway entries that one of you wanted to see a Saran Wrap tutorial. There were more than a few of you who wanted to see video tutorials. So, I was spending all day yesterday editing my first real nail art video. I have a whole new level of respect for video bloggers!
Here are the nails I'll be showing you how to create in the video. This is a very easy mani to do, and with pink and white polish it is perfect for Valentine's Day!
I don't really have the set up or the best software/know-how for this, but I gave it my best shot. Enjoy!
Wednesday, January 23, 2013
T is for ...
Yay, with this post I am finally caught up in the ABC Challenge!! I really hated being behind. What I don't hate is this mani. Too cute!!
T is for ... Toadstools + Tutorial.
I search high and low every week for ideas to do for this challenge. For some reason, T was hard! Everything I found simply didn't spark an idea I felt happy doing. My inspiration came from the strangest place. Wii games. I wanted to borrow a Wii game from my niece and had to go through her completely disorganized collection. I saw Mario and there it was — the illusive idea. The mushroom power-ups and the adorable Toad race.
I was going to use white for the base color until I remembered Sunday's haul. Using CQ Pearls would create an interesting base and would give me the perfect chance to try this new polish.
Pearls is so pretty. Lightly shimmery and not streaky at all ... well, it wasn't until I rushed adding a top coat. I think this is the most perfect pearly white.
T is for ... Toadstools + Tutorial.
I search high and low every week for ideas to do for this challenge. For some reason, T was hard! Everything I found simply didn't spark an idea I felt happy doing. My inspiration came from the strangest place. Wii games. I wanted to borrow a Wii game from my niece and had to go through her completely disorganized collection. I saw Mario and there it was — the illusive idea. The mushroom power-ups and the adorable Toad race.
I was going to use white for the base color until I remembered Sunday's haul. Using CQ Pearls would create an interesting base and would give me the perfect chance to try this new polish.
Pearls is so pretty. Lightly shimmery and not streaky at all ... well, it wasn't until I rushed adding a top coat. I think this is the most perfect pearly white.
I told you I would try to start creating some easy tutorials. I was going to do a picture tutorial but, as always, I forgot to get pictures while I was doing the designs. So, I decided to just draw one up. I wish I had made this bigger; I stretched it a bit so forgive the slight blurriness. It's not perfect, but it works. At least now I know to make the next one bigger! :)
I used Avery Binder Reinforcement Labels for this mani and this is how it should look. Be very careful of the holes in the center; you can see my nail peeks out through this. You don't want to accidentally drag polish into this hole. I didn't have any on hand, but I prefer using DG Office Color Coding Labels. They're a bit wider, so cover more of your nail, and have no hole in the center.
So, what do you think? Ready to try them for yourself?
Wednesday, January 9, 2013
My Nail Care Routine
I've been asked many times how I keep my hands/nails/cuticles looking so nice. Well, after taking off my latest polish I realized it's that time of the month — the time when my nails are starting to look a little long and ragged and I have to do a complete work over on them. I do this once, maybe twice a month, and do multiple smaller touch-ups between. So, I decided to snap a few pictures and attempt a short video in an attempt to explain how I keep my nails in shape. You guys asked for it!! :)
Here are the main things you'll need. I use non-acetone nail polish remover and a cotton ball to remove all my nail polish. I use so much of this stuff that I go for the cheaper Equate option. It works just as well as name brand and costs less! I bought the nail trimmer from the Born Pretty Store over a year ago, and I still love this thing! I recommend getting a six (or seven) sided file; I prefer my Revlon Shape 'N' Buff six sided file. And, the only lotion I will ever use is Aveeno, usually Daily Moisturizing. If you use something else make sure it is not water based. Check the list of ingredients and make sure water is near the end of the list. Water dries out your skin and nails, so I have never understood why you would want to use a water based lotion in an attempt to cure said dry skin. Aveeno Daily Mouisturizing has a dimenthicone skin protectant (a breathable barrier that locks in moisture) and is natural colloidal oatmeal based (which will help soothe and soften dry skin). You'll also need to have a sink and some soap nearby.
Tuesday, January 8, 2013
Influenster Holiday VoxBox — Kiss Nail Dress
I've been chomping at the bit to start reviewing the products I received in my Influenster Holiday VoxBox. And, now that the Brand Challenges have opened up I can finally start my review posts. Since I'm a nail blogger I decided to start with the one nail related product in this VoxBox. Kiss Nail Dress in Princess!! Love me some leopard print. ♥
Friday, November 23, 2012
Nail Whitening Tutorial
Lately I've been noticing my base coat just hasn't been doing its job as well as it used to. I'm sure it has something to do with all the swatching and daily nail art I've been doing, but that doesn't make the staining any less horrifying. It was definitely time to do another whitening treatment. I promised with my last whitening tutorial that I would try one of the other methods of whitening nails so I leave you with this to try over the weekend.
There really doesn't seem to be much difference in my before and after photos, but it is very noticeable in person. I admit, I'm a one hand painter. If I have no where to be, I only paint my left hand. So the staining was much worse on the hand you see in this tutorial. After ten minutes, my right hand was nearly stain free—after fifteen it really was stain free, so this method really does work and with much less effort on my part than the peroxide/baking powder method I tried last time.
So, while your out shopping this weekend pick up some denture cleaning tablets or crystals and give this tutorial a try. :)
There really doesn't seem to be much difference in my before and after photos, but it is very noticeable in person. I admit, I'm a one hand painter. If I have no where to be, I only paint my left hand. So the staining was much worse on the hand you see in this tutorial. After ten minutes, my right hand was nearly stain free—after fifteen it really was stain free, so this method really does work and with much less effort on my part than the peroxide/baking powder method I tried last time.
So, while your out shopping this weekend pick up some denture cleaning tablets or crystals and give this tutorial a try. :)
Monday, November 12, 2012
Veterans Day Tutorial
Here in the Untied States we have Veterans Day, a holiday to honor our armed service veterans. For other countries, there is Armistice Day or Remembrance Day. With the exception of Italy who celebrates on the 4th, these holidays are celebrated on November 11th. Here is my attempt to honor US veterans, the only way that truly comes from the heart, with nail art. It's a photo tutorial too!!
I used Wet n Wild - I Red a Good Book and L.A. Colors - White for the stripes. The blue is China Glaze First Mate and the stars and holo glitter were painstakingly dug out of Wet n Wild Fergie - Hollywood Walk of Fame.
I've been asked many time how I get such perfect stripes. I wouldn't exactly call them perfect, but I'll take a moment to explain. As you can see in the second step, I use tape. I don't use any special kinds of striping tape or anything, just regular scotch tape. I put a piece of tape on some wax paper and cut notches along the length, as evenly spaced as I can get. Once I have notches across I use them as a guide and cut the whole way up the tape. After that, it's simple to peel the tape off and create stripes with it along my nail. Make sure your nails are completely dry before you put tape on them. Press lightly along the edges and make sure you get the tape into the edges of your nails. If the tape has any bubbles near the edges or there are any raised parts polish will seep under and it might ruin your stripes. Paint over them and immediately—carefully—remove the tape.
Cut the tape larger or smaller for larger or smaller stripes. I've used this method to create stripes side to side, up and down, and sunbeams too so be creative. And, if this isn't enough to make you happy, just think of all the money you're saving by not having to buy striping tape!
Wednesday, September 19, 2012
Whiten Your Nails At Home (Tutorial)
The ingredients are simple! You just need some baking soda and some hydrogen peroxide. It doesn't matter how much or how little you pay for these. I had some brand name baking soda and some Rite Aid peroxide on hand so I decided to use them. So, don't feel bad about getting off brand products if you're on a budget! Just make sure your peroxide is 3%. If you can't find 3% listed on the front, check the active ingredients list; hydrogen peroxide should be listed there as 3%.
You'll need a bowl or a cup. I've tried both and found I preferred the bowl but will go with a slightly smaller bowl next time. You'll get a whiter look if you have something to scrub your nails with. I used an old, soft toothbrush.
The original instructions said to make a paste from 1 teaspoon of peroxide and 2 1/4 teaspoons of baking soda. However, I found this mixture was too runny to call a 'paste' so I simply dumped in more baking soda and peroxide until I had a suitably thick paste, as seen in the picture above. Keep in mind that your body heat will cause the paste to melt slightly.
Simply wash your hands and nails of the remaining paste and they should be noticeably whiter. I recommend putting on a good hand and nail cream after this.
Here are my nails before ... very yellow at the tips especially around my nail line ...
And here are my nails after two whitening treatments done over two weeks, one a week.
From some of the other recipes I found during my search you can add a small amount of lemon juice to this mixture to speed up whitening. I didn't have any lemons on hand so I couldn't try this. I will say that I had a small amount of pain and irritation under some of my nails after soaking them. The irritation faded quickly but I'm not sure how adding lemon would affect this. Certainly don't use this, with or without lemon, if you have any cuts or open wounds on or around your hands!
I would love to know if you try this recipe and if it works for you. I would also love to know if you know of a better one!
Subscribe to:
Posts (Atom)


