Showing posts with label Holiday. Show all posts

Thursday, November 27, 2014

Spellbound Nails Christmas 2014 Collection

Hello lovelies!!! Happy Thanksgiving to those who celebrate. I don't know about you but I'm more than ready to eat my weight in turkey and stuffing and all the fixin's today!

I'm also really excited to announce that my Christmas Collection is finally being released. :) I'm going to attempt to keep this short and to the point as I know a lot of you will be spending the day with family, some of you resting up for late night or early morning Black Friday shopping. So onto the polishes!


I used a little of everything Christmas in this collection and then added a dash of carefully chosen scent for each polish - optional of course.


I've always admired theses kinds of bottle/brush close ups so I decided to try my own. They're not hard to do and they look amazing so you'll definitely be seeing more of them in the future. Now I just have to work on getting the angle of each picture the same. :)


Reindeer poo is a brown tinted jelly with gold and tangerine flakies. The optional scent for this polish is reindeer poo - a slightly fruity scent with hints of woods and vanilla.


Candy Cane Kisses is like crushed candy canes for your nails with rainbow shimmer, red micro-glitter, white hex glitter, and red and white bar glitter. This polish comes with optional candy cane scent.


Elf Sweat is like candy in a jar. It has a clear rainbow shimmered base with dots in a variety of sizes and colors. This polish comes with optional elf sweat scent - like candy, candy canes, candy corn, syrup, and soda. It's a very sweet scent.


What Happens Under the Mistletoe (shortened to Under the Mistletoe to fit on my labels) is a green tinted base packed full of micro-flakies. The gold-green and red-gold flakies create an amazing gold shimmer that has an almost rainbow effect in various lights. This polish comes with optional mistletoe scent.


And last but not least is Frosty's Melting. I created this polish to look like a melted snowman with orange triangles for the nose, large and small black dots for coal eyes, mouth, and the buttons down the front. All packed into a white crelly base with blue shimmer and blue micro-flakies. This polish comes with optional snow/snowman scent - a vanilla mint with a hint of woods.

Enjoy your Thanksgiving ya'all. Be safe, happy, and healthy. :)

Until next time,
Ashley

Wednesday, December 25, 2013

Merry Christmas

Hello lovelies!! I'm a little late posting today, but right after finishing these this morning I had to immediately leave. How immediate? Immediate like I was terrified I was going to smudge them while getting dressed - thank goodness for my trusty Seche Vite top coat! The chance of smudging made me snap a few quick pics and then I was out the door. I just now settled down to watch some Christmas Doctor Who (goodbye, Doctor #11 ♥♥) and realized I never got around to taking the pics off my camera. So, here's my Christmas mani ... late but at least it's still Christmas. :)


I wanted a mani that I could wear after Christmas. Once Christmas is over I want Christmas over so I went simple - more winter than truly Christmas. I started with 3 coats of CQ Pearls and then topped it with 2 coats of Firefly from Hell.


If you'll remember Firefly from Hell was the glow-in-the-dark glitter topper from my Halloween collection. There are still a few of these glow polishes left if anyone wants one; you can get them on sale for $6 in my Storenvy shop. :) I adore how the stamped snowflakes still show up in the dark!!


I think I'm getting better at this whole stamping thing!! These snowflakes were done in mere moments (with China Glaze Blue Bells Ring) as I was in such a hurry and they're almost all there - only a few smudges and missing lines. And, as you can see, I also added a pearl to the center of the large snowflake on my ring fingernails. I think it added a slightly elegant, dressy touch.

So, how was your holiday? Do anything special? Wear anything special on your nails? How about gifts?? Did you get everything you asked Santa for? :)

Until next time,
-Ashley

Monday, December 23, 2013

Santa Came To Say - More Christmas Stamping

Yes, this is another attempt at Christmas stamping. I think I'm getting a little better. I'm still working on placement and which colors I can stamp over which polishes but not too horrible if I do say so myself.


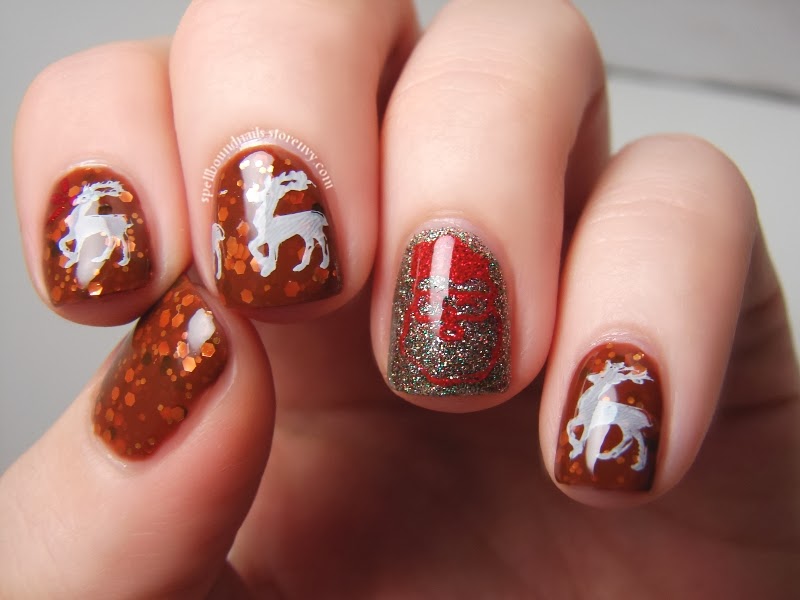
This is Eight Tiny Reindeer with an accent nail of Holly Jolly. The main polishes used in this mani are from my Christmas collection and except for Holly Jolly, which was a freebie with select Christmas orders, you can now get them on sale here!!


I couldn't do a Christmas mani, especially one with a polish like Eight Tiny Reindeer and not use the reindeer stamp! And since this was inspired by Rudolph, this mani just wouldn't be complete without a bright red nose on at least one of the reindeer. :)


And since this didn't show up on the full mani shot I had to do a close-up of Holly Jolly. Just look at that sparkle! Holly Jolly is red, green, silver, and gold micro-glitter, and this is just two coats for full coverage! It also works wonderfully as a glitter topper - such a versatile little glitter.

Order 6 full-size Christmas sale polishes, and I will include a mini of Holly Jolly in your order completely free! :) This offer is only valid until the year's end, 12/31/13, so order quick!!

Until next time,
- Ashley

Sunday, December 22, 2013

Happy Christmas To All

Hello lovelies! Welcome to another very simple mani idea for Christmas.

I've said it before but OPI The Spy Who Loved Me is perfect for Christmas manis. However, if you don't have this you can use a really any shimmery red or even just a plain creme red. I believe my go-to polish last year was Orly Star Spangled. It's a little bit of a darker red from what I remember, but is just as, if not more, shimmery!


So, super simple! Two coats of OPI The Spy Who Loved Me and three coats of my own polish, Spellbound Nails Happy Christmas To All as an accent nail.


This mani looks so much better in person because you can really see the sparkle and shift of the glitter and this does seem to trick the eye into thinking Happy Christmas To All really does look like a Christmas tree especially with that star at the top of my nail. I admit I started this mani with a different design in mind; a bit of a tape mani to create a tree shape on the accent nail with a carefully placed star glitter, but once the star came out of the bottle (without my permissions lol) and refused to budge it all came together so much better in my opinion!

I plan to have at least another one or two designs before Christmas so keep an eye out for those.

Until next time,
- Ashley

Thursday, December 19, 2013

Candy Canes and Holly Berries - Holiday Christmas Nail Art

Hello lovelies! Can you believe it's already less than a week until Christmas?? I feel like it was just last week that it was months and months from Christmas. Still, the Christmas spirit seems to have hit me hard ... well, hit me with nail art ideas because my house still isn't decorated and I have done less than no Christmas shopping.

And speaking of nail art ideas ... I think I'm a little obsessed with candy cane stripes. I seriously just want to keep these on until after Christmas; I love them so much!


These are actually really simple to do but there's a lot of waiting involved because the stripes are done with tape and the white polish has to be completely dry before you can start. If you don't wait for it to dry it will dent if you're lucky or ruin all your work at worst.


I think I'm also developing an obsession with OPI The Spy Who Loved Me. It is such a lovely shade of shimmery red and has such wonderful coverage. It also makes perfect candy cane stripes ... and holly berries!

Well, I think that's just about it. I hope you enjoyed yet another of my Christmas manis. :)

Until next time,
- Ashley

*A huge congratulations to Ariel of Lacquer: The Best Medicine for winning my Season of Giving Giveaway!! Her prize is already in the mail. :)

Looking for more holiday manis? Take a look at these!!

Thursday, December 12, 2013

A Candy Cane Christmas with another Born Pretty Store Stamping Plate

Hello again!! First off, have you entered the giveaways I'm either hosting or a part of yet? If not you can enter here, here, and here. That's a lot of polish you could win; don't miss out! Go on. I'll wait. Done? Okay, onto the nail art!


I really wanted something simple but eye-catching so I started with a base of OPI The Spy Who Loved Me. This polish was a Christmas gift last year but red is always in season around Christmas. What makes this polish even better is the gold shimmer.


In some lights the shimmer will just look red but as you can see here and in the next pic the gold will occasionally show itself. It can be a little shy. :)


This one is a little blurry but it really shows off the gold shimmer.


via BornPrettyStore
To complete this mani, and add just a little more of a Christmas-y touch, I used my new-found stamping skills and added some candy cane stripes in white. This was done using the Born Pretty Store stamping plate M65. If you'll remember I used this stamping plate before to create my Elegant Border Nails. You can buy this stamping plate right now for $2.99. As always feel free to use MLE10W21 for 10% off your BPS orders.

If you don't have and don't want to buy this stamping plate you can always draw the stripes on freehand, use a base coat of white and put down some striping tape before painting on your red, peeling up the striping tape after ... or just use the striping tape itself to create the stripes! All it takes is a little imagination!

Until next time
♥ Ashley

Monday, December 9, 2013

The Season of Giving GIVEAWAY

December is supposed to be the season of giving right? Well, this year I'm embracing that wholeheartedly! I am part of 2 huge giveaways (here and here), and I took it one step further and am now hosting my own with some of my wonderful bloggers. You may or may not recognize their names but I'm sure you'll recognize their nails. They do almost all the lovely swatches you see when checking out my polishes. If it's not my swatch, it is more than likely one of theirs. How could I give away some polish as a thank you for all the support and love you've all given me and not include them?


First up, the thing I'm sure you're all eager to know - the prizes! The winner will have their choice of 6 mini bottles from my Christmas collection - 'Twas the Night Before Christmas.


I may even toss in a few other things I've been holding onto for a giveaway. Season of giving and all that. ;)

And now onto business - the rules. As I cannot ship internationally at this time this giveaway is only open to those in the US or Canada ... or those who have a friend in either country willing to risk shipping for them. Once the package is out of my hands however, I take no responsibility for it - especially during the holidays when customs is sure to be cracking down on shipping polishes. Or pass on the season of giving by shipping to a friend in the US or Canada as a present. :) The giveaway starts 12:00am EST 10th December and ends 12:00am EST 17th December. The winner will have 24 hours to reply and claim their prize. If I get no reply in 24 hours, I will be forced to choose another winner.

Onto the fun! Use the Rafflecopter app below to enter. :)

a Rafflecopter giveaway

Friday, March 29, 2013

Blogs to Love #8

Hello everyone. Sorry for the late post. I thought I had it to post automatically but I got back from girl's night out and found it was only saved as a draft. Better late than never? Anyway, get ready for a long post! Since I missed last week and since Easter is this weekend I thought I'd do a huge Easter link-up. :)

Blogs to Love Friday linkup
 

Since this post is so big I'm going to split the links into sections.

Nails
Hair
Makeup
  • Want to add a little color to your eyes, but don't want to go wild? Try this Easter Look by Simply Beauty. It's a very fresh and feminine look using yellow, white, and pink.
  • If you're looking for a lot of color and really want to pop try this Easter Makeup from Jessie Blush on Facebook.
  • Don't want to pop that much? Try a pastel look (also from Jessie Blush).
Fashion
Food
Crafts
  • This one is part food, part craft. These Cute Printable Carrot Cones found on The Red Thread will make the perfect addition to any Easter basket and can be filled with candy or even healthy treats.
  • What a cute idea for the little ones and it takes very little effort from you! Sew your little ones or someone else's little ones a Sweet Bunny with this tutorial by Lifeologia.
  • Don't have a basket for Easter yet? Don't rush out to buy one this weekend — create your own with this Easter Bunny Basket Tutorial from Lizzie Florence!
Easter Eggs
  • My favorite part of Easter (besides making myself sick on candy) was always the Easter eggs! I never liked eating them; I just wanted to decorate them!! Sharpie Tie Dye Easter Eggs by Housing a Forest are something I wish I knew about as a kid. They are so fun!! They remind me of peeling paper mache.
  • If you want something a little more elegant to sit around you should try Golden Marbled Easter Eggs. It takes a bit of work but your friends and family are sure to ooh and ahh over them.
  • Neither of these your style? Here are 40 other Creative Ways to Decorate Easter Eggs compiled by Brit + Co. Seriously, the Message in an Egg is genius. It leaves me wishing I had a sweetie to give one to.
My Contributions to Easter

Easter Spellbound Nails nail polish nailart art fashion beauty shoes hair makeup outfit

I have big plans for making this my Easter outfit. I have nearly everything needed to complete this outfit. Simple makeup, messy hair (in blonde instead of red), pastel polish for an Easter skittles mani, the purse, the shoes and a blazer nearly like this one. The key piece however is the pink pants and I don't have them. If I can't find a pair that fit in the color I want this weekend this whole outfit will fall to pieces. :( Keep your fingers crossed for me.

Skittles Spellbound Nails nailart art nail polish pink green purple yellow blue speckled Easter

My other contribution to this Easter post are my Easter nails! I plan to wear my nails like this Sunday instead of doing a fancy design. However, for this post I couldn't resist doing a little something extra.

Easter eggs polish nail nailart art polish Spellbound Nails speckled dyed pink purple yellow blue green

Speckled Easter eggs nails!! I used an old eyebrow brush that was fraying to dab on the base color mixed with some white and then I used some brown polish to create the speckled look. I adore how the blue nail looks here and the purple and green nails looked really awesome in person. Sadly, the pink and yellow nails were so light on their own that mixing the polish with white didn't really add any definition. Still, I think this looks really awesome overall.

And yes, that is a brown chicken egg I'm holding. It was the next best thing since I didn't have any speckled eggs ... or even any dyed Easter eggs. :(

Forgive me for any errors or typos. It's late, and not only am I so tired I can't see straight I have a headache to contend with so I didn't do my usual ten-thousand read throughs looking for errors.

Wednesday, February 20, 2013

St. Patrick's Day Duo

Hello everyone! I'd like to introduce you to a cute little duo you can now buy in my Etsy shop.


This is the St. Patrick's Day Duo. I missed getting my Valentine's Day polish out so I'm jumping the gun on this collection. :) Meet Fool's Gold and Clover the Rainbow.


Fool's Gold has a clear base filled with small and medium matte green glitter and large gold glitter — all hex.


Here is Fool's Gold over Petites Black. I adore how this looks! Almost like a galaxy nail or a flakey ... maybe a combination of both. :)


I also tried Fool's Gold over CQ Pearls. I thought Fool's Gold would look better over the slightly shimmery, off-white color than it would over regular white.


The second half of this lucky duo is Clover the Rainbow, named by Lyssa over on my Facebook page.  Clover the Rainbow is a green jelly with small matte green hex glitter and rainbow holographic hex glitter.


With three coats over bare nails you might not get full coverage, as is typical with a jelly, but you could certainly wear this out and show your Irish pride!


If you're looking for full coverage, you can wear one coat over white for a minty, lightly glittered nail.


Two coats over white will get you this look in sunlight. Clover the Rainbow is a very versatile polish. Change it up for different looks, wear it alone or with an undie.

Remember to follow and favorite my shop on Etsy to be the first to see new polishes. :)

Thursday, February 14, 2013

Write Me A Love Letter

Happy Valentine's Day!!! Welcome to the last Valentine's Day manicure of 2013 — Love Letters.


nails nail art nailart mani manicure polish Spellbound Lacquer holiday Valentine's Day Valentine Love Letters Newspaper newsprint envelopes envelope hearts heart stickers red white black LA Colors Energy Source L.A. Petities Night fun cute sweet lovely

I started with a base of LA Colors Energy Source. This is the best white I've found to date. It can be bought in most Dollar Stores at a great price and it takes a really, really long time to turn thick in the bottle. I used a nail art brush and Petites Night to create the envelopes, sealed them with top coat, and topped with a red heart sticker. The accent nail is a simple newspaper nail. I used the wedding announcements section of the newspaper. :)


nails nail art nailart mani manicure polish Spellbound Lacquer holiday Valentine's Day Valentine Love Letters Newspaper newsprint envelopes envelope hearts heart stickers red white black LA Colors Energy Source L.A. Petities Night fun cute sweet lovely

Here is what the mani looks like without the heart stickers. You could certainly keep them like this, use heart rhinestones, or even just draw the hearts on with polish if you don't have stickers or rhinestones.

Have trouble creating newspaper nails? Don't do them on completely dry nails. Wait until your nails are almost dry before dipping your nails or the newspaper into rubbing alcohol and applying to your nails. You want your nails to be at that point where they're dry to the touch but applying any pressure will leave fingerprints. This degree of 'wetness' will soak up the newspaper ink much better than dry nails. Be sure to apply even pressure across your entire nail or you'll end up with patchy newsprint. If you do have a place on your nail that is blank simply line up another piece of newspaper — being as exact in lining it up as possible, lightly dip a finger of the other hand in alcohol, and use it to hold the newspaper onto the blank spot.

Wednesday, February 13, 2013

W is for ...

Hello everyone and welcome to another ABC Challenge post! This week we're up to the letter W. Coming up with words to use for each letter and then creating a nail art design for that word is harder than it sounds! My mind goes blank every week, so I usually scroll through dictionary sites to find my word of the week. I thought there was absolutely nothing to do this week that I could then link to Valentine's Day, but I finally came up with something. And it has no pink!!

W is for ... Wings of Love.


nails nailart nail art polish mani manicure Spellbound Lacquer ABC Challenge letter W is for Wings of Love bird cage birdcage caged bird love cursive flying fly away heart hearts black white LA Colors Energy Source Petites Night elegant sweet holiday Valentine's Day design

I have wanted to do a caged bird mani forever! And I completely and totally adore how this one turned out!! I started with 3 coats of LA Colors Energy Source. More coats than I usually use, but since so much of the white was going to show I didn't want any chance of this being sheer or patchy. The black is Petites Night. I tried to keep everything connected between nails. The open birdcage, the cursive love, and the bird all leading to the heart. 


nails nailart nail art polish mani manicure Spellbound Lacquer ABC Challenge letter W is for Wings of Love bird cage birdcage caged bird love cursive flying fly away heart hearts black white LA Colors Energy Source Petites Night elegant sweet holiday Valentine's Day design

I love this mani so much that I couldn't seem to stop taking pictures. I tried to choose one from every angle so you can get the full effect.


nails nailart nail art polish mani manicure Spellbound Lacquer ABC Challenge letter W is for Wings of Love bird cage birdcage caged bird love cursive flying fly away heart hearts black white LA Colors Energy Source Petites Night elegant sweet holiday Valentine's Day design


nails nailart nail art polish mani manicure Spellbound Lacquer ABC Challenge letter W is for Wings of Love bird cage birdcage caged bird love cursive flying fly away heart hearts black white LA Colors Energy Source Petites Night elegant sweet holiday Valentine's Day design


nails nailart nail art polish mani manicure Spellbound Lacquer ABC Challenge letter W is for Wings of Love bird cage birdcage caged bird love cursive flying fly away heart hearts black white LA Colors Energy Source Petites Night elegant sweet holiday Valentine's Day design

I actually sacrificed an old nail art brush to do this mani. I couldn't get the lines small and delicate enough for the birdcage and the cursive love with the brushes I have, so I cut some bristles off an old brush to make it thinner! A great use for old brushes and cheaper than buying a thinner brush!!

It looks intricate and elegant, but is actually pretty simple when you break it down by nail. I found the hardest part is actually the birdcage, at least for me. Don't try to twist your hand around to do it right-side-up — this will just make your hands shaky and it's harder/messier to do an 'n' shape with nail polish; it's so much easier to leave your hand pointed straight away from you and just create a U on your nail. Create a smaller U inside that making sure the bottom of your u's touch/overlap and put a line down the middle. Add a line across the bottom, a handle at the top, and an open door on the side.

I really hope you enjoy this mani as much as I do. Check back tomorrow for the last Valentine's Day mani.

Tuesday, February 12, 2013

I'm Having Mixed Feelings

Hello everyone!! Today's post is a very simple Valentine's Day mani since I've been hard at work on the really awesome nail art coming tomorrow and Thursday.

nails nailart nail art polish mani manicure Spellbound Lacquer glitter bars squares hearts red pink grey gray saran wrap Mixed Feelings indie holiday V-Day Valentine's Valentines Day Sally Hansen Pink Blink NYC New York Color Sidewalkers

I started with a saran wrap mani using Sally Hansen Pink Blink and New York Color Sidewalkers. I admit deciding to change my original idea of stripes to a saran wrap mani wasn't the best choice; I'm not perfect! Still, topping it all with Mixed Feelings was the right choice. And I guess with a name like Mixed Feelings the pink and grey kind of fits.

Mixed Feelings is an unreleased Valentine's Day polish of mine. If there's enough interest I may decide to release it later on though so definitely let me know if you want it. It's perfect for Valentine's Day, but would make a good every day polish. Also, don't forget to check out my Etsy shop next week for new polishes!!

Monday, February 11, 2013

Feeling Girly With Revlon

In my continuing attempt to be unique this Valentine's Day I decided to dig out my recent Revlon purchase. I've used the new Revlon Enchanting a few times, but I never got around to using their new glitter I was so excited about. So here is a shot of Girly over Enchanting.

nails nailart nail art polish mani manicure Spellbound Nail Lacquer Etsy shop Revlon Girly Enchanting glitter pink purple holiday Valentine's Day V-Day St. Saint Patrick's Day color swatch swatches swatched hair hairstyle The Freckled Fox post faux hawk mowhawk curls 80s eighties beauty fashion

I'm really fond of this combo. Girly is a light purple/pink sheer base with purple, light pink, and fuchsia glitter. There are also some small holographic pink and purple glitter tossed into the mix. Overall, it really does make for a soft and girly mani.

What wasn't girly was my hair yesterday. Some of you will remember my adoration of The Freckled Fox's Posh Faux Hawk in my Blogs to Love Friday #1 post. Well, I went and did it! I am nowhere near an expert at doing my hair. Usually it's either straight and down, up in a ponytail, or curled in the off chance I'm not feeling lazy. Like I said, I'm no expert. Far from it. But I don't think I did too bad for my first try. I dressed in the cute striped top you see with some black skinny jeans and gray heeled cowboy boots; I love how this new hairstyle added some edge to the outfit. I will definitely be trying this again.

nails nailart nail art polish mani manicure Spellbound Nail Lacquer Etsy shop Revlon Girly Enchanting glitter pink purple holiday Valentine's Day V-Day St. Saint Patrick's Day color swatch swatches swatched hair hairstyle The Freckled Fox post faux hawk mowhawk curls 80s eighties beauty fashionnails nailart nail art polish mani manicure Spellbound Nail Lacquer Etsy shop Revlon Girly Enchanting glitter pink purple holiday Valentine's Day V-Day St. Saint Patrick's Day color swatch swatches swatched hair hairstyle The Freckled Fox post faux hawk mowhawk curls 80s eighties beauty fashion


nails nailart nail art polish mani manicure Spellbound Nail Lacquer Etsy shop Revlon Girly Enchanting glitter pink purple holiday Valentine's Day V-Day St. Saint Patrick's Day color swatch swatches swatched hair hairstyle The Freckled Fox post faux hawk mowhawk curls 80s eighties beauty fashion

I also took a picture once I took my hair down. I felt like a true child of the 80s. :)

Here's hoping Valentine's Day comes soon because I am running out of unique V-Day mani ideas. You should want Valentine's Day to be over too because I have some really awesome St. Patrick's Day polishes that will be for sale in my Etsy Shop next week. I will be posting swatches after V-Day. If you can't wait, you can get a preview (and help name one of them) on my Facebook Page.

Wednesday, February 6, 2013

V is for ...

Is it Wednesday already?? This week is going way too fast! Still, it is Wednesday and you know what that means: ABC Challenge nail art. Can you believe we're up to the letter V already?

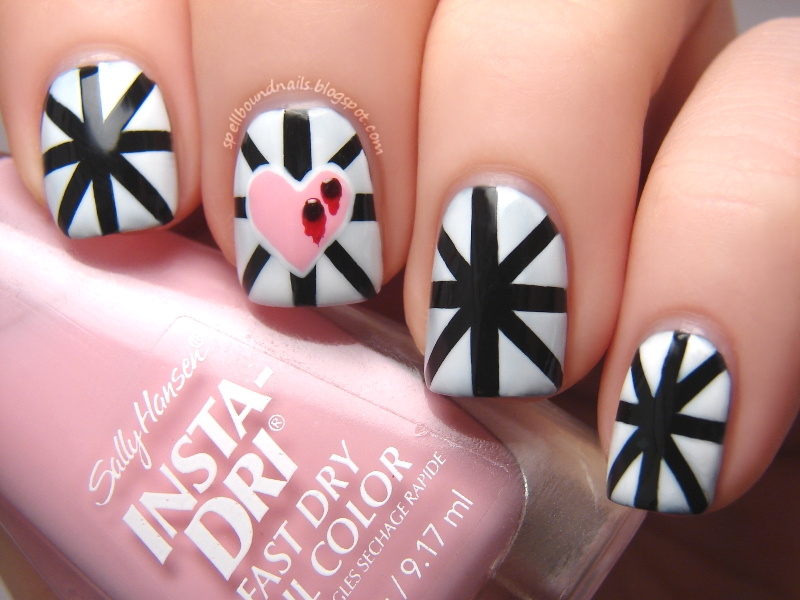
V is for ... Vampire's Valentine.

nails nailart nail art polish mani manicure Spellbound Lacquer ABC Challenge holiday Valentine's Day Anti-Valentine's Day V-Day sunbeams Vampire's Vampire starburst tape taping taped blood drips drip heart pink white black red L.A. Colors Energy Source Circuits Sally Hansen Pink Blink Wet n Wild I Red A Good Book NYC New York Color Lincoln Center Venique Runway Sparkle glitter shimmer

I loved last year's Anti-Valentine's Day nails so much that I decided to use it as inspiration for this mani. Honestly, I really can't believe how far I've come in a year.

nails nailart nail art polish mani manicure Spellbound Lacquer ABC Challenge holiday Valentine's Day Anti-Valentine's Day V-Day sunbeams Vampire's Vampire starburst tape taping taped blood drips drip heart pink white black red L.A. Colors Energy Source Circuits Sally Hansen Pink Blink Wet n Wild I Red A Good Book NYC New York Color Lincoln Center Venique Runway Sparkle glitter shimmer

I loved the entire design of this mani, every step taken to create them, so I took many pictures! A base of black, some tape, and some white polish created this star-burst design.

nails nailart nail art polish mani manicure Spellbound Lacquer ABC Challenge holiday Valentine's Day Anti-Valentine's Day V-Day sunbeams Vampire's Vampire starburst tape taping taped blood drips drip heart pink white black red L.A. Colors Energy Source Circuits Sally Hansen Pink Blink Wet n Wild I Red A Good Book NYC New York Color Lincoln Center Venique Runway Sparkle glitter shimmer

I used white polish to create a heart on my index nail. The white creates a barrier over the black; this means you don't need to use a ton of pink to cover the black. It also creates a very pretty border around your pink heart if you make it slightly smaller than your white heart. This alone would make for a gorgeous Valentine's Day mani!! You could even create hearts on all your nails instead of just as an accent or use red for the heart to make it really stand out.

nails nailart nail art polish mani manicure Spellbound Lacquer ABC Challenge holiday Valentine's Day Anti-Valentine's Day V-Day sunbeams Vampire's Vampire starburst tape taping taped blood drips drip heart pink white black red L.A. Colors Energy Source Circuits Sally Hansen Pink Blink Wet n Wild I Red A Good Book NYC New York Color Lincoln Center Venique Runway Sparkle glitter shimmer

Since I was going to create bleeding fang marks on my heart I knew I couldn't use red. :) The bleeding marks add depth and give these nails a nearly 3-D look—all a pretty illusion of course. With the dark fang marks, the bright red blood, and the white outline, doesn't it look like the heart is really bleeding?

nails nailart nail art polish mani manicure Spellbound Lacquer ABC Challenge holiday Valentine's Day Anti-Valentine's Day V-Day sunbeams Vampire's Vampire starburst tape taping taped blood drips drip heart pink white black red L.A. Colors Energy Source Circuits Sally Hansen Pink Blink Wet n Wild I Red A Good Book NYC New York Color Lincoln Center Venique Runway Sparkle glitter shimmer

Finally, I created white outlined blood on the tips of my nails. I added a small amount of Venique Runway Sparkle over all of the blood. Sadly, I couldn't seem to get a good picture with the actual sparkle.

So, which are you this Valentine's Day: hearts and roses or vampire bites? Will you be rolling out the Anti-Valentine's Day red carpet?