*Some products were sent to me for testing and review, completely complimentary, from OPI, Preen.me, and Barielle. All thoughts and opinions are my own. Hello lovelies!! I know I'm not around much anymore, and I definitely recommend following me on Instagram (@spellbound_nails) to keep more up to date than following my blog. Buuuttt Halloween is my favorite holiday so I did two nail art designs to celebrate, and I thought I'd post them here too.
The first I want to show you is actually the second design I did and what is on my nails right now. I started with a base of white and used the fingerprint stamp on Vivid Lacquer's VL009. I added lots of blood drops to my accent nail and a few to my index and thumb. A few highlights and shadows on the blood drops and this design was done. Easy peasy.
The second design I want to share is so fun! I started with a base of OPI Cosmo with a Twist and added blobs of Barielle Hawaiian Sunset. I painted my accent nail with Barielle Hawaiian Sunset and painted the jack-o-lantern in white and then went over that with a yellow tinted glow pigment mixed with clear polish. I loved how it had the lit pumpkin look in the day and really lit up at night! Like I said, so fun!!!
This wasn't done for Halloween but it reminded me of something very Halloween before cleanup ... like frost bite gone bad or the fingertips of some evil witch so enjoy. ;) Colors used are OPI Colors of the You-niverse and OPI By the Light of the Moon. Happy Halloween, Ashley *Some products were sent to me for testing and review, completely complimentary, from OPI, Preen.me, and Barielle. All thoughts and opinions are my own.
*Some products were sent to me for testing and review, completely complimentary, from Born Pretty Store. All thoughts and opinions are my own. Another post already? Yes! I was contacted by the Born Pretty Store and given the chance to review some of their products. I knew immediately what I wanted to do. I sketched out two designs, a dark and a light, and picked out products I could use for them. Here is my dark design. Welcome to my web. :)
It has been forever since I've done a border/frame nail and I struggled like crazy to figure it out again, but I'm pretty happy with how it turned out. I started with a black base and leaving a border around cuticle and sides painted white down my nails. I went over that with China Glaze Adventure Red-y. And then finished by tipping my nails with black.
I used the web looking stamp on Born Pretty Store Stamping Plate BP12 and some white polish. It wasn't a stamping polish (and I'm no stamping genius lol) so I did have some trouble picking up the small details in the middle of the web, but I really love how it turned out anyway. After stamping I went over the border again with some black acrylic paint. The borders are a little wobbly looking in maco but looked amazing to the named eye.
I finished the design with a spider. I created this using a previously purchased Born Pretty Store 3 Size Pearls Wheel (in the largest size) and a diamond gem from the Mixed Multisize Rhinestones I got as part of my sample packet. Then I used black and white acrylic to draw on some legs.
Can I just say how much I adore these mixed rhinestones?? You get a little of everything. There's a variety of colors in small, medium, and large. I will definitely be using these in more manis!! So, did you get caught in my web? Let me know what you think in the comments. And don't forget to use SBN10K31 for 10% off your Born Pretty Store order if you decide you can't live without these products! :) Until next time, Ashley *Some products were sent to me for testing and review, completely complimentary, from Born Pretty Store. All thoughts and opinions are my own.
*Some products were sent to me for testing and review, completely complimentary, from OPI and Preen.Me. All thoughts and opinions are my own.
Hello lovelies!! I'm really excited to share today's post with you. I received a really nice sampler box of OPI Infinite Shine polishes as part a collaboration between OPI and Preen.Me. Those of you who follow me on Instagram will have seen a sneak peek of these polishes in my 15 second unboxing video. I immediately had my eye on the two pinks in my sampler and since it's now Spring (Is it? Is it really??? -_- The snow here says different) I went with what I think is a very Spring themed mani.
Along with the polishes I also received the OPI Infinite Shine base coat and top coat as part of the sampler. These polishes are said to have a hi-def gel like shine that wears up to 10 days without the light or the soak needed for removal!
I used the base coat on all nails but wanted to test the durability of the top coat so I used the OPI Infinite Shine top coat on my pinky and middle nail but my usual Seche Vite top coat on my other fingers.
First thoughts: I love the base coat. It went on smoothly, dried quickly, and didn't bubble or anything like that and my mani held up really well which is surprising because I've only found one (now discontinued) base coat that works well with my body chemistry. It was a light colored mani so I didn't really expect it to stain and it didn't.
However, I'm iffy about the top coat simply because it smeared my stamping long after I allowed it to 'set' for a few minutes. It also took a long time to dry - feeling tacky and not set long after applying. I know Seche Vite spoils me with how quickly it dries but the nails I used the OPI Infinite Shine top coat on still had me worried about bumping them about half an hour later. However, once it dried it had a really nice shine - on par with my Seche Vite so that's saying something! And it held up really well. I'm not easy on my nails but there wasn't much, if any, wear showing on any of my nails after the 2-3 days I wore it. Would I use this again? For a simple one color or gradient mani: yes. For nail art I've spent hours on: NO!
Woohoo!! I had a credit card offer come in the mail today so I have myself a much better scraper than that bit of cardboard from the video. This means I get a better and more complete image lol. I still don't have the set up for a video, but I rigged up much better lighting for this one at least. :) I also realized I paint over (and over and over) my nails way too much while editing this video given how much painting I had to cut out lol.
I have so many more polishes to try out and a few more manis already done and waiting to be posted to stick around or scroll back to the top, look to the right, and follow me so you don't miss a post! Until next time, Ashley *Some products were sent to me for testing and review, completely complimentary, from OPI and Preen.Me. All thoughts and opinions are my own.
*Some products were sent to me for testing and review, completely complimentary, from Born Pretty Store. All thoughts and opinions are my own. Hello lovelies! This week's A-Z challenge was P for Pale. I took a little leeway ... okay a lot of leeway with this week's challenge. Instead of going with pale or pastel polishes I went deep and dark and used 'pale as death' as my inspiration.
I've been calling this mani Your Number's Up in my head since I couldn't resist using the jumbled number stamp that was on the stamping plate too.
Being honest I almost didn't want to stamp over this. I started with a two coat base of Vintage Gray [Petites Color Fever] and then used some saran wrap to smudge on acrylic paint in White, Black, Pewter Gray, and Khaki. I topped it with a coat of my very own Fairy Dust like holographic topper, Spellbound Nails Holo Back Girl.
I received this stamping plate (BP-39) from the Born Pretty Store as a nice addition to a review package (review coming soon) and it couldn't have come at a better time! This skull stamp was seriously the hardest thing to stamp EVER! And it had nothing to do with the stamp itself and everything to do with having such a dark base. The stamp was really great with such clean lines that are deep enough to give you a perfect stamp! My problem came with not having anything opaque enough to stamp over the dark base. I wanted neon green but surprise surprise that didn't work. I went through nearly my entire polish collection trying to find a polish that would show up - one that wasn't white because I always use white!! I finally used an undiluted metallic that I sometimes use to mix polish, but it worked perfectly!
This mani was so sparkly and shiny in person! And I'm already dreaming of an Alice in Wonderland mani with that jumbled number stamp. If you'd like to try the stamp for yourself you can find it on the Born Pretty Store website here. As of today (2/27) it is on sale for $0.99! If you do decide to place an order you can use my promo code SBN10K31 for 10% off. This code is good on full price items only though so if you're just picking up this stamping plate while it's on sale it will tell you the code is invalid ... but can you really shop at BPS and not fill your cart with goodies? Seriously, don't even try to tell me I'm the only one who does this because I won't believe it!! Be sure to check out the other Pale manis below, and have a good weekend! Until next time, Ashley *Some products were sent to me for testing and review, completely complimentary, from Born Pretty Store. All thoughts and opinions are my own. An InLinkz Link-up
Hello lovelies!! I'm a little late posting today, but right after finishing these this morning I had to immediately leave. How immediate? Immediate like I was terrified I was going to smudge them while getting dressed - thank goodness for my trusty Seche Vite top coat! The chance of smudging made me snap a few quick pics and then I was out the door. I just now settled down to watch some Christmas Doctor Who (goodbye, Doctor #11 ♥♥) and realized I never got around to taking the pics off my camera. So, here's my Christmas mani ... late but at least it's still Christmas. :)
I wanted a mani that I could wear after Christmas. Once Christmas is over I want Christmas over so I went simple - more winter than truly Christmas. I started with 3 coats of CQ Pearls and then topped it with 2 coats of Firefly from Hell.
If you'll remember Firefly from Hell was the glow-in-the-dark glitter topper from my Halloween collection. There are still a few of these glow polishes left if anyone wants one; you can get them on sale for $6 in my Storenvy shop. :) I adore how the stamped snowflakes still show up in the dark!!
I think I'm getting better at this whole stamping thing!! These snowflakes were done in mere moments (with China Glaze Blue Bells Ring) as I was in such a hurry and they're almost all there - only a few smudges and missing lines. And, as you can see, I also added a pearl to the center of the large snowflake on my ring fingernails. I think it added a slightly elegant, dressy touch. So, how was your holiday? Do anything special? Wear anything special on your nails? How about gifts?? Did you get everything you asked Santa for? :) Until next time, -Ashley
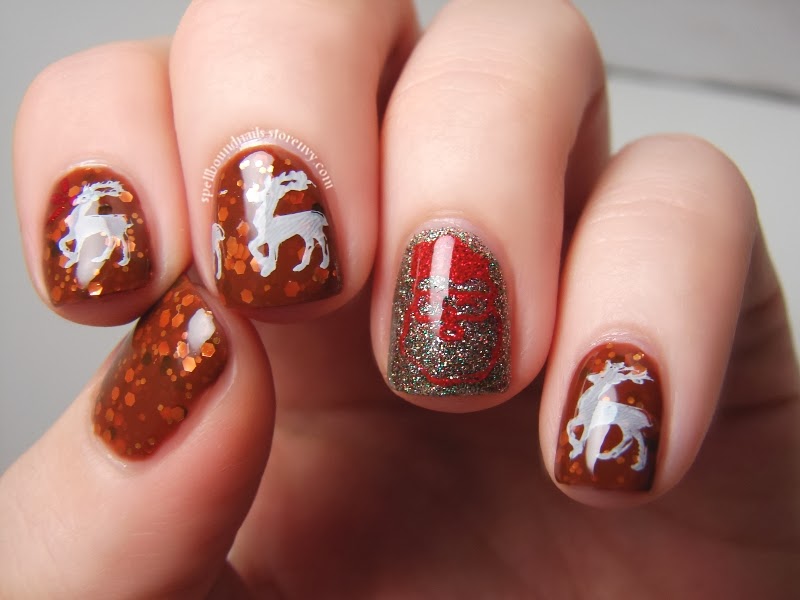
Yes, this is another attempt at Christmas stamping. I think I'm getting a little better. I'm still working on placement and which colors I can stamp over which polishes but not too horrible if I do say so myself.
This is Eight Tiny Reindeer with an accent nail of Holly Jolly. The main polishes used in this mani are from my Christmas collection and except for Holly Jolly, which was a freebie with select Christmas orders, you can now get them on sale here!!
I couldn't do a Christmas mani, especially one with a polish like Eight Tiny Reindeer and not use the reindeer stamp! And since this was inspired by Rudolph, this mani just wouldn't be complete without a bright red nose on at least one of the reindeer. :)
And since this didn't show up on the full mani shot I had to do a close-up of Holly Jolly. Just look at that sparkle! Holly Jolly is red, green, silver, and gold micro-glitter, and this is just two coats for full coverage! It also works wonderfully as a glitter topper - such a versatile little glitter. Order 6 full-size Christmas sale polishes, and I will include a mini of Holly Jolly in your order completely free! :) This offer is only valid until the year's end, 12/31/13, so order quick!! Until next time, - Ashley
Hello again!! First off, have you entered the giveaways I'm either hosting or a part of yet? If not you can enter here, here, and here. That's a lot of polish you could win; don't miss out! Go on. I'll wait. Done? Okay, onto the nail art!
I really wanted something simple but eye-catching so I started with a base of OPI The Spy Who Loved Me. This polish was a Christmas gift last year but red is always in season around Christmas. What makes this polish even better is the gold shimmer.
In some lights the shimmer will just look red but as you can see here and in the next pic the gold will occasionally show itself. It can be a little shy. :)
This one is a little blurry but it really shows off the gold shimmer.
To complete this mani, and add just a little more of a Christmas-y touch, I used my new-found stamping skills and added some candy cane stripes in white. This was done using the Born Pretty Store stamping plate M65. If you'll remember I used this stamping plate before to create my Elegant Border Nails. You can buy this stamping plate right now for $2.99. As always feel free to use MLE10W21 for 10% off your BPS orders. If you don't have and don't want to buy this stamping plate you can always draw the stripes on freehand, use a base coat of white and put down some striping tape before painting on your red, peeling up the striping tape after ... or just use the striping tape itself to create the stripes! All it takes is a little imagination! Until next time ♥ Ashley
I was busy mixing polish and filling orders last night when I was suddenly and inexplicably struck with inspiration for some nail art. Maybe it's the Christmas spirit finally kicking in? I'm not real fond of Christmas. Lemme explain! I loved it as a kid - the wonder of going out and picking/cutting/bringing home our own tree, decorating, going for long drives to see Christmas lights; the anticipation on Christmas eve, attempting to sneak out to the living room to see if Santa had come yet ... when finding anything under the tree was a surprise and a delight, but it's just not the same and hasn't been for a long while. And it's not just because I'm not a child anymore. Now-a-days, most kids (and adults are guilty of this too) are all about the receiving - how much their presents are worth and how many they can get ... and most are completely ungrateful. Where's the spirit of good will and charity gone?? So yeah, my reasons for wishing Christmas would come and go quickly. But my Grinch-like behavior isn't what this post is about. This is about nail art inspiration and my very first truly successful attempt at stamping!
I used 2 coats of And To All A Good-Night from my 'Twas the Night Before Christmas Collection. I put down a layer of top coat and then sponged the tips with basic white. Another layer of top coat and then came the attempt at stamping. You've all seen my previous stamping disasters so I went into this with a cringe on my face. But I read somewhere that you should file the gel bit of your stamper before you use it the first time. Well, I never did this ... didn't know you should, but I figured why not? What's the worst that could happen? The filing could ruin it but it was of no use to me now so worth a shot right? I'm guessing since this attempt at stamping was a roaring success that this does help!
I used my Born Pretty Store stamping plate QA19. I'm pretty sure I received this free last year, just after Christmas, when they did a flash sale/giveaway thing. You can buy it right now for only $0.99! If you'd like to buy this stamping plate or anything else from their site you can always use my 10% off code: MLE10W21.I only had a small amount of trouble with the tree, and that was all my own fault ... I didn't roll the stamper enough on my nail and the tip of the tree didn't stamp. I had to attempt to line it up so it's just a little lopsided. And I did loose a line or two on the house; I don't think you can really tell though. But overall, I really couldn't be happier. I'm already dreaming of buying some more stamping plates and seeing what other quick and easy designs I can come up with. I don't have time anymore for full out nail art, but I should have time for stamping. :)
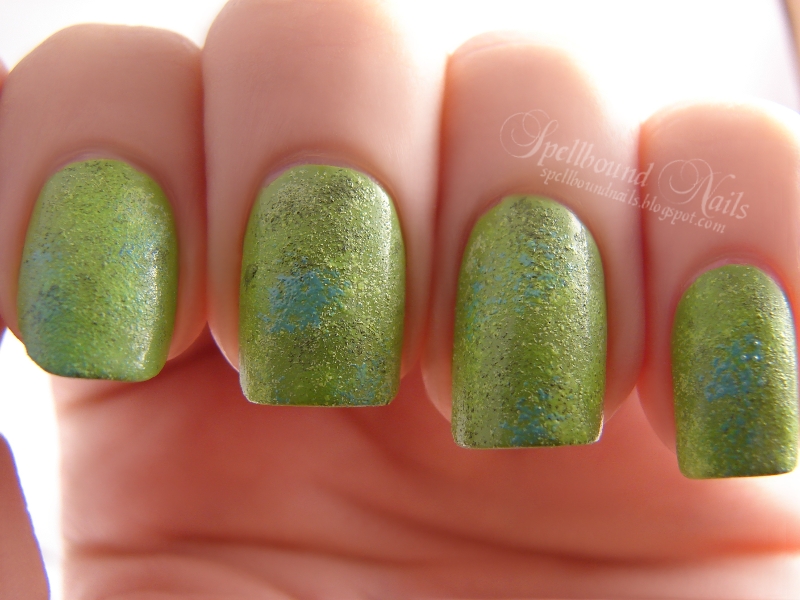
I scoured the internet looking for something, anything, unique that I could do for the letter I in the ABC Challenge. I was going to do Rorschach ink blots, but I didn't have the correct tools to accomplish them the way I wanted. I attempted them anyway and ended up with an absolute disaster. I decided to start over and try something else. So ... I is for ... Iguana. Not very unique, but I tried. :)
I used Revlon Garden as my base color. I lightened it and darkened it with white and black for the texture. I also added a few dabs of Color Club's neon yellow Yell-Oh! Looking through pictures of iguanas I found a beautiful green iguana that had light blue patches on its skin so I also added some dabs of Wet n Wild I Need a Refresh-Mint over the texturing.
Here is a closer look at the texture. I had a moment of panic upon realizing I had no scale stamps on any of my stamping plates. The one stamp that looked anything like scales was absolutely tiny! So, I settled for Born Pretty Store's m61 stamping plate. I used China Glaze Holly-Day and actually consciously slowed my movements so I wouldn't get the full stamp. A first for me, but I wanted it to look uneven like scales and I also wanted some of the texturing to show through in places.
I wasn't completely happy with the texturing and scales so I added an iguana eye to my index nail hoping to give this mani some life. In this picture, before I removed the design, I decided to see what it looked like with a top coat. The nails lost nearly all the rough texturing I worked so hard to create, but I really like how the eye took on a more realistic quality. Look into it and tell me it doesn't stare back at you!
Hello everyone. I'm in the midst of a cold and debated even doing a post today, but thanks to some help from the lovely women on my Facebook Page I was able to beat the sore throat and tone down the other symptoms of my cold. You can totally thank them for this post!
I've been waiting to post these nails for a while but there were always other posts that needed posted first. Well, I'm making today the right day. Lustrous Lacquer wanted to see border nails and this is what I came up with.
Start out with a base color. This will be the color of your borders. I used two coats of L.A. Colors Black. The next step is to paint your nails again, but leave a border around the edges. I found it easier to simply use the nail polish brush and be a little more careful around the edges, but you could use a nail art brush or a dotting tool to lay down an outline first if you don't feel comfortable jumping right in. You'll go back later and create a tip so don't worry if the tips look messy or the black shows on the edges. This picture shows one coat of L.A. Colors White. I used three coats to completely cover the black.
Here's where you complete the border by repainting the tips with your border color. Remember to round the edges of this tip to give a nice oval shape to the borders. I let this part of the mani dry completely and then put on a layer of top coat to give myself a nice stamping surface.
I used the rose image on m65 of my Born Pretty stamping plates. This is the one and only time I got such perfect images on all my nails. I'm sure it has something to do with the L.A. Colors polish I used. It's a very slow to dry polish, and I worked extra fast. Be sure to let your nails dry completely before stamping and be sure it's completely dry before using any top coat. With the black and white even the smallest amount of smudging or running will be immediately visible!
My not-so-well kept secret is that I love coffee. I would drink it all day, every day if I could. And to me, the cup is just as important as the coffee. I can't just put my coffee in any cup. My family knows this and they are nice enough to get me some of the prettiest cups. Today's nail art is inspired by one of these cups.
Here are the (not so perfect) finished nails. I can't for the life of me get my stamper to work consistently. Though it hardly ever stamps this bad. This likely had something to do with the fine and delicate etching for the flower petals.
And here is the cup that inspired these nails. I started with three coats of Lightening from Sally Hansen's Insta-Dri line of polish.
It's one of the most perfect yellow polishes, in my opinion. I have owned light yellows and sheer yellows but before Lightening I have never owned an actual, true yellow.
To get the yellow gingham pattern from the cup I used tape and China Glaze's White on White.
I used three strips of tape from cuticle to nail tip and three strips of tape from side to side before painting over the nail with white. This is such an easy design to do and creates such an amazing affect!!
My coffee cup has such gorgeous flowers in various colors, but the ones that catch my eye most are definitely the blue morning glories. To complete this design there just had to be flowers. Sadly, the only flowers I can do without a good deal of time are swirly roses and daisy-like flowers using a dotting tool. I had to use my stamper. I want so much to be good at stamping ... but I'm just not. :( I did manage to get one nearly perfect flower and it really did make the design come to life! It makes me all the more longing of a deft stamping hand. I could definitely see this gingham pattern being used in a picnic nail art. Use red in place of the yellow and a dotting tool with some black to create an ant or two scuttling their way over the picnic blanket. If you have fimo fruit slices it would certainly add life to the design. :)
I've given myself something of a challenge. I want to see how many ways I can spice up a simple French manicure. I will keep the standard French white as a base for these manis as an added challenge.
You've seen the standard French manicure in Mother's Day post, 'The Mommy Mess', and you've seen the Mother's Day design I created over those nails. Now, I bring you French Hearts. :)
I used my new Born Pretty image plate m56 for this design. I adore this image plate. It's a plate full of tip stamps. It's the same plate that contained the bow from my 'All Wrapped Up' nails
I only had one problem with stamping this design. I didn't push enough near the tip of my index nail and lost the hearts from the very tips. You can see that I went back and tried adding them. Well, I didn't line them up well enough and overlapped them slightly. I like to think I'm getting better though. The other nails are almost perfect!! Yay!
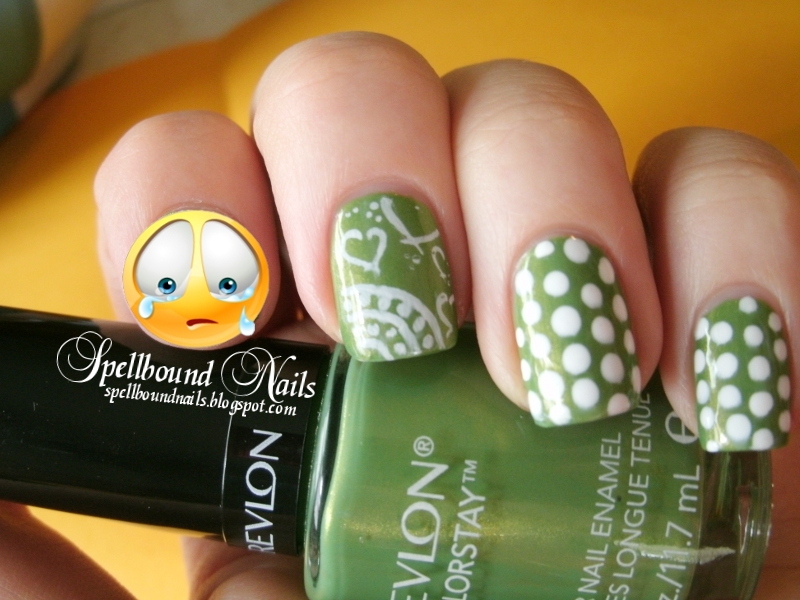
I used OPI Alpine Snow and Bubble Bath as the base again. The hearts are done with Wet n Wild's 'I Red a Good Book'.
Wow! I am like dead on my feet. I've been going to my sister's place every day. Sometimes we go shopping, mostly we go tanning. I'm getting a nice jump on some summer color. She also has three little girls: the older two in school and a two-year-old with her constantly. So, I've been getting run ragged by a little girl who wants to play with her 'Annie'. I was talked into throwing a softball for her and the middle girl yesterday. This is why I have a dog! Children expect you to run after them and get involved unaware that you are many years older than them and have nowhere near the amount of energy they have ... a dog will run and bring the ball back perfectly content if you stand in the same spot the entire time! Lol. I've had no time or energy to create elaborate nail art so I used a stamp and my dotting tool for this one.
I picked this color up last weekend during a shopping trip to Walmart. They have changed their entire selection of nail polish. They now offer new brands of nail polish and new collections from old brands. As always seems to be the case though, the one collection I was there looking for was the one collection they seemed not to have. With my luck, I simply overlooked it.
I did manage to snag Bonsai from the Revlon Colorstay collection. I'm not the kind of person who can pull off many shades of green without looking sickly, but Bonsai is a really pretty shade that worked well with my skin tone. This might have something to do with the very light yellow gold shimmer.
You can see in the pictures that the shimmer is very hard to see though. That wasn't the only problem I had with this polish either. The polish was very hard to get on the nail, streaky and with large gaps where the polish wouldn't lay. I had to use three coats to get total coverage. It wasn't such a big problem since I was using a design over it, but it is something to think about if you enjoy one color nails.
Another downside is that this polish only stayed on for one day! Not even that long because it showed signs of wear almost immediately and began chipping that night. I know I've been going non-stop and have likely put my nails through some hard times but that was ridiculous. Especially from the Colorstay collection which touts long wear, 11 days of wear if worn with their base and top coats. I did not wear this with their top coat but I did use their base coat. That should add something right?? I will allow that maybe I got a bad batch or some other kind of error because I have never had this many problems with the other polishes I own from this collection. But ...
All in all, pretty though it may be, I don't think Bonsai will become a staple around my house.
The stamping was done with Sally Hansen White On. I found this worked very well with my image plate but that might have something to do with White On being very old and thick. If you have some old lying around give it a try with your stamper. Or try it with new and let me know how it works.
I'm off to get ready for another day on the town. Have a great day everyone!
'ello lovelies! I'm kind of embarrassed to post today. These are nowhere near my best nails. They just look so messy to me. Also, I decided not to use a smiley with this mani. The broken nail on my left hand isn't so noticeable in the two pics I got of that hand.
I tried something new and then used another stamp over top. I loaded a large brush with four colors and attempted to do a one-stroke nail. Things didn't work out as I hoped.
Since I was only allowing myself one stroke I used a white base in hopes the colors would really pop.
Sadly, the one stroke is much harder than it looks. The polish got everywhere except my nails! It flooded my cuticles and smeared all over my fingers but would not stay on my nail. One stroke turned into many as I attempted damage control.
It was all so messy that I looked for a stamp to cover some of the mess. I decided to use this stamp, Born Pretty m64. Even after all that I still wasn't satisfied and was really glad to take this mani off.
Here's an attempt to explain the title of this mani. The finished nail makes me think only of bird as it looks out through the bars of its cage at the setting sun wishing more than anything to fly free. I tried to think of a title that would make more sense but that's all that I could think of.