Showing posts with label Red. Show all posts

Tuesday, June 24, 2014

Feeling Patriotic - The Americana Collection

It's collection time again!! This time I take inspiration from the upcoming 4th of July and the national anthem, The Star Spangled Banner, to bring you the ultimate Americana Collection. :)

Available on:


This collection has a little of everything. 2 glitter toppers, 2 shimmered holographics in red and blue, and a creamy white crelly with red and blue glitter.


And did I mention how amazing they look together? I used all 5 to create this amazing mismatched mani - perfect for any patriotic holiday. It is seriously easy too! This is 2 thin coats of Star Spangled on my middle fingers, 3 thin coats of Rockets Red Glare and Twilight's Last Gleaming with one thin coat of Home of the Brave and Bombs Bursting in Air over each respectively.

Stick around to get a look at each polish. :)


Twilight's Last Gleaming is a blue holographic with a chunky blue shimmer. It dries to a matte like finish so a top coat is a must to really bring life back.


Bombs Bursting in Air is one of those very simple polishes that manages to be something amazing! It's a mix of red, white, and blue stars and bar glitter with a dose of rainbow colored shimmer. I am reminded of fireworks exploding in a night sky every time I look at this. Shown here over Carbon Copy from The Neutrals creme collection.


And here is a close-up of how it looks over Twilight's Last Gleaming. That shimmer is just to die for!!


Star Spangled is a creamy white crelly with red and blue hexes and stars that is just sheer enough to showcase every piece of glitter. Shown here is 2 thin coats. The key is keeping your layers thin so you show glimpses of the previous layers glitter. :)


This may look familiar to those of you who have been with me from the start. This is the reformulated Miss 'Merica that was tucked into orders around the 4th of July last year. Now going by Home of the Brave, this polish is a perfect fit for the Americana Collection. It's a mix of red, white, and blue glitter with blue stars. It adds a patriotic touch to any polish. Shown over Hearthstone from The Darks creme collection.


Last but no where near least is Rockets Red Glare. This one is so hard to photograph, and I really didn't manage to capture the true awesomeness of this polish. It is a red holographic with a fine red shimmer. I direct your attention to the mismatched mani at the top of this post as it really shows a lot more of its shimmer and shine in that pic. This polish also dries to a matte like finish so a top coat will really help add shine and sparkle. :)

If you stuck around through the whole post - congrats and I hope you enjoyed the Americana Collection. Do you have a favorite from this collection?

And here's a bit of real life news if you stuck around. One of my nieces just turned 16 yesterday. Where does the time go?? For the first few years of this little girl's life I helped raise her ... so I'm really feeling old. 


Until next time,
♥ Ashley

Monday, January 27, 2014

Laced Up Corsets - Valentine's Day Nail Art

Valentine's Day is closing in quickly and I figured it was time to start posting some of my Valentine's Day nail art. First up - corset nails. :)


I've always wanted a corset (and the confidence to actually wear it). I guess having them on my nails is the next best thing.


I started with a base of Spellbound Nails Cheeks Tinted Red and drew a quick line down the middle with Spellbound Nails I'm All Aflutter. If I had thought this through I would have started with a base of I'm All Aflutter and taped off the middle for neater lines but the end result wasn't horrible. The laces of the corset actually helped disguise the imperfect lines so I call it a win!


A close up look of the corsets. I used Spellbound Nails Steel Wool for the metal and some unaltered white base for the laces.

Overall, this is not a hard mani at all! And if you don't feel up to doing all 10 nails as corsets these work perfectly as accent nails as well. :)

Until next time,
♥ Ashley ♥

Sunday, December 22, 2013

Happy Christmas To All

Hello lovelies! Welcome to another very simple mani idea for Christmas.

I've said it before but OPI The Spy Who Loved Me is perfect for Christmas manis. However, if you don't have this you can use a really any shimmery red or even just a plain creme red. I believe my go-to polish last year was Orly Star Spangled. It's a little bit of a darker red from what I remember, but is just as, if not more, shimmery!


So, super simple! Two coats of OPI The Spy Who Loved Me and three coats of my own polish, Spellbound Nails Happy Christmas To All as an accent nail.


This mani looks so much better in person because you can really see the sparkle and shift of the glitter and this does seem to trick the eye into thinking Happy Christmas To All really does look like a Christmas tree especially with that star at the top of my nail. I admit I started this mani with a different design in mind; a bit of a tape mani to create a tree shape on the accent nail with a carefully placed star glitter, but once the star came out of the bottle (without my permissions lol) and refused to budge it all came together so much better in my opinion!

I plan to have at least another one or two designs before Christmas so keep an eye out for those.

Until next time,
- Ashley

Thursday, December 19, 2013

Candy Canes and Holly Berries - Holiday Christmas Nail Art

Hello lovelies! Can you believe it's already less than a week until Christmas?? I feel like it was just last week that it was months and months from Christmas. Still, the Christmas spirit seems to have hit me hard ... well, hit me with nail art ideas because my house still isn't decorated and I have done less than no Christmas shopping.

And speaking of nail art ideas ... I think I'm a little obsessed with candy cane stripes. I seriously just want to keep these on until after Christmas; I love them so much!


These are actually really simple to do but there's a lot of waiting involved because the stripes are done with tape and the white polish has to be completely dry before you can start. If you don't wait for it to dry it will dent if you're lucky or ruin all your work at worst.


I think I'm also developing an obsession with OPI The Spy Who Loved Me. It is such a lovely shade of shimmery red and has such wonderful coverage. It also makes perfect candy cane stripes ... and holly berries!

Well, I think that's just about it. I hope you enjoyed yet another of my Christmas manis. :)

Until next time,
- Ashley

*A huge congratulations to Ariel of Lacquer: The Best Medicine for winning my Season of Giving Giveaway!! Her prize is already in the mail. :)

Looking for more holiday manis? Take a look at these!!

Wednesday, July 3, 2013

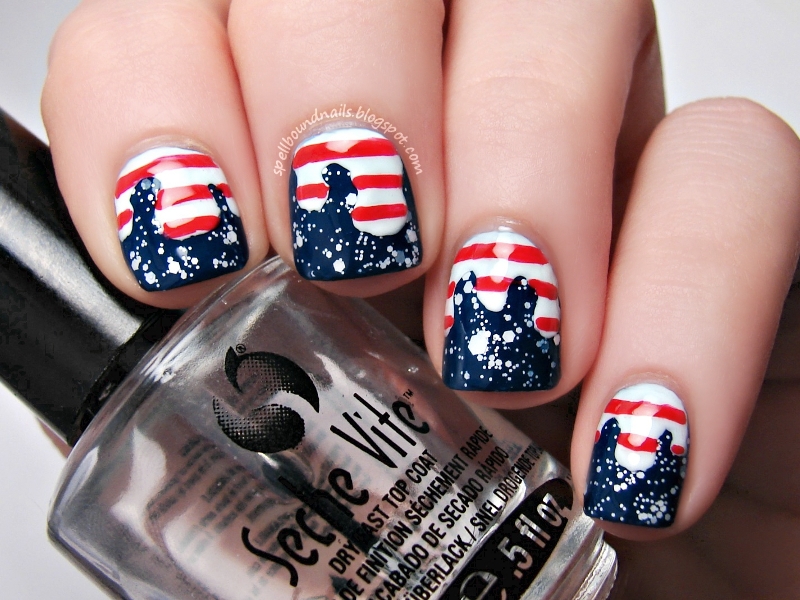
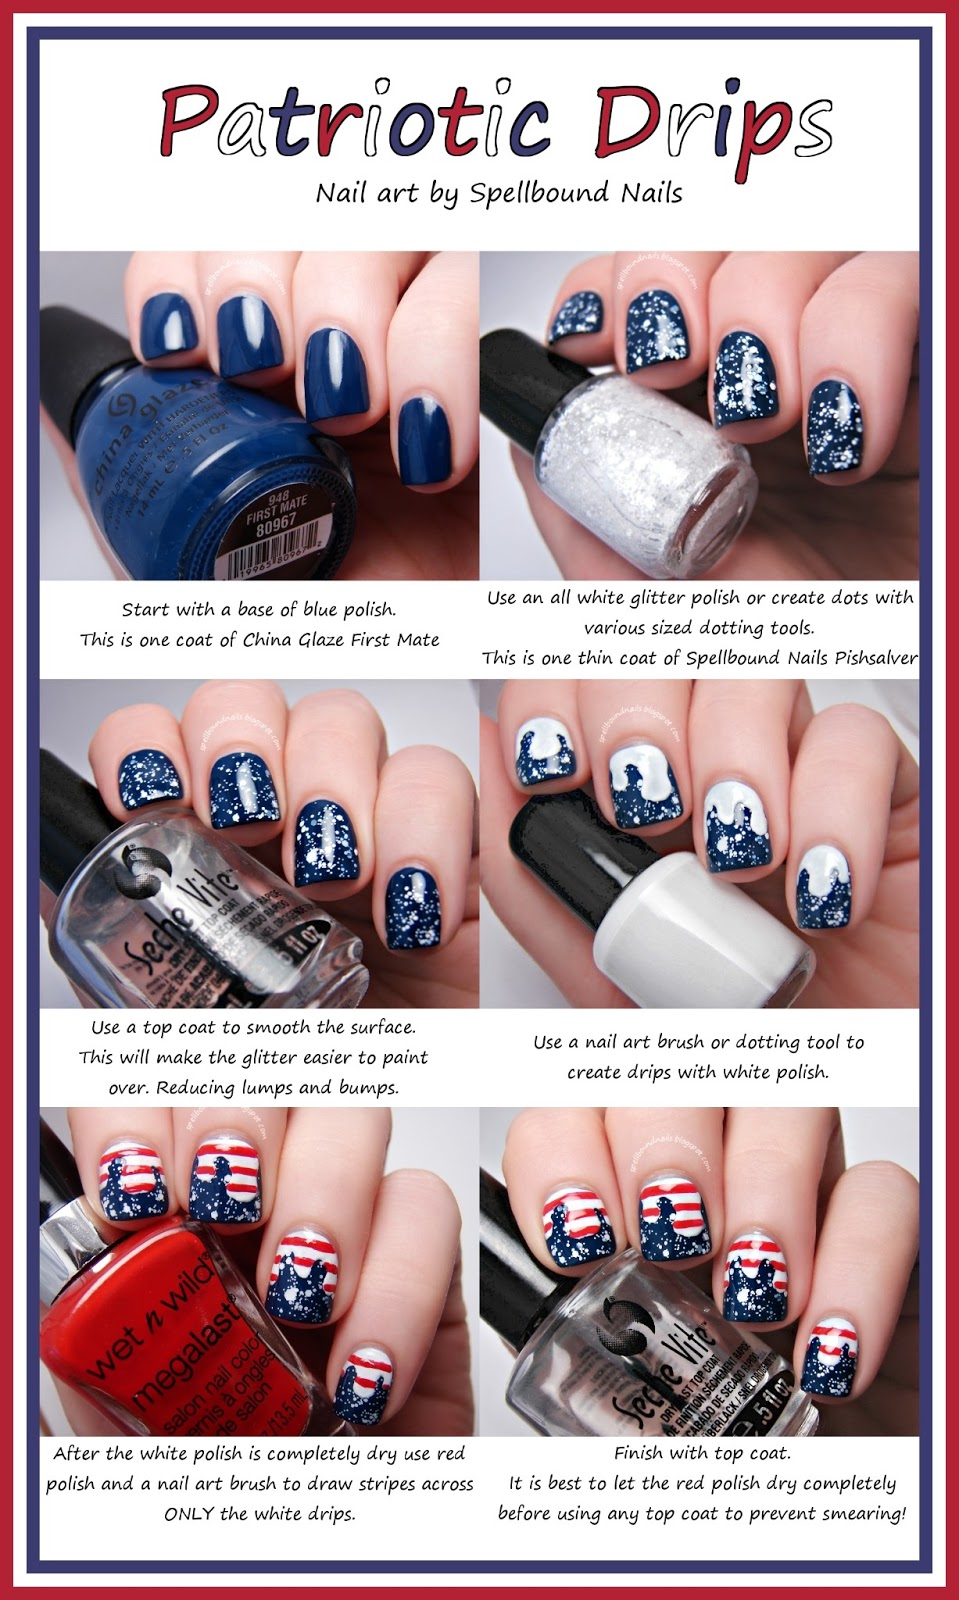
Patriotic Drips Nail Art Tutorial

Hello everyone!! It's been forever since I posted anything. I knew running a nail polish business was going to take time, but I guess I never realized just how much of my blogging time it would eat into. I'm working really hard to keep up with orders, restocks, and developing new releases. Any free time I manage to grasp is spent storing up nail art and swatches so I can start posting again - hopefully within the next few months.

nail art Spellbound Nails Patriotic 4th of July red white blue stripes stars glitter America Independence Day

My patriotic nail art has been getting a ton of stardom lately. My nails can even be found in the July issue of People StyleWatch magazine! If you don't have a subscription to this magazine I recommend getting one. It's one of the best magazines I've read in a long time! I didn't have to search and skim, skipping large portions of the magazine, because every page had something interesting to me.

Spellbound Nails People Style Watch StyleWatch patriotic 4th of July Independence Day red white blue

Now, onto the nails!!! With all that interest for my patriotic nails I decided to try something different. I won't claim that I created this - someone, somewhere has probably done this before - but I will say it is something I have never seen before! I would love to see your nails if you decide to try the tutorial, so don't be scared to send them to me. I don't bite. Promise!! :)

Right click and open in a new tab if you're having trouble reading the tutorial.

Patriotic Drips nail art Tutorial Spellbound Nails red white blue stripes glitter America Independence Day 4th of July

That's it for now. For those who don't follow me on Facebook but enjoy my polish I will be having a big restock, complete with a ton of NEW polishes and the return of those sold out polishes some of you may be waiting for! Head over to my Etsy shop tomorrow to see what I've come up with. Hope to see ya there. :)

Thursday, March 7, 2013

Z is for ...

And so ends the ABC Challenge. I am terribly sad to see this challenge over. I almost want to start all over again because there are so many letters that I had multiple nail art ideas for. Take Z for example. There's zebras, zombies, and zigzags and the one I went with: 

Z is for ... Zippers

nails nailart nail art mani manicure polish Spellbound Lacquer ABC Challenge Z is for Zipper Zippers tutorial Shimmer Polish Mary black silver white red China Glaze Adventure Red-y L.A. LA Colors Circuits Energy Source Pure Ice Silver Mercedes glitter unzipped

I did this design completely backwards. I was working on swatching Shimmer Polish (swatches coming next week) when I was hit with the idea of zippers opening up to reveal Mary in all it's glittery glory.

I think it turned out pretty great considering I had to draw everything around that small V of Mary you see. To learn how to do a traditional zipper nail and not my backwards version you should definitely check out this picture tutorial found on Beautylish.

Will any of you be joining me for the Inspired by Time Periods Challenge??

Wednesday, February 20, 2013

Rainbow Gradient

Today is supposed to be my X nail art for the ABC Challenge, but I'm stumped on what to do for this letter. I'll think of something by next challenge ... hopefully. For now, check out the rainbow gradient I wore last weekend.

nails nailart nail art polish mani manicure Spellbound Lacquer fun cute sweet rainbow gradient eyeshadow applicator sponge sponged sponging red orange yellow green blue purple colorful Rimmel English Rose Sinful Colors Hazard Sally Hansen Lightening Green with Envy Wet n Wild I Need a Refresh-Mint On a Trip

I hate the claw, but it's pretty much the only position in nails that need to include the thumb. Some of you may remember the sideways rainbow gradient from my NOH8 nails. I wanted to try something different this time so I did them as a normal gradient. I found the lightest rainbow colors from my collection to use for this.

nails nailart nail art polish mani manicure Spellbound Lacquer fun cute sweet rainbow gradient eyeshadow applicator sponge sponged sponging red orange yellow green blue purple colorful

Here are my nails before clean-up. So messy!!! I usually tape around my nails before doing something this messy, but I forget. Isn't that the way things usually go? You only forget something that would speed things up when you're in a hurry!

nails nailart nail art polish mani manicure Spellbound Lacquer fun cute sweet rainbow gradient eyeshadow applicator sponge sponged sponging red orange yellow green blue purple colorful Rimmel English Rose Sinful Colors Hazard Sally Hansen Lightening Green with Envy Wet n Wild I Need a Refresh-Mint On a Trip Rimmel English Rose Sinful Colors Hazard Sally Hansen Lightening Green with Envy Wet n Wild I Need a Refresh-Mint On a Trip

I took this picture in the car. It was snowing so hard and then a little bit of sunlight peeked through, and I couldn't resist snapping a few pics. It's not up to my usual standard, but there's something I really like about this picture.

 Rimmel English Rose Sinful Colors Hazard Sally Hansen Lightening Green with Envy Wet n Wild I Need a Refresh-Mint On a Trip

I couldn't resist getting a picture of my cotton ball after I removed the gradient. I'm reminded of a clown's wig, lol.

Colors Used: Rimmel English Rose, Sinful Colors Hazard, Sally Hansen Lightening, Sally Hansen Green with Envy, Wet n Wild I Need A Refresh-Mint, Wet n Wild On a Trip

Wednesday, February 6, 2013

V is for ...

Is it Wednesday already?? This week is going way too fast! Still, it is Wednesday and you know what that means: ABC Challenge nail art. Can you believe we're up to the letter V already?

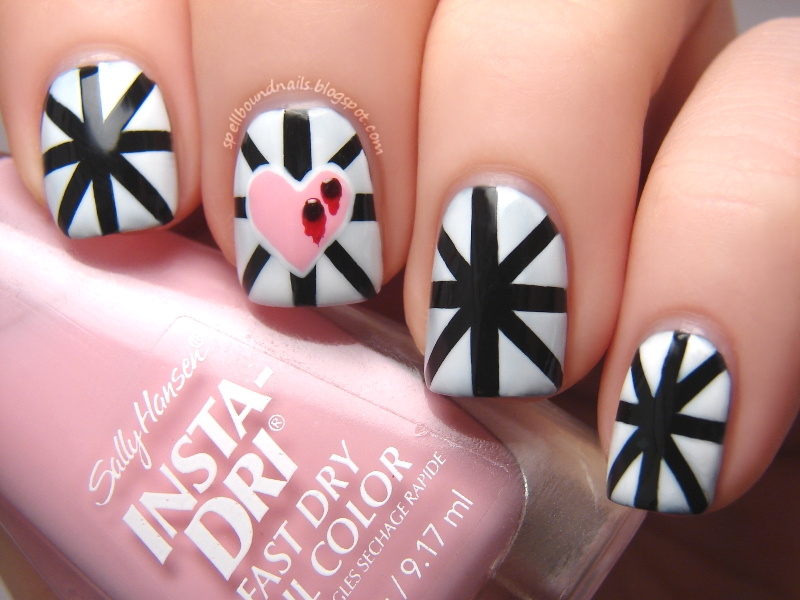
V is for ... Vampire's Valentine.

nails nailart nail art polish mani manicure Spellbound Lacquer ABC Challenge holiday Valentine's Day Anti-Valentine's Day V-Day sunbeams Vampire's Vampire starburst tape taping taped blood drips drip heart pink white black red L.A. Colors Energy Source Circuits Sally Hansen Pink Blink Wet n Wild I Red A Good Book NYC New York Color Lincoln Center Venique Runway Sparkle glitter shimmer

I loved last year's Anti-Valentine's Day nails so much that I decided to use it as inspiration for this mani. Honestly, I really can't believe how far I've come in a year.

nails nailart nail art polish mani manicure Spellbound Lacquer ABC Challenge holiday Valentine's Day Anti-Valentine's Day V-Day sunbeams Vampire's Vampire starburst tape taping taped blood drips drip heart pink white black red L.A. Colors Energy Source Circuits Sally Hansen Pink Blink Wet n Wild I Red A Good Book NYC New York Color Lincoln Center Venique Runway Sparkle glitter shimmer

I loved the entire design of this mani, every step taken to create them, so I took many pictures! A base of black, some tape, and some white polish created this star-burst design.

nails nailart nail art polish mani manicure Spellbound Lacquer ABC Challenge holiday Valentine's Day Anti-Valentine's Day V-Day sunbeams Vampire's Vampire starburst tape taping taped blood drips drip heart pink white black red L.A. Colors Energy Source Circuits Sally Hansen Pink Blink Wet n Wild I Red A Good Book NYC New York Color Lincoln Center Venique Runway Sparkle glitter shimmer

I used white polish to create a heart on my index nail. The white creates a barrier over the black; this means you don't need to use a ton of pink to cover the black. It also creates a very pretty border around your pink heart if you make it slightly smaller than your white heart. This alone would make for a gorgeous Valentine's Day mani!! You could even create hearts on all your nails instead of just as an accent or use red for the heart to make it really stand out.

nails nailart nail art polish mani manicure Spellbound Lacquer ABC Challenge holiday Valentine's Day Anti-Valentine's Day V-Day sunbeams Vampire's Vampire starburst tape taping taped blood drips drip heart pink white black red L.A. Colors Energy Source Circuits Sally Hansen Pink Blink Wet n Wild I Red A Good Book NYC New York Color Lincoln Center Venique Runway Sparkle glitter shimmer

Since I was going to create bleeding fang marks on my heart I knew I couldn't use red. :) The bleeding marks add depth and give these nails a nearly 3-D look—all a pretty illusion of course. With the dark fang marks, the bright red blood, and the white outline, doesn't it look like the heart is really bleeding?

nails nailart nail art polish mani manicure Spellbound Lacquer ABC Challenge holiday Valentine's Day Anti-Valentine's Day V-Day sunbeams Vampire's Vampire starburst tape taping taped blood drips drip heart pink white black red L.A. Colors Energy Source Circuits Sally Hansen Pink Blink Wet n Wild I Red A Good Book NYC New York Color Lincoln Center Venique Runway Sparkle glitter shimmer

Finally, I created white outlined blood on the tips of my nails. I added a small amount of Venique Runway Sparkle over all of the blood. Sadly, I couldn't seem to get a good picture with the actual sparkle.

So, which are you this Valentine's Day: hearts and roses or vampire bites? Will you be rolling out the Anti-Valentine's Day red carpet?

Friday, January 25, 2013

Candy Coated Collection — Peppermint Pinwheels

I've been reading through the new giveaway entries for the 'what do you want to see on my blog this year' question and there were a few who wanted Valentine's Day nail art and a few who wanted holiday nail art so I decided to tie a V-Day mani into one of my swatches.

Update: This polish and the rest of the collection are now up for sale in my Etsy shop.


nails nailart nail art polish mani manicure Spellbound Lacquer Candy Coated Collection Candyland Candy Land Peppermint Pinwheels red white hex square glitter indie Sally Hansen Pink Blink Emerald City pink green Valentine's Day holiday Christmas

Peppermint Pinwheels was inspired by the Peppermint Forests of Candyland and their mesmerizing swirls of red and white.

nails nailart nail art polish mani manicure Spellbound Lacquer Candy Coated Collection Candyland Candy Land Peppermint Pinwheels red white hex square glitter indie Sally Hansen Pink Blink Emerald City pink green Valentine's Day holiday Christmas

With its red squares and white hexes, Peppermint Pinwheels is perfect for everyday wear. But, layer it over the right color and it works great for holidays like Christmas and Valentine's Day. :)

nails nailart nail art polish mani manicure Spellbound Lacquer Candy Coated Collection Candyland Candy Land Peppermint Pinwheels red white hex square glitter indie Sally Hansen Pink Blink Emerald City pink green Valentine's Day holiday Christmas

I layered two very thin coats of Peppermint Pinwheels over Sally Hansen Emerald City for a festive Christmas look (I did actually do this around Christmas). Sadly, I added a layer of top coat over Emerald City too soon and caused some pretty bad streaking.


nails nailart nail art polish mani manicure Spellbound Lacquer Candy Coated Collection Candyland Candy Land Peppermint Pinwheels red white hex square glitter indie Sally Hansen Pink Blink Emerald City pink green Valentine's Day holiday Christmas

For a simple Valentine's Day mani, I used a base of Sally Hansen Pink Blink and a thin coat of Peppermint Pinwheels. You may remember Pink Blink from my recent haul. I couldn't ask for a better color. I think this is the most perfect V-Day pink ... actually, I think this is the most perfect pink EVER!! This is definitely the color of pink I think of when I think of my favorite color. :)


nails nailart nail art polish mani manicure Spellbound Lacquer Candy Coated Collection Candyland Candy Land Peppermint Pinwheels red white hex square glitter indie Sally Hansen Pink Blink Emerald City pink green Valentine's Day holiday Christmas

Here is a second, thicker coat of Peppermint Pinwheels.

More Valentine's Day manis will be coming soon. There are definitely a few I have sketched up that I want to try. :)

So, what do you gals think of the Candy Coated Collection so far? Have a favorite?

Wednesday, January 2, 2013

P is for ...

Hello everyone. Welcome to 2013!! :) Today's post was supposed to be for the letter Q in the ABC Challenge but, after the Christmas rush, I felt like doing nothing, so I'm a little behind in my posts. I don't feel right moving onto Q before posting P so ...

P is for ... Phoenix.

nails nailart nail art polish mani manicure Spellbound ABC Challenge P is for Phoenix Harry Potter Fawkes flames red yellow orange black Wet n Wild I red a good book Sally Hansen Sun Kissed Lightening white L.A. Colors fire

I cringe a little looking at this design. I was cleaning my usual nail art brush and the bristles came out. I was stunned because I was cleaning it like I always clean my brushes. I wasn't any more or less rough/gentle or pulling on the bristles excessively. I'm really not pleased because I pay an outrageous price for these brushes—4 brushes for about $15! I think I'll be ordering my brushes online from now on; for my usual price I can probably get a full set.

So, all brush rants aside, this design is a little messier than my usual since I had to use a thicker brush for the line work. Still, I felt very Harry Potter creating this phoenix ... though it's not as stunning as Fawkes. :)

Monday, December 31, 2012

Happy New Year!!

Happy New Year everyone!! Wow, it feels like forever since I've posted anything. I only have three real resolutions for this year and that one is definitely on there. I want to get back into my regular posting schedule and keep coming up with more and better ideas. I want to get and succeed at my dream job. And last but not least I want to keep eating healthy, continue my workout schedule, and keep losing weight. I lost over 30 pounds in about 1.5 years — most of that this year. Yay me!! I still have another 10-20 pounds to lose (continuing in a healthy, non-obsessive way) to reach my goal weight. Wish me luck. :)

nails nailart nail art polish mani manicure Spellbound Happy New Year tape taped red gold glitter shimmer James Bond The Spy Who Loved Me Goldeneye OPI Skyfall Collection metallic flaky flakies holiday 007

Now, onto the post. One of my Christmas gifts this year was 'Get Bonded' a three piece nail polish gift set. It contained The Spy Who Loved Me, Goldeneye, and Skyfall — all three from the OPI Skyfall Collection, their James Bond holiday collection. I decided to use Goldeneye and The Spy Who Loved Me in a tape mani for New Year's. Wow, this mani was stunning!!! I left it on for four days. For a girl who changes her polish daily, sometimes multiple times a day, this shows just how much I loved this mani.

nails nailart nail art polish mani manicure Spellbound Happy New Year tape taped red gold glitter shimmer James Bond The Spy Who Loved Me Goldeneye OPI Skyfall Collection metallic flaky flakies holiday 007

Honestly, I had every intention of passing on this collection. Looking at the swatches I didn't see anything truly stunning and worth searching for. Boy was I wrong!! I am so glad I got this as a gift. I couldn't manage to capture the true magnificence of Goldeneye. This picture gives an idea of the range of gold shades this glitter captures. The glitter was odd, kind of chunky and flaky, almost a metallic and went opaque for me in just two coats. It's not like any other glitter in my collection which is awesome!!

nails nailart nail art polish mani manicure Spellbound Happy New Year tape taped red gold glitter shimmer James Bond The Spy Who Loved Me Goldeneye OPI Skyfall Collection metallic flaky flakies holiday 007

Here is another shot of Goldeneye before I started taping. This picture washes out the color but gives you a better look at the chunky quality of the glitter. I can't get over how close I came to missing this glitter, of choosing not to get it. How silly of me!!

nails nailart nail art polish mani manicure Spellbound Happy New Year tape taped red gold glitter shimmer James Bond The Spy Who Loved Me Goldeneye OPI Skyfall Collection metallic flaky flakies holiday 007

I am equally as happy to own The Spy Who Loved Me. These polishes went on beautifully, look amazing together, and lasted the four days with not a hint of a chip. I did need to take a chisel to my nails to get Goldeneye off. It's misleading, looking so flaky and metallic. It makes you forget it's a glitter at heart. I think maybe it's harder to remove than regular glitters. I scrubbed and soaked and still had patches that just wouldn't come off. They're actually still there, like little golden bruises on my nails.

You've heard my resolutions; what things do you hope, wish and/or promise to do in 2013?

Friday, December 21, 2012

Christmas Borders

The rush to Christmas is insane! I spent the day baking cookies and there's a full day of shopping to look forward to tomorrow ... and probably Monday too. Yes, I am a world class procrastinator. I've put this all off until the last minute ... again, because this is exactly what I did last year. I don't even have any decorations up yet. So, this is the reason for the cut back in posts if you were wondering, lol.

nails nailart nail art polish mani manicure Spellbound Christmas border borders dots dotted dotting red green holiday Sinful Colors Exotic Green Wet n Wild I Red a Good Book simple easy

I had all these wonderful ideas I was going to do, and then I just never seemed to have the time to do them. So, I came up with a few very simple nail designs to share. This is one of them. Dotted border nails. It's something new to me. I've done true border nails before but never dotted borders.

nails nailart nail art polish mani manicure Spellbound Christmas border borders dots dotted dotting red green holiday Sinful Colors Exotic Green Wet n Wild I Red a Good Book simple easy

I decided to keep it very Christmas-y with alternating red and green. This is carried over onto my other hand, starting with green on my thumb so it's all very different and interesting. This could totally be worn alone if you don't have much time for dots. Two coats of Sinful Colors Exotic Green and two of Wet n Wild I Red A Good Book, a layer of quick drying top coat and you're out the door looking perfectly festive.

nails nailart nail art polish mani manicure Spellbound Christmas border borders dots dotted dotting red green holiday Sinful Colors Exotic Green Wet n Wild I Red a Good Book simple easy

For the dotted border I used my smallest dotting tool. I created the dots and then went over them again to make them brighter when I realized they weren't showing up well. I wish I had started with white dots first before using red and green. This would have made them much more noticeable, but you live and learn.

Overall though, a very simple and Christmas-y mani. Enjoy. :)

Monday, December 10, 2012

China Glaze Holiday Joy — Pure Joy

Today's swatch from the China Glaze Holiday Joy Collection is Pure Joy.


nails nailart nail art polish mani manicure Spellbound China Glaze Holiday Joy Pure Joy color swatch glitter red gold christmas
Two coats of Pure Joy with two coats of top coat

Pure Joy is another of the glitters from this collection. It has a clear base with small red hex glitters and larger gold hex glitters.


nails nailart nail art polish mani manicure Spellbound China Glaze Holiday Joy Pure Joy color swatch glitter red gold christmas
One coat of Pure Joy; no top coat

This has good coverage with one coat. Not enough to be a one coat wonder but really good for a glitter. The small red glitters fill in nicely around the larger gold glitters. The gold glitters did need a bit of dab and drag to get them around the nail but I didn't have to dig for them. They came out of the bottle good; they just didn't want to spread out.

nails nailart nail art polish mani manicure Spellbound China Glaze Holiday Joy Pure Joy color swatch glitter red gold christmas
Two coats of Pure Joy; no top coat


nails nailart nail art polish mani manicure Spellbound China Glaze Holiday Joy Pure Joy color swatch glitter red gold christmas
Two coats of Pure Joy; two coats of top coat

I found that all the glitters of this collection needed two coats of top coat to get a smooth to semi-smooth finish. That said, I think this one was the best at accepting top coat. The glitter lay pretty smoothly on its own and the glitters left very few cracks between them for the top coat to sink between.

nails nailart nail art polish mani manicure Spellbound China Glaze Holiday Joy Pure Joy color swatch glitter red gold layered poinsettia christmas
One thin coat of Pure Joy; layered over two coats China Glaze Poinsettia

And just to show you how well this one layers, I put one very thin coat of Pure Joy over two coats of China Glaze Poinsettia. The only problem I had with this was that no matter how much I dabbed and pushed the glitters wouldn't stick to the polish around my cuticles. Not a big problem at all and the awesome shimmer effect of the red glitter more than made up for this!


Color: Small red hex glitters and larger gold hex glitters in a clear base.
Finish: Glitter
Application: Application was good. The glitter came out of the bottle nicely with no digging needed and only needed a bit of dabbing and pushing to get the gold glitter arranged around the nail. Builds up perfectly so it can be worn alone, but layers over other polish just as nicely.
Coats to Opaque: 2
My Rating (1-5): 4 — 4.5 if pushed. It's not a bad glitter, and it really is perfect for the holidays.

Tuesday, December 4, 2012

China Glaze Holiday Joy — Cranberry Splash

Today's China Glaze Holiday Joy polish is by far my favorite of this collection. It was one I picked up completely on a whim, but I couldn't be happier.

nails nailart nail art polish mani manicure Spellbound China Glaze Holiday Joy Collection Christmas red shimmer glitter ruby Cranberry Splash color swatch review

Meet Cranberry Splash, an amazingly beautiful ruby red shimmer. This is two coats of Cranberry Splash, picture taken in the shade. In some lights this polish looks almost liquid on the nails. Its shine is so intense and gorgeous.

nails nailart nail art polish mani manicure Spellbound China Glaze Holiday Joy Collection Christmas red shimmer glitter ruby Cranberry Splash color swatch review

This picture was taken in my lightbox. Polishes like Cranberry Splash, Christmas red with shimmer, are fairly common additions to most holiday collections. However, I find China Glaze has captured the most perfect shade of shimmery red for the holiday season.

nails nailart nail art polish mani manicure Spellbound China Glaze Holiday Joy Collection Christmas red shimmer glitter ruby Cranberry Splash color swatch review

This picture, taken in full sunlight, shows the wonderful shimmery side of Cranberry Splash.

Application was nearly perfect. It went on very smoothly and was easy to control. I find most red polishes have a messy application but Cranberry Splash needed next to no cleanup. There were a few streaks when I wasn't careful enough with the brush, but nothing too noticeable. I simply had to slow down a bit and apply from one side of the nail to the other instead of starting in the middle. This put a stop to any streaking and left behind a perfect finish. A top coat sealed it and gave it a shiny gleam.

All in all, China Glaze Cranberry Splash is a striking polish and will make a lovely addition to your nail polish collection. And just think how beautiful this color will look against some snow or in the presence of a lit and decorated tree during any holiday celebrations.


I'm attempting to start giving better, more thorough reviews instead of my usual 'it's pretty; go buy it'. I'm more than open to ideas on what a good review should include. If there's something you always look for in a review let me know and I'll try to include it in my upcoming reviews. Thank you!