Showing posts with label Gradient. Show all posts

Saturday, November 15, 2014

Barielle Jetsetter Collection | ZigZag Gradient Nail Art

*Some products were sent to me for testing and review, completely complimentary, from Barielle. All thoughts and opinions are my own.

Hello lovelies!! Some of you may have seen the black & white sneak peek of this mani on my Instagram account (@spellbound_nails) - now see it in full color! I was sent some really gorgeous fall colored polishes by Barielle from their fall/winter Jetsetter Collection. I'm not a great swatcher, but I pride myself on my nail art. With this in mind, I set myself the challenge of using them all in one mani. 6 polishes in one mani? It was a little challenging, but I love the final product!!


I started by painting my index and my pinky nails with my all time new favorite brown Autumn in Seoul. This is seriously the most gorgeous brown. It's a little bit red and a little bit gold with a light shimmer and a metallic-y finish that does streak a little but a good layer of top coat took care of that. This color leaves me wanting to paint my nails and just leave them that color all fall long so you know it's an amazing color!! While the brown was drying I took a sponge and created a gradient using (from cuticle down) Irish Eyes, Gondola Ride, Rain in Spain, and lastly Kiss Me Kate. There's not a huge difference between the green shades of Irish Eyes and Gondola Ride but the fade between greens is actually more visible in person than in pictures so I was pleased! I added some Born Pretty 2mm round gold studs to help it compete with the pattern I knew I was adding to the gradient. And lastly I did the pattern with Midnight in Paris.


I found this really awesome pattern while browsing for zigzag patterns to use. I was going to do a simple zigzag but then this one popped up in my search so I ran it through my Silhouette software and printed/cut it with my Silhouette vinyl cutter. It was tricky because the pattern was nowhere close to the simple peel and stick patterns I've been using but thankfully I had some vinyl transfer paper on hand and after 4 trials and errors before this I managed to get the pattern on my nails nearly perfectly. After that it was the simple paint over and peel off of regular vinyls. :)

L-R: Autumn in Seoul, Kiss Me Kate, Irish Eyes, Gondola Ride, Midnight in Paris, Rain in Spain

Here are the shades I used in case you were wondering. And I'm very sure I'll be finding all kinds of fun things to do with these all fall and winter long ... and probably longer because most of these are such great basic shades that can be used all year long and ones that everyone should have in their collection.


And I leave you with one last mani pic. ;)

What do you think? Do you have a favorite color from the Jetsetter Collection? As always, let me know in the comments.

Until next time,
Ashley

*Some products were sent to me for testing and review, completely complimentary, from Barielle. All thoughts and opinions are my own.

Sunday, May 25, 2014

Memorial Day Round-up

Memorial Day is tomorrow. It seems like time just flies by anymore. I blink and a week has passed. I planned to do this post early but life got busy. Half the time I figure if I get a chance to do it at all I'm ahead! Do you have your nail art ready for the holiday? If not take a look at some of these past designs (and the one I did especially for this post) that could be perfect for your nails. :)


The first is my Patriotic Drip nails. These are still, to this day, one of my favorite nail art designs. And honestly, they are so easy to do! I even have a tutorial to walk you through it!! (The original post for the Patriotic Drips)


Easy, right? It's okay if you're not up to using a nail art brush though because I have one even simpler for you! All it takes is red, white, and blue polish and some saran wrap!


This mani is not only easy, but it's fast too! I started with just one coat of China Glaze First Mate. Let this dry completely before moving on, and it is really the only part you have to wait for. Next put a drop or two of white polish on a piece of paper and dip a bit of crumpled saran wrap into it. Dab the saran wrap around the paper until you start to see a design that is more than just blobs of nail polish and then dab the saran wrap around your nails. Repeat with the red polish. I went back and forth between red, white, and blue until I got a design I liked. There is really no way to do this wrong so have fun! I topped the design with Seche Vite and then did a quick clean up with a q-tip dipped in nail polish remover.

My helpful tip of the day: Using top coat before you clean is perfect for those of you who have a tendency to over clean and ruin your hard work as it will protect the design - you'll need to clean through a layer of top coat before you erase any of the design. :)

Still not what you're looking for? Try one of my older designs. I think I am nearing the end of new and different when it comes to patriotic nail art because I've done so much of it already!


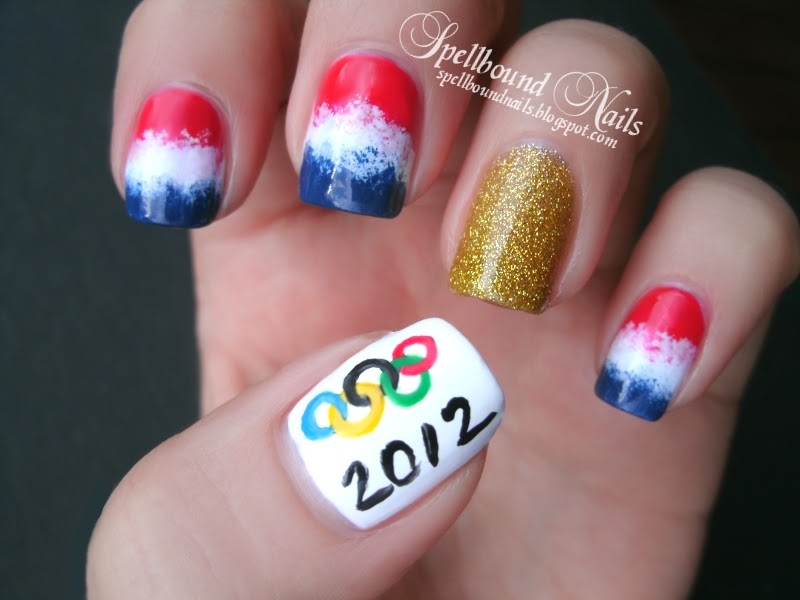
And while this may be a design I did for the Olympics of 2012 this red, white, and blue gradient would be perfect alone or used as an accent. (The original post for the Olympic nails.)

Whether you choose one of these designs or already have an idea in mind ... what will be on your nails for Memorial Day?

Friday, January 31, 2014

Vintage Valentine Nail Art

Woohoo, more V-Day nail art! Today's mani is by far one of my all time favorites. I just love vintage-y nail art for Valentine's Day... anytime really. This mani is just so simple but still so elegant. :)


This mani was done with polishes from my Valentine's Day collection (Victorian Romance) and a little help from Born Pretty Store rose decals. I started with a base of My Own Sweet Valentine with an accent nail of Parchment & Lace. Once MOSV was dry I sponged on some Cheeks Tinted Red and a little more MOSV to really blend it together. The shimmer on this gradient was insane! I used top coat on Parchment and Lace and then used a Born Pretty Store water decal. (These decals are only $0.88 right now! Plus if you use the code BPS2014 you'll get 15% off sitewide! I say these are more than worth every penny!!!)


The decal was so easy to use. Just cut it out, dunk it into water (warm water if it's winter) for 10-15 seconds and the decal will slip right off the paper and be easy to position on your nail. I lightly wet the nail and placed the rose. I used a paper towel to blot the excess water and then gently used a finger to press the decal down, getting rid of wrinkles and bubbles until the decal dried completely. Then I topped it with more top coat and it was perfect!!


I couldn't resist trying the glitter of Love & Devotion over the gradient. It's nice, but I found I preferred the simplicity of the gradient alone.

What's your go-to nail art for Valentine's Day?

Monday, March 11, 2013

Pastel Gradient with Born Pretty Store Studs

Hello again! Gradients seem to be the thing for me lately. I think it's the coming of Spring and Summer; I'm just preparing! So I dug out the most pastel colors I own for a pretty and feminine spring gradient — a little early, but it would be perfect for Easter.

nails nailart nail art polish mani manicure Spellbound Lacquer pastel gradient Born Pretty Store metal studs rhinestones Revlon Enchanting Sally Hansen Pink Blink Petites Color Fever Creme Blue Spring Summer feminine elegant

Those most pastel colors I own just happened to be Sally Hansen Pink Blink, Petites Color Fever Creme Blue, and Revlon Enchanting. I decided to try a makeup sponge with this gradient instead of my usual eyeshadow applicator. I like the smooth fade between colors, but I didn't like the extra work it took to get the colors built up. I also thought it was beyond time to break out my Born Pretty Store gold metal studs. I received these by mistake with an old order and they were nice enough to let me keep them while also shipping out the ones I did order. It's been too long since I played with these studs. ;)

I'm thinking it's also been too long since I ordered anything from the Born Pretty Store. I forgot how awesome their nail decorations are! And they've come out with so much more since my last order. I'm dying for the hearts ... and the squares ... and the stars ... and ... well, I think you get the idea! I'll definitely be ordering something. 


You can use the code MLE10W21 at checkout for 10% off your order if you decide to purchase something from the Born Pretty Store too!

Wednesday, February 20, 2013

Rainbow Gradient

Today is supposed to be my X nail art for the ABC Challenge, but I'm stumped on what to do for this letter. I'll think of something by next challenge ... hopefully. For now, check out the rainbow gradient I wore last weekend.

nails nailart nail art polish mani manicure Spellbound Lacquer fun cute sweet rainbow gradient eyeshadow applicator sponge sponged sponging red orange yellow green blue purple colorful Rimmel English Rose Sinful Colors Hazard Sally Hansen Lightening Green with Envy Wet n Wild I Need a Refresh-Mint On a Trip

I hate the claw, but it's pretty much the only position in nails that need to include the thumb. Some of you may remember the sideways rainbow gradient from my NOH8 nails. I wanted to try something different this time so I did them as a normal gradient. I found the lightest rainbow colors from my collection to use for this.

nails nailart nail art polish mani manicure Spellbound Lacquer fun cute sweet rainbow gradient eyeshadow applicator sponge sponged sponging red orange yellow green blue purple colorful

Here are my nails before clean-up. So messy!!! I usually tape around my nails before doing something this messy, but I forget. Isn't that the way things usually go? You only forget something that would speed things up when you're in a hurry!

nails nailart nail art polish mani manicure Spellbound Lacquer fun cute sweet rainbow gradient eyeshadow applicator sponge sponged sponging red orange yellow green blue purple colorful Rimmel English Rose Sinful Colors Hazard Sally Hansen Lightening Green with Envy Wet n Wild I Need a Refresh-Mint On a Trip Rimmel English Rose Sinful Colors Hazard Sally Hansen Lightening Green with Envy Wet n Wild I Need a Refresh-Mint On a Trip

I took this picture in the car. It was snowing so hard and then a little bit of sunlight peeked through, and I couldn't resist snapping a few pics. It's not up to my usual standard, but there's something I really like about this picture.

 Rimmel English Rose Sinful Colors Hazard Sally Hansen Lightening Green with Envy Wet n Wild I Need a Refresh-Mint On a Trip

I couldn't resist getting a picture of my cotton ball after I removed the gradient. I'm reminded of a clown's wig, lol.

Colors Used: Rimmel English Rose, Sinful Colors Hazard, Sally Hansen Lightening, Sally Hansen Green with Envy, Wet n Wild I Need A Refresh-Mint, Wet n Wild On a Trip

Tuesday, January 29, 2013

Spun Sugar Gradient

Hey everyone! Sorry about the non-nail art related posts yesterday. There was a bit of an emergency Sunday that left me with no time to edit and type up posts. So, I went with what I did have. I do really hope to see a few of you joining me in the Blogs to Love Friday linkup. That said, today's post really is nail art!!


nails nailart nail art polish mani manicure Spellbound holiday Valentine's Day Sugar Spun Gradient Sally Hansen Pink Blink Fuchsia Power Wet n Wild I Red A Good Book Sinful Colors Beautiful Girl L.A. Colors white red Energy Source

I have a few ideas for Valentine's Day nails and this was one of the first I thought of — spun sugar Valentine's Day nails done as a gradient.


nails nailart nail art polish mani manicure Spellbound holiday Valentine's Day Sugar Spun Gradient Sally Hansen Pink Blink Fuchsia Power Wet n Wild I Red A Good Book Sinful Colors Beautiful Girl L.A. Colors white red Energy Source

Spun sugar nails are really easy. They are a bit messy but the wispy strings make it easy to clean up. I started with a base of two coats L.A. Colors white. This is Energy Source now that L.A. Colors started naming their polishes. The next step is probably the hardest and it's not hard at all! It just takes a bit of patience. I started at the tips of my nails and worked up using Sally Hansen Pink Blink first. Put a drop or two of your first color on a piece of paper, using a pin or a dotting tool mix the polish until it's thick. You can speed this along by blowing on it as you stir. You can start as soon as it's thick enough to start forming strings when you lift the pin out of the polish. I didn't wait long enough with my red polish and got some drips instead of strings, so make sure it's thick enough not to drip.

Once strings start to form you'll need to get your nail very close to the thick polish. Lay your finger on it's side angled towards the polish if you're having trouble getting the strings on your nail. Use your pin or dotting tool to quickly but smoothly pull strings across your nails, doing one nail at a time.


nails nailart nail art polish mani manicure Spellbound holiday Valentine's Day Sugar Spun Gradient Sally Hansen Pink Blink Fuchsia Power Wet n Wild I Red A Good Book Sinful Colors Beautiful Girl L.A. Colors white red Energy Source

Continue doing the tips of each nail with Pink Blink. You may need to thicken more polish if you didn't start with enough or if it thickened too quickly. I used Sinful Colors Beautiful Girl next. I placed some of my strings over some of the Pink Blink strings to create a seamless fade of color. After Beautiful Girl, I used Sally Hansen Fuchsia Power and then finished with Wet n Wild I Red A Good Book.

Let the polish dry. It shouldn't take long! Then do a quick cleanup. I pinched off some of the wispy strings that were flying around my nails and then used some nail polish remover and a Nail Tee (a fancy pointed Q-tip) to clean up the rest.


nails nailart nail art polish mani manicure Spellbound holiday Valentine's Day Sugar Spun Gradient Sally Hansen Pink Blink Fuchsia Power Wet n Wild I Red A Good Book Sinful Colors Beautiful Girl L.A. Colors white red Energy Source

Add top coat if you like and admire your new mani. Take into consideration when deciding whether to use top coat or not that, while it will make your mani last longer, it will smooth all those strings you just worked so hard on. It will likely take more than one coat as this is a very thick mani. It may also cause some bubbling if you're not careful applying your top coat.

That said, I did use top coat, two coats ... and I did get one large bubble that popped while the top coat dried and left behind a spot bare of top coat. It's really not noticeable though, even in my close-up pictures. I did kind of miss the stringed look though.

Tuesday, January 22, 2013

Gradient Fail

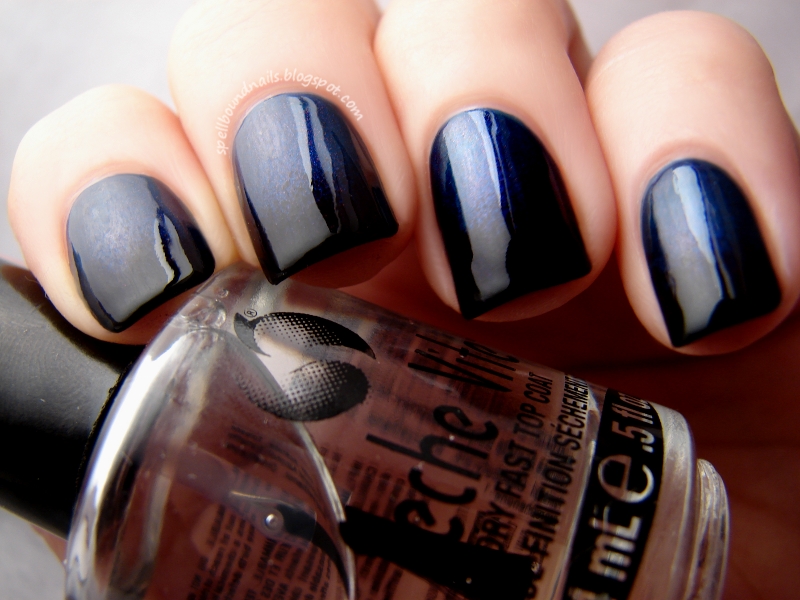
Welcome to my gradient fail. This isn't a full fail, but under any light except very direct sunlight and my lightbox these colors are just too dark to show the gorgeous fade between them.

nails nailart nail art polish mani manicure Spellbound OPI Best of the Best mini collection Russian Navy indigo blue shimmer magenta Lincoln Park After Dark purple eggplant deep dark LA Colors black gradient fail sponge sponged Seche Vite Dry Fast Top Coat

Even with my lightbox I had a very hard time capturing this gradient. I used two polishes from the OPI Best of the Best mini collection. I got this collection as a gift Christmas 2011, and I love it to pieces.

nails nailart nail art polish mani manicure Spellbound OPI Best of the Best mini collection Russian Navy indigo blue shimmer magenta Lincoln Park After Dark purple eggplant deep dark LA Colors black gradient fail sponge sponged Seche Vite Dry Fast Top Coat

The first polish I used, and the base of my gradient, is Russian Navy. Wow! I can see why this was one of the Best of the Best. Originally from the OPI Russian Collection, Russian Navy is now an OPI Classic shade. From the outside, Russian Navy looks purple. However, once you untwist that cap you're in for a shock! This polish is a deep indigo blue and all that purple you saw from the outside fades into a subtle shimmer.

nails nailart nail art polish mani manicure Spellbound OPI Best of the Best mini collection Russian Navy indigo blue shimmer magenta Lincoln Park After Dark purple eggplant deep dark LA Colors black gradient fail sponge sponged Seche Vite Dry Fast Top Coat

Next, I used Lincoln Park After Dark, originally from the Chicago Collection. Alone this polish is a very deep, dark purple, but turned black when layered over Russian Navy. I was hoping once I got it sponged on and added a top coat that the beauty of this purple would shine through but I couldn't get a hint of purple on my nails no matter the light I put it under ... though some of the purple color did show in the bottle.

nails nailart nail art polish mani manicure Spellbound OPI Best of the Best mini collection Russian Navy indigo blue shimmer magenta Lincoln Park After Dark purple eggplant deep dark LA Colors black gradient fail sponge sponged Seche Vite Dry Fast Top Coat

Lastly, I added a small amount of black to the very tips, reminiscent of a French tip.

nails nailart nail art polish mani manicure Spellbound OPI Best of the Best mini collection Russian Navy indigo blue shimmer magenta Lincoln Park After Dark purple eggplant deep dark LA Colors black gradient fail sponge sponged Seche Vite Dry Fast Top Coat

One coat of Seche Vite Dry Fast Top Coat sealed the colors together and gave my nails an amazing amount of shine. This is my very first bottle of Seche Vite, bought and paid for with a free gift card I earned with my Swagbucks account. Sign up for an account of your own and use the code JANTASTIC (before 11:59 PT tonight) and you'll start with 100 Swag Bucks. Hint: A $5 Amazon gift card is 450 Swag Bucks.

So, overall, if I was going to walk around with my hands in a lightbox this would be a perfect gradient. I don't think that idea would work very well though and, sadly, neither does this mani anywhere except these pictures. :(

Monday, August 27, 2012

Neon Sunbeams

I'M BAAACK!!! Well, I've been back for a week but I needed time to mourn the loss of the beach. I missed it horribly this week. Gasp, I didn't even want to do my nails this week! However, that's over with, and I'm ready to get back into my usual posting schedule. I have a few nail designs saved up for you but I want to share my beach nails in this post. The design for this post was inspired by Neon Rays by Chloe's Nails. I thought they were the perfect nails to arrive at the beach with. And these nails are amazingly easy to do. The hardest part was actually cutting the tape since I don't own any striping tape.

nailart nail art nails mani manicure Spellbound Neon Sunbeams Rays Sunrays China Glaze Funky Fingers Color Club Taped Taping Tape orange green yellow pink hot black white Sun Worshiper Kingston Yell-Oh!

I'm not sure where the idea came from, I remember reading it on a blog somewhere, but the easiest way to cut the tape is to take a strip of the tape and place it on a sheet of wax paper. That way the tape doesn't stick to your scissors and you can get nearly perfect 'beams' every time. Simply peel them off once your base polishes are dry and create the beam pattern. I used the fairly standard beam pattern but you could turn the beams around, do different beam patterns on different nails or even do something else like zigzags.

nailart nail art nails mani manicure Spellbound Neon Sunbeams Rays Sunrays China Glaze Funky Fingers Color Club Taped Taping Tape orange green yellow pink hot black white Sun Worshiper Kingston Yell-Oh!

Speaking of the base polishes, you gals should know by now that I always use two (or more) coats of white to make the neons pop. This time I used two coats of China Glaze White on White. The neon polishes are China Glaze Sun Worshiper, Color Club Yell-Oh! (which looks slightly green to me and these pictures agree), and Funky Fingers Kingston. I didn't do or use anything special to get the polishes lined up on my nails. I tried using a nail art brush but they were simply too small to work with so I used the polish brush and carefully painted stripes on either side of my nail and finished with a stripe down the middle. These colors took two coats and I was extra careful with the final coat to touch up any mistakes I made with the first. It may sound daunting and there is a moment of panic before you begin (how could such a large brush make three lines without overlapping horribly?) but it's really not once you start! Trust me! You will want to be careful with the wider brushes such as some of the Sally Hansen brushes and the Wet n Wild Pro brushes. If you just have to use one of these brushes try tipping the brush in it's side. That will give you a slimmer brush to work with.

nailart nail art nails mani manicure Spellbound Neon Sunbeams Rays Sunrays China Glaze Funky Fingers Color Club Taped Taping Tape orange green yellow pink hot black white Sun Worshiper Kingston Yell-Oh!

Let your base polishes dry. You can add a top coat before taping for extra protection against chips and bleed through and also to give a smoother finish if you like. After your polishes are dry simply tape your pattern. Make sure the tape lays flat and remember to fold the ends of the tape over your nail tips and work it into the creases of your fingers. Coat your nail (and the tips of your nail between the tape) in your top polish. I chose black but again it doesn't have to be black. Once you have your top polish on immediately remove your tape. I use a pair of tweezers to grasp the tape (less messy and a smaller chance of smudging already completed nails) and get best results when I pull the tape slowly and smoothly back over my nail from the tip ... much like waxing in slow motion. :)

Saturday, July 21, 2012

A Week of Glitter: Flaming Glitter

Welcome to Day 5, the last and final post for 'A Week of Glitter'. There are many more ways to use glitter, but I have to end somewhere! So, I'll end with one of my favorite ways of using glitter. This post focuses on gradient glitter.


Both polishes I used are from the China Glaze Capitol Colours Collection. If you'll remember this was dubbed the China Glaze Hunger Games Collection. I used Stone Cold as my base color and created the gradient using the red and gold glitter, Electrify.


You can see in this picture that Stone Cold has it's own bit of sparkle to it with it's silver shimmer. Stone Cold is a matte polish, however I used a top coat with this mani. The color change of Stone Cold from matte to shine is almost startling. It goes from the dark silver/grey of stone to a deep almost black color. Different, but still gorgeous.


No matter how much I love the look of Electrify, I try to use it only occasionally. Why, you ask, if I love it so much? Electrify is one of the most stubborn glitters I've ever encountered. Even using the foil method recommended for stubborn glitters it still takes a few minutes of scrubbing to get this removed from my nails. That's saying nothing about how the bits of removed glitter cling to everything they meet.

Friday, January 13, 2012

Feeling Purple

I went to bed last night with the polish laid out for a pattern inspired nail design. However, I woke up today feeling ... purple. Instead of going for my fallback of matte purple I decided to attempt my first gradient.


How hard could this possibly be, I asked myself? I've watched videos and read blogs about this topic before. It seems pretty impossible to screw this design up.


I should know better by now than to ask what could possibly go wrong. My feeling purple day has left me feeling pretty blue.


I instantly picked up my new sponge and began dabbing the color on. Everything was going great. I was a bit disappointed that my two dark purples were hard to differentiate, but that was okay. There was enough of a color difference along the entire nail to make up for that. I let it dry a bit before I went to work with an old clear polish. The colors started their typical watercolor effect, as they always do when I use a sponge, but that was what I was going for this time. Great, right? Except that not all the color was blending and not all the color was staying on the nail. The color was picking up in places leaving the light base purple where there should be dark. Other places just weren't blending. It was like a train wreck. I couldn't look away, and I certainly couldn't stop once I had already begun. I finished up and decided to add some sparkle to the tips with a purple/blue glitter. Maybe this would act as a disguise. Well, it didn't ... but the glitter made me feel better.


Overall, this wasn't a complete disaster. I'm just such a drama queen perfectionist if I don't reign myself back that to see such a splotchy, streaked design leaves me cringing slightly. That said, most people in everyday life don't look at my nails through a microscope. The gradient effect is in full force and looks stunning from far away. However, my perfectionism makes me all the more determined to perfect my gradient making abilities so that the design looks just as stunning under a microscope.


I welcome hints, tips, ideas, and requests. I can't promise to do every request, but I'll certainly try my best. All I ask is that you be polite. :)


Polishes Used

  • Sally Hansen Double Duty
  • Sally Hansen nailgrowth Miracle in Loyal Lavender
  • L.A. Colors Color Craze unnamed purple (BCC 590)
  • Revlon in No Shrinking Violet
  • Sally Hansen in Deeply Violet
  • L.A. Colors Color Craze unnamed glitter (BCC 582)