Another day, another post. I know I mentioned it somewhere before, whether here in a post or on my Facebook page, but I was asked to do a set of nails for my niece for her Spring Fling dance. I'm happy to say I got them completed and didn't mess them up while helping her glue them on. They looked amazing with her dress!
She was my personal hand model for the day and was nice enough not to complain when I twisted and repositioned her fingers into what was surely uncomfortable positions. :)
The nails also looked adorable with her enormous ring and oversized earrings!
Alright, gals, say hello to my niece. She was finally all decked out for Spring Fling and ready for pictures.
Can you imagine dancing in those shoes???
Monday, May 14, 2012
Sunday, May 13, 2012
The Mommy Mess
I thought long and hard about this design. I didn't want a generic Mother's Day design. What I really wanted was something personal to my mother. Well, my mom's favorite flower is the lilac. Best of all? Her favorite color is also purple! Talk about perfect.
Sadly, I found the lilac flower almost impossible to recreate into something people would look at and think, "Oh, that's a lilac!" In my opinion, it's a bit of a mess.
However, my mom was kind enough to point out that her knowing what it was was all that should matter. This mani was created for her after all, and she loves it.
I started with these nails. I'm not usually one for a French mani. I always end up with streaks when using a 'natural' polish, which was no different with this mani. But I became pretty fond of these. I used two coats of OPI Bubble Bath with one coat of OPI Alpine Snow on the tips. I was feeling very steady handed that day so I went ahead and free handed the tips.
These last two pictures are of my left hand. This is the hand I usually use for my pictures, but I found myself liking the nails of my right hand better. But, I guess the lack of precision worked better for this mani. Go figure.
Polish Used
Borghese - Brilliante
OPI - Bubble Bath
OPI - Alpine Snow
OPI - Uh-Oh Roll Down the Window
Sally Hansen - Green with Envy
Sally Hansen - Lacey Lilac
Pure Ice - New Lilac
LA Colors - Purple
Sally Hansen - Insta-Dri
Thursday, May 10, 2012
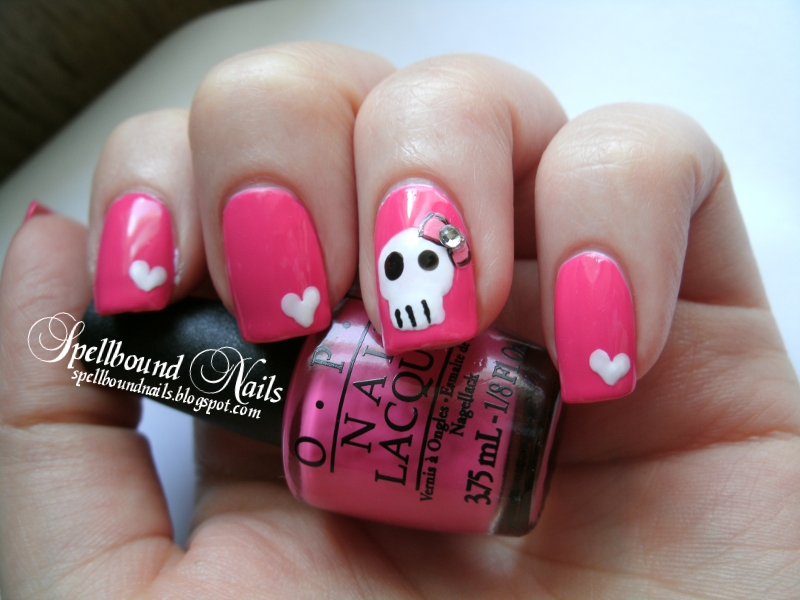
Bowed Skulls and Hearts
'ello, Girlies! It's been a really busy week. I've barely had time to do my nails let alone post anything. But that's why I'm here now, isn't it? To post something!
Today's post is a mani I absolutely adore, but am very sad about. I'll explain in a moment. For now, gaze upon the awesomeness.
I was going to do this mani using my nails studs right up until it came time to add them and I panicked. It just didn't feel right. The hearts were a last minute decision but worked so much better.
Think you've seen this mani before? Well, you just might have if you follow MixedMama! I honestly had no idea that I was doing an almost exact replica of another blogger's work. And I would have posted this with no idea if I hadn't stumbled across a picture of her mani while tagging the Bite the Bullet nails on my Facebook page. I was absolutely stunned and completely crushed to know this design was already done, but I guess that's the way nail art goes. You win some and you lose some.
I would also like to lay some credit at the feet of ProfessionalDQ over on Youtube. I first got the idea of bowed skulls there.
So, if you don't follow MixedMama or haven't watched some of ProfessionalDQ's nail art in action I definitely recommend heading over there next. :)
Polish Used
Today's post is a mani I absolutely adore, but am very sad about. I'll explain in a moment. For now, gaze upon the awesomeness.
I was going to do this mani using my nails studs right up until it came time to add them and I panicked. It just didn't feel right. The hearts were a last minute decision but worked so much better.
Think you've seen this mani before? Well, you just might have if you follow MixedMama! I honestly had no idea that I was doing an almost exact replica of another blogger's work. And I would have posted this with no idea if I hadn't stumbled across a picture of her mani while tagging the Bite the Bullet nails on my Facebook page. I was absolutely stunned and completely crushed to know this design was already done, but I guess that's the way nail art goes. You win some and you lose some.
I would also like to lay some credit at the feet of ProfessionalDQ over on Youtube. I first got the idea of bowed skulls there.
So, if you don't follow MixedMama or haven't watched some of ProfessionalDQ's nail art in action I definitely recommend heading over there next. :)
Polish Used
- Borghese - Brilliante
- LA Colors - White (2 coats)
- OPI - Strawberry Margarita (2 coats over white)
- Sinful Colors - Beautiful Girl (bow)
- LA Colors - Black
- Sally Hansen - Insta-Dri
Saturday, May 5, 2012
Bite the Bullet
Hello girlies! First off, I want to say sorry for the sparsity of my posts. While the teabag and nail glue holding my torn nail together are still holding up nicely I don't want to push my luck until the nail grows out a bit more.
Still, I'm happy to post a new color swatch today. I'm sure you all know by now that my go to color is purple. Well, this purple is so pretty! It's a good deal lighter than my usual purples but still matched well with my skin tone. This is Wet n Wild, Bite the Bullet.
I tried something new with the pictures this time. While running them through my art program to resize them I also 'oilified' then blurred my skin. It gave it a really weird look!
I'm not exactly sure how to describe this shade. It has so many different 'looks'. In some lights it looks fairly dark, in others it's a beautiful cool purple, but there were times it had a hint of gray. This was completely opaque in two coats, but I'm sure if I went slightly thicker on the coats I could have gotten away with just one. I still adore the new ManiCurve Pro Brush. It gives me so much more control. This mani needed no clean-up! It was so perfect.
It also held up magnificently! I'm hard on my polish so if it lasts past day two I think of it as something of a miracle. Well, Bite the Bullet was on day four with only one or two small chips on the very tips of my fingers that could probably have been prevented with periodic re-coats of my top coat. Most of my nails still had the ends capped.
A lovely color that holds up well? What more could you ask for? Not much, in my opinion.
Wednesday, May 2, 2012
Mattifying
Hello, lovelies! How do my nails look? These are the first pictures since I broke the index nail of this hand and did an emergency teabag fix. It's holding up great!!
As for this post, I bring you a new product today. Or rather, New York Color (NYC) brings you a new product. It's a mattifying top coat (yep, they called it mattifying) they've named Matte Me Crazy.
I was stunned to find this on the shelf. The only matte top coat to be found around here is Hard Candy's, Matte-ly in Love, found exclusively in Walmart. Hard Candy will cost you about $4 for a .35 fl oz bottle. It will even get you a cute little cardboard topper that fits over the cap. This makes finding it in a polish drawer very easy!
But, the reason I was so excited to find this new matte top coat is that NYC costs under $2 for a .33 fl oz bottle and can be bought in a multitude of locations. Sadly, it doesn't come with a cardboard topper and is not so easy to find in a polish drawer. :(
Now for the nitty gritty. Hard Candy has a much thicker formula. Hard Candy passed the drip test with flying colors. NYC ... not so much. It gave two very quick drips and a slower third before leveling out on the brush.
While on the subject of brushes. Hard Candy has a short, rounded brush with a slightly short and round cap. It fits in my hand okay but its short length may not be comfortable for everyone. NYC has a longer and wider brush that's attached to a round cone like cap. My preference in brushes have always leaned towards the wider and flatter. I adore the Sally Hansen flat brush and the new Wet n Wild megalast Pro brush so I prefer the NYC brush.
I don't think Riveting was the polish to go for when testing out a new matte top coat. I know it turned matte but I'm not sure just how matte. I can however tell you that NYC mattified slower than Hard Candy. I was actually kind of pleased about this though. I've had trouble with one part of my nails turning more matte than another with Hard Candy because it dried and turned matte too quickly. I don't know about anyone else, but I paint backwards so my pinkie nail was just settling into fully matte by the time I started my thumb with NYC. I had no streaking or blobs of darker matte with NYC.
I will definitely give you a more thorough answer on just how matte is matte when talking about these two in another post with another mani. NYC may just be a good substitute for the more expensive Hard Candy. We'll see ... probably sometime next week.
Sunday, April 29, 2012
Feeling Studly
Hello, girlies! I was going to post this mani Friday but with my nails breaking I held off. I managed to fix two of the nails with the teabag method. I really wish I had taken pictures to share but I was so focused and panicked at the time to think of it. I definitely recommend trying this method next time your nail tears. I've never had any of the fixes I've attempted before last this long. Do a search for the instructions and keep the supplies handy! You'll be happy you did.
Onto my Friday mani.
These are 2mm silver nail studs I bought from Born Pretty. I also picked up some black and gold studs that you'll definitely see used later. The Customer Service department was wonderful when I received two gold and a black. They immediately shipped out a package of silver for me and told me to keep the extra gold pack! Use the code EMILYW21 for a 10% discount if you place an order with Born Pretty.
I think I'm becoming obsessed with these things! They look even better in person.
I was so very, very sad to take these off so I could fix my nails. I didn't even get any really great pictures. I was waiting until Saturday when the weather was supposed to be less cloudy. I'll have to do these again and get better pictures. :)
Onto my Friday mani.
These are 2mm silver nail studs I bought from Born Pretty. I also picked up some black and gold studs that you'll definitely see used later. The Customer Service department was wonderful when I received two gold and a black. They immediately shipped out a package of silver for me and told me to keep the extra gold pack! Use the code EMILYW21 for a 10% discount if you place an order with Born Pretty.
I think I'm becoming obsessed with these things! They look even better in person.
I was so very, very sad to take these off so I could fix my nails. I didn't even get any really great pictures. I was waiting until Saturday when the weather was supposed to be less cloudy. I'll have to do these again and get better pictures. :)
Friday, April 27, 2012
HELP!
I just had to get out of what was to be a nice, relaxing bath to do emergency work on a broken nail. I reached up to turn off the water and my hand slipped off the knob. Sadly, my nail caught and broke. I'm thankful that it wasn't a clean break as this gives me a very slight chance of saving it.
I was happy to find that I had some left over nail glue and managed a temporary fix. However, what I'm asking is ... does anyone know how to save my nail? It's a fairly deep break right down the side. I know you can go into some of the local salons and have them fix it up for you but I don't have the transport, the time, or the money for this option. Are there any do-it-yourself options? Any products I can look for locally?
Subscribe to:
Posts (Atom)