Thursday, April 19, 2012

Chessur Disaster

Not all my nail designs work out. I, like everyone else, have off days and disasters. I call today's post the 'Chessur Disaster'.


For those who don't know, Chessur is the Cheshire Cat of Tim Burton's, Alice in Wonderland. This is one of my favorite movies and I dream of one day having a Cheshire tattoo complete with the Mad Hatter's top hat. I love any Alice in Wonderland but Burton always adds a certain flair to everything he touches that I simply adore.


In addition to being a simple tribute to such a wonderful movie, it is National Pet Month. I have my own pets that I adore, but I would love a Cheshire Cat of my own. Who wouldn't??


As you can see, this isn't my best mani. I tried something a bit different and it didn't work out. It happens to all of us. The thing to remember is: don't dwell. Seriously! Pick yourself back up, mop up those tears (if there are any), and move on. Thankfully, I realized what a disaster this was before I completed more than this hand. Yes, this turned into a one-handed design! The polish stayed on only long enough to take these pictures and then I moved on. C'est la vie!


Polish Used

  • Borghese - Brilliante
  • New York Color - Sidewalkers
  • New York Color - East Village
  • LA Colors - Black
  • LA Colors - White
  • Sally Hansen HD - Resolution
  • Sally Hansen - Fuchsia Power

Tuesday, April 17, 2012

Cracked Neon

Hello all you lovely followers! I hope everyone is doing okay. I was going to have this posted sooner but I got horribly sick this weekend. I'm happy to say that I'm feeling much better now though.


Today's post is a very simple mani, but one that I think is so perfect for summer.


Summer is the perfect time to catch the eyes of those around you, and what better way than with such of burst of color?


The thing to remember with neon polish is that you get the most color when it is layered over white. That's why, for this mani, I used two coats of white polish under two coats of neon before adding one coat of white crackle. This makes the neon color really pop.


Polish Used

  • Borghese - Brilliante
  • LA Color - White
  • Funky Fingers - Kingston
  • Funky Fingers - White Scales
  • Sally Hansen - Insta-Dri

Friday, April 13, 2012

From The Vault: Simple Glitter

... or maybe not so simple glitter.


This post is coming to you from the vault (or what I call my forgotten nail folder) since my nails are still painted Ocean Sunrise. They're holding up very well, showing simple tip wear on only one finger. Amazing! So, I decided to keep them until they start chipping.


With this in mind, I decided to post my before Easter mani. This mani was painted for one day of wear; between Paint Splatter to Hoppy Easter. I didn't want something I wouldn't want to take off so it had to be kept simple. This is what I came up with.


I used the polish that is quickly becoming a favorite of my collection. Maybe not my all time favorite but definitely within the top 10 ... maybe even the top 5 of the polishes I own. This is 2 coats of Wet n Wild Megalast in 'I Need a Refresh-Mint' with one coat of Funky Fingers 'Flashing Lights'.


Flashing Lights is a blue (or blue/green) based holographic glitter that I picked up at Five Below last month. The glitter is always catching the light and shifting colors. My two-year-old niece was fascinated by this mani and wouldn't let my fingers go for nearly five minutes, insisting she wanted her nails to look like mine. It must be something great if it can keep a kid that age distracted for any length of time!


What glitter post is complete without a blurred photo? This is just one coat of holo polish; you could certainly get a more eye-catching look with more glitter. However, I tried to keep the glitter (and thus the cleanup) to a minimum.


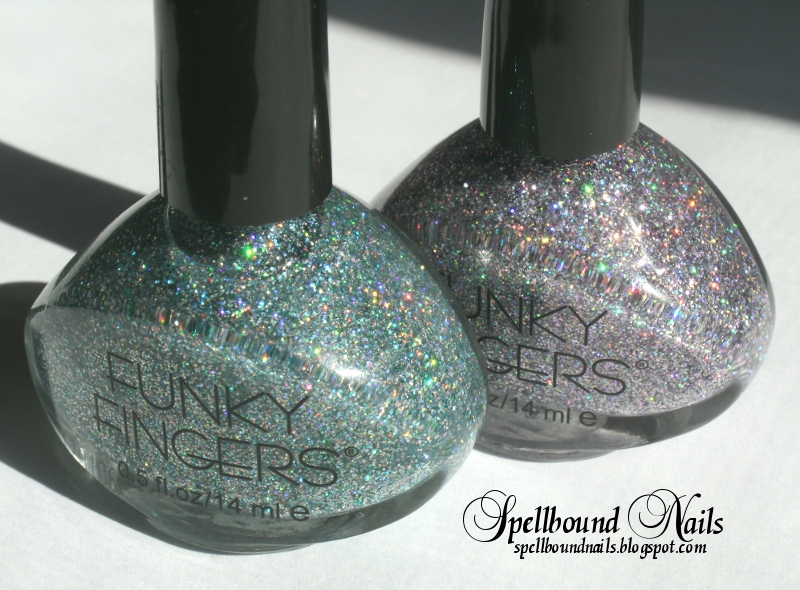
I thought I would take a moment and add a picture of the bottle so you can see what I mean when I call it a blue based holo. This is Flashing Lights compared to Sand & Stilettos, a purple based holo.

Wednesday, April 11, 2012

Ocean Sunrise


I am so excited for today's post!! The women of my family started what we hope is a yearly tradition last year by going on vacation together. My mom, my sister, her three girls, and myself went to the beach for a few days. We're going for a full week this year!


My favorite part of being at the beach (besides everything!) was sitting on our hotel balcony every morning with a cup of coffee watching the sunrise over the ocean. I think I got more pictures of that than nearly anything else.


I don't think this is a design you look at and immediately think beach, but I'm getting a gym membership soon in hopes of toning up a bit for the beach. I needed motivation!! I look at my nails and see the overwhelming beauty of every sunrise I saw over the ocean. It's just what I need.


Thumb

I had such fun doing this mani. It was like truly painting on tiny canvases. I mixed up my own colors and swirled them around on my nails to get just the right look. I put the sun on my ring finger and edged the sunrise out to the purple and blue of a night sky just being touched by the sun's rays.


So, what do you guys think of my motivational beach nails?

Sunday, April 8, 2012

Hoppy Easter!!!


Forgive me if this post looks all wrong. I'm writing it from my Kindle in the html. However I wanted to wish you guys a very Hoppy Easter and show you the nails I'm wearing today.

Be safe and enjoy your day. :)

Friday, April 6, 2012

Paint Splatter - Image Heavy

Hey guys! I hope everyone is doing great today. It's looking pretty nice here. The sun is shining, there's an Easter egg hunt later, and the kids are off school. Not my kids though since I don't have any—they're my sister's kids and it will be great to watch them hunt for Easter eggs. :)


The mani I have for you today is one I've been dying to try since I did The Hunger Games nails. Paint splatter!! I thought of doing pastels for Easter but I've fallen in love with the Funky Fingers neon orange color, Kingston, and decided to work around that instead. Wanting to give it a chance to really shine I used blue, purple, and yellow with the orange.


This post is very image heavy since I took pictures of nearly every stage of doing these nails. So, prepare yourselves. :p


The first part of doing these nails (after painting your base color) is taping your fingers. This will make cleanup much easier. This is 3 coats of LA Colors white. I've tried many whites (both cheap and expensive) and none have held up as well as this white. The whites I use chip within the day but LA Colors held up for multiple days and are only showing slight wear and tear to the tips. I definitely recommend hunting this polish out if you have trouble finding a good white because not only does it hold up well, I found it at my local Dollar Store.

The next step is gathering your supplies (polish and a regular old straw. I used a bendy one and it worked perfectly) and getting your station set up. You'll need something to put under your fingers while you 'splatter' or you'll end up with this mess all over your work station instead of on a piece of paper. This is just the mess from one hand. I switched papers for my right hand.


Even with the tape your nails will need some cleanup.


Direct Sunlight

Shade

Right Hand


I had trouble getting splatter on my right hand. It came out of the straw in blobs or small sprays, but in all I think it actually turned out better. I'll have to remember that less splatter looks more realistic when I do this again.


So, what do you guys think? Ready to try splatter nails? If you are, I recommend using your cheaper polishes. Splatter nails waste a good bit of polish, both with the actual splatter and with the large drops of polish you dip your straw into.


Polish Used

  • Borghese - Brillante
  • LA Colors - BCC 561 (White)
  • Funky Fingers - Kingston
  • Sally Hansen - Blue Me Away!
  • Sally Hansen - Mellow Yellow
  • NYC - Prince Street
  • Sally Hansen - Insta-Dri

Wednesday, April 4, 2012

The Luxe and Lush of Pink

Finally, we come to the end of the polishes I own from the Hunger Games collection. This last one was the hardest to find. I scoured the local shops and finally had to give in and order it online, paying the extra for shipping. Thankfully, I had a loyalty card and got an extra discount in conjunction with the already low price. In all, even with the discounts and sale prices, I paid the full price for this polish but it is so worth it.


This glitter does not picture to its full potential. I tried everything! Direct sunlight, indirect sunlight, shade, artificial light. My eyes saw the awesomeness of this flakie but my camera lens saw something completely different. It frustrates me to no end when this happens.


However, if you want to see at least some of the true potential of Luxe and Lush I recommend heading over to The PolishAholic's post: China Glaze Luxe and Lush


The flakies are in a very thick base. This makes it slightly hard to control where and how thick the glitter goes on. This is my first flakie polish so I'm not sure how this measures up to other flakie polishes. The flakes themselves flash many colors. I've seen green, blue, gold, pink, and a purple color at some angles. My favorite is the way the pink and gold flashes sometimes mix and create a perfect creamy peach or even a light salmon color. It makes this polish look expensive and ethereal. I can definitely see how Luxe and Lush relates to District 1, the district of luxury.


It was these peach/salmon flashes that made me choose to layer Luxe and Lush over a pink base color. And though the pictures don't show it too well, I think it was a really good choice.


I also want to mention how well Luxe and Lush removed. It was so easy to get this glitter off my nails. It took a bit longer than removing a few layers of simple nail polish but was nowhere near the ultimate hassle of removing glitter. Most of the flakies just sloughed right off and those that didn't came off with a few extra swipes. After that, my pink base polish was super easy to remove.


Polish Used

  • Borghese - Brilliante
  • Sinful Colors - Beautiful Girl
  • China Glaze - Luxe and Lush
  • Sally Hansen - Insta-Dri