I just received the email from Influenster letting me know the Holiday VoxBox survey was up, and I realized I never posted a review for my Goody Quikstyle brush! This is definitely not a review I want to forget.
As you can see, I received the Paddle Brush version of the Quikstyle. It's not the one I would have bought for myself, but it's all I'll buy now! There's just something about it that I like better than the Half-Round Styler Brushes.
The Quikstyle is made up of the regular ball tipped bristles with the addition of absorbent microfiber bristles. They remind me of those microfiber hair wrap towels of the same color. The microfiber is antimicrobial so the brush stays fresh. I recommend hitting it with a bit of hot air from your blow-dryer if you use it on wet hair since they will start to smell a bit like mildew if you put them away wet. The vents along the sides of the brush will pull the air deep into the microfiber bristles and direct it out so don't worry about ruining the brush or causing overheating! The brush is also lightweight with a textured ergonomic handle for better grip.
The packaging tells us that these microfiber bristles are super absorbent and will help reduce water by 30% to help hair dry faster. My hair is fairly thin and dries well on its own, so I really didn't notice any difference in my dry time.
What I did notice was the brushes ability to detangle every knot on my head and leave behind frizz free hair! My hair is always somehow managing to tie itself into knots. Honest to goodness, tied in knots — sometimes big knotted bows that are literally impossible to unknot. I either have to attempt to unknot them, but really only end up yanking the hair from my head, or trim the knots out. Seriously, I would buy this brush for its seemingly magical detangling ability if nothing else!!
I'm loving my new knot-free, frizz-free, perfect hair day every time hair. There will be no other brush for me unless Goody comes out with a better version of the Quikstyle, but I'm not sure that's possible. I'm pleased with it just the way it is.
This will be my last Influenster Holiday VoxBox review since I wasn't one of the lucky few who received one of the Montagne Jeunesse Face Masques, and I still haven't tried the EBOOST. After much debating with myself, I really can't bring myself to try the Pink Lemonade energy/immunity dietary drink supplement I received. I would love to try it, but I really hate lemonade. It would likely be a really unfair review.
*All products were sent to me for testing purposes, completely complimentary, from Influenster.
Thursday, January 31, 2013
Saran Wrap Valentine's Day Nail Art Tutorial
Hello again everyone! I missed my post yesterday, but I have a really great excuse! It was mentioned in an answer to one of the 1st Blogiversary Giveaway entries that one of you wanted to see a Saran Wrap tutorial. There were more than a few of you who wanted to see video tutorials. So, I was spending all day yesterday editing my first real nail art video. I have a whole new level of respect for video bloggers!
Here are the nails I'll be showing you how to create in the video. This is a very easy mani to do, and with pink and white polish it is perfect for Valentine's Day!
Here are the nails I'll be showing you how to create in the video. This is a very easy mani to do, and with pink and white polish it is perfect for Valentine's Day!
I don't really have the set up or the best software/know-how for this, but I gave it my best shot. Enjoy!
Tuesday, January 29, 2013
Candy Coated Collection — Frosting Coated Sprinkles
Welcome to the last swatch of my Candy Coated Collection.
Update: This polish and the rest of the collection are now up for sale in my Etsy shop.
This is two coats of Frosting Coated Sprinkles over bare nails. You can really see the shimmer contained in the polish in this picture. Both pictures were taken after I applied top coat. There is so much glitter in this polish that it does have a rough finish when dry ... top coat really is a must with this one.
Update: This polish and the rest of the collection are now up for sale in my Etsy shop.
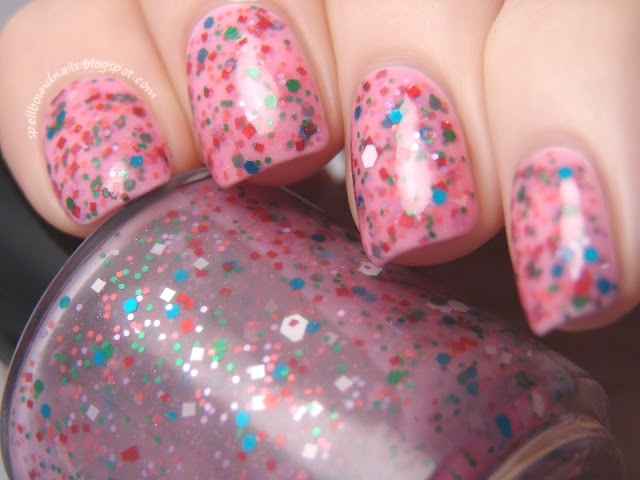
This is Frosting Coated Sprinkles inspired by the Candy Castle. Depending on which version of Candyland you look at you'll find some of the Castles with frosting, some with ice cream, and some with both. This polish was mixed up to look like the bright pink frosting decorating the Castle.
Contained in this bright pink shimmery frosting is 'sprinkles' of various colors and sizes in squares and hexes. I think this polish is the essence of Candyland melted down and bottled. :)
This is two coats of Frosting Coated Sprinkles over white. You'll have no trouble getting glitter on your nails with this polish!
This is two coats of Frosting Coated Sprinkles over bare nails. You can really see the shimmer contained in the polish in this picture. Both pictures were taken after I applied top coat. There is so much glitter in this polish that it does have a rough finish when dry ... top coat really is a must with this one.
Spun Sugar Gradient
Hey everyone! Sorry about the non-nail art related posts yesterday. There was a bit of an emergency Sunday that left me with no time to edit and type up posts. So, I went with what I did have. I do really hope to see a few of you joining me in the Blogs to Love Friday linkup. That said, today's post really is nail art!!
I have a few ideas for Valentine's Day nails and this was one of the first I thought of — spun sugar Valentine's Day nails done as a gradient.
Spun sugar nails are really easy. They are a bit messy but the wispy strings make it easy to clean up. I started with a base of two coats L.A. Colors white. This is Energy Source now that L.A. Colors started naming their polishes. The next step is probably the hardest and it's not hard at all! It just takes a bit of patience. I started at the tips of my nails and worked up using Sally Hansen Pink Blink first. Put a drop or two of your first color on a piece of paper, using a pin or a dotting tool mix the polish until it's thick. You can speed this along by blowing on it as you stir. You can start as soon as it's thick enough to start forming strings when you lift the pin out of the polish. I didn't wait long enough with my red polish and got some drips instead of strings, so make sure it's thick enough not to drip.
Once strings start to form you'll need to get your nail very close to the thick polish. Lay your finger on it's side angled towards the polish if you're having trouble getting the strings on your nail. Use your pin or dotting tool to quickly but smoothly pull strings across your nails, doing one nail at a time.
Continue doing the tips of each nail with Pink Blink. You may need to thicken more polish if you didn't start with enough or if it thickened too quickly. I used Sinful Colors Beautiful Girl next. I placed some of my strings over some of the Pink Blink strings to create a seamless fade of color. After Beautiful Girl, I used Sally Hansen Fuchsia Power and then finished with Wet n Wild I Red A Good Book.
Let the polish dry. It shouldn't take long! Then do a quick cleanup. I pinched off some of the wispy strings that were flying around my nails and then used some nail polish remover and a Nail Tee (a fancy pointed Q-tip) to clean up the rest.
Add top coat if you like and admire your new mani. Take into consideration when deciding whether to use top coat or not that, while it will make your mani last longer, it will smooth all those strings you just worked so hard on. It will likely take more than one coat as this is a very thick mani. It may also cause some bubbling if you're not careful applying your top coat.
That said, I did use top coat, two coats ... and I did get one large bubble that popped while the top coat dried and left behind a spot bare of top coat. It's really not noticeable though, even in my close-up pictures. I did kind of miss the stringed look though.
Monday, January 28, 2013
Influenster Holiday VoxBox — Sole Society
Hey girlies! The month is coming to a close and the Sole Society promo code I received in my Influenster Holiday VoxBox will be expiring on the 31st. Just use the promo code INFLUENSTER25 before January 31st and you'll get $25 off your first pair of shoes from Sole Society.
I really wanted to have this code out there sooner but I searched and searched, debated and talked myself into and out of half a dozen shoes and then finally used my $25 off code last Friday. I have been posting it like crazy on my Twitter account from the start though, so I'm hoping someone got some use out of it.
Aren't they gorgeous? I love the heel! The reason I bought these when there were so many amazing shoes to choose from? I recently purchased a summer dress, had another summer dress bought for me, and remembered I already have the perfect outfit to match these shoes. Seriously? To have 3 outfits made with these shoes and to get said shoes for $24.95 after using the promo code is awesome!!
This is a picture of the dress I recently purchased for myself with an Amazon gift card I earned through Swagbucks. It is an Allegra K dress sold by uxcell. I recommend checking out their Amazon store or just doing a search for Allegra K on Amazon because they sell some really great things at wonderful prices!! These shoes also match the dress bought for me which is a really pretty flowing beach style blue dress with a brushstroke pattern. I've paired this with a thick brown stretch belt and pulling the fabric up from the belt makes it the perfect shorter length beach dress. I also have a really gorgeous tiered brown mini skirt that I pair with a simple tank top and heels in the summer.
Like I said though, before deciding on Monica, I had picked out half a dozen or more shoes. Here's the ones that got a serious second look and actually made it into my cart before I talked myself out of them. Miranda actually made it into the cart more than once. However, I live in the middle of nowhere ... the middle of nowhere that gets knee deep snow at times. And honestly, I'm just not good enough walking in wedges to risk it. As for Vida ... well, I've been told I was made for heels. I'm like an elephant in flats — an elephant that trips over nothing.
Finally, here are the shoes I think deserve a mention because they're so darn pretty listed by heel height.
Remember that my 1st Blogiversary Giveaway also ends on the 31st. This giveaway is open to both my US and international followers. Click on the link, go take a peek, and definitely enter! You can't win if you don't enter. And if you buy yourself a nice pair of shoes from Sole Society with the INFLUENSTER25 promo code and you do happen to win one of the prizes in my giveaway imagine how great you'll look opening the package I send you!!
*All products (unless otherwise stated) were sent to me for testing purposes, completely complimentary, from Influenster.
I really wanted to have this code out there sooner but I searched and searched, debated and talked myself into and out of half a dozen shoes and then finally used my $25 off code last Friday. I have been posting it like crazy on my Twitter account from the start though, so I'm hoping someone got some use out of it.
This is a picture of the dress I recently purchased for myself with an Amazon gift card I earned through Swagbucks. It is an Allegra K dress sold by uxcell. I recommend checking out their Amazon store or just doing a search for Allegra K on Amazon because they sell some really great things at wonderful prices!! These shoes also match the dress bought for me which is a really pretty flowing beach style blue dress with a brushstroke pattern. I've paired this with a thick brown stretch belt and pulling the fabric up from the belt makes it the perfect shorter length beach dress. I also have a really gorgeous tiered brown mini skirt that I pair with a simple tank top and heels in the summer.
Like I said though, before deciding on Monica, I had picked out half a dozen or more shoes. Here's the ones that got a serious second look and actually made it into my cart before I talked myself out of them. Miranda actually made it into the cart more than once. However, I live in the middle of nowhere ... the middle of nowhere that gets knee deep snow at times. And honestly, I'm just not good enough walking in wedges to risk it. As for Vida ... well, I've been told I was made for heels. I'm like an elephant in flats — an elephant that trips over nothing.
Finally, here are the shoes I think deserve a mention because they're so darn pretty listed by heel height.
Remember that my 1st Blogiversary Giveaway also ends on the 31st. This giveaway is open to both my US and international followers. Click on the link, go take a peek, and definitely enter! You can't win if you don't enter. And if you buy yourself a nice pair of shoes from Sole Society with the INFLUENSTER25 promo code and you do happen to win one of the prizes in my giveaway imagine how great you'll look opening the package I send you!!
*All products (unless otherwise stated) were sent to me for testing purposes, completely complimentary, from Influenster.
Blogs to Love Friday Linkup
I'm always trying to find new blogs to follow, new content to read, and new things to inspire me. So, while browsing, when I saw this post by My Beautiful, Crazy Life I knew I had to join. I also knew I had to share it with you!!
Have you ever read a blog post and wanted nothing more than to share it on your own blog? You may remember that I tried something like this before. Sadly, there was a lot of hype around that time about image theft and what one blogger was allowed to post of another blogger's work, even with proper credit given, so my posts were discontinued. However, I would love to try this again — in a slightly different way, of course.
This linkup is being hosted by My Beautiful, Crazy Life and Mrs. Monologues. I think it's the perfect way to give deserving bloggers some love and additional traffic. Who doesn't love having their blog shared or the content they worked so hard on getting a little bit of extra, well-deserved credit?
So, starting Friday, February 1st, and every Friday after, take the posts you loved or that inspired you from that week and share them with your followers. Scream about them from the rooftops if you feel the need. :)
As written by My Beautiful, Crazy Life: I encourage you to construct your posts however you want. Feel free to make it fancy or even show us images because we all love visuals, but the main objective is to share the love of your favorite posts.
Also, remember to grab the button above and include it in your post if you decide to participate.
I will definitely try to include at least one nail related post each Friday, but that's not all the blogs I read. I love beauty blogs in general, fashion, health and fitness, and FOOD!!! So you'll definitely see a little bit of everything in my Friday posts.
Will you be participating? Will you be looking forward to my Friday posts? Here's your chance to share your blogs with me, share a friend's blog, or even just a blog you love that you think deserves some love. Post your links in the comments! :)
Saturday, January 26, 2013
Candy Coated Collection — Lollipop Princess
The only polish from this collection inspired by a character and not a location. Lollipop Princess was inspired by Princess Lolly, resident of the Lollipop Woods and princess of Candyland.
Update: This polish and the rest of the collection are now up for sale in my Etsy shop.
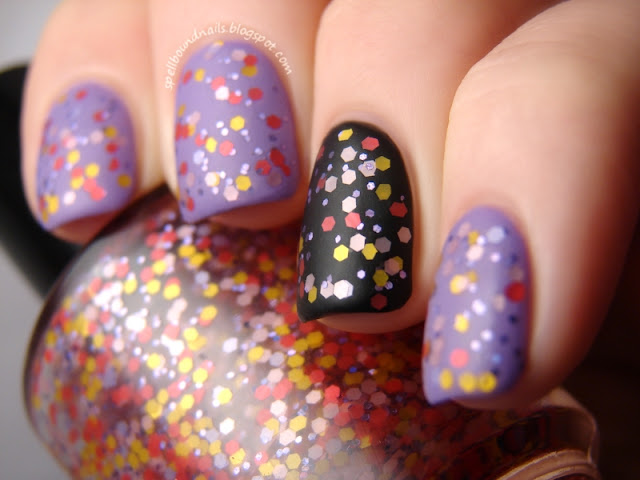
Lollipop Princess has pink, purple, and yellow hex glitters. And, since every princess needs some bling, small purple holo glitters.
Lollipop Princess over Wet n Wild I Need A Refresh-Mint.
In an effort to really showcase the holographic glitter I layered one coat of Lollipop Princess over Revlon Enchanting with a black accent nail. I think I caught the holo at just the right angle and light to make it flare. Mostly I caught the bright blue flares but it also turns a white/purple and a bright pink. You can see one small flash of pink on my pinky nail.
I have been dying to see this glitter matte since I first mixed it up so I decided to add a layer of NYC Matte Me Crazy. Wow! I don't ever want to take this off!!!
Update: This polish and the rest of the collection are now up for sale in my Etsy shop.
Lollipop Princess has pink, purple, and yellow hex glitters. And, since every princess needs some bling, small purple holo glitters.
I'm going to have to try to get some better pictures. The colors are slightly off in this close-up and in the bottle picture.
Lollipop Princess over Wet n Wild I Need A Refresh-Mint.
In an effort to really showcase the holographic glitter I layered one coat of Lollipop Princess over Revlon Enchanting with a black accent nail. I think I caught the holo at just the right angle and light to make it flare. Mostly I caught the bright blue flares but it also turns a white/purple and a bright pink. You can see one small flash of pink on my pinky nail.
I have been dying to see this glitter matte since I first mixed it up so I decided to add a layer of NYC Matte Me Crazy. Wow! I don't ever want to take this off!!!
Friday, January 25, 2013
Candy Coated Collection — Peppermint Pinwheels
I've been reading through the new giveaway entries for the 'what do you want to see on my blog this year' question and there were a few who wanted Valentine's Day nail art and a few who wanted holiday nail art so I decided to tie a V-Day mani into one of my swatches.
Update: This polish and the rest of the collection are now up for sale in my Etsy shop.
I layered two very thin coats of Peppermint Pinwheels over Sally Hansen Emerald City for a festive Christmas look (I did actually do this around Christmas). Sadly, I added a layer of top coat over Emerald City too soon and caused some pretty bad streaking.
For a simple Valentine's Day mani, I used a base of Sally Hansen Pink Blink and a thin coat of Peppermint Pinwheels. You may remember Pink Blink from my recent haul. I couldn't ask for a better color. I think this is the most perfect V-Day pink ... actually, I think this is the most perfect pink EVER!! This is definitely the color of pink I think of when I think of my favorite color. :)
Here is a second, thicker coat of Peppermint Pinwheels.
More Valentine's Day manis will be coming soon. There are definitely a few I have sketched up that I want to try. :)
So, what do you gals think of the Candy Coated Collection so far? Have a favorite?
Update: This polish and the rest of the collection are now up for sale in my Etsy shop.
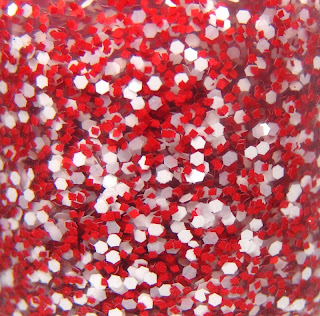
Peppermint Pinwheels was inspired by the Peppermint Forests of Candyland and their mesmerizing swirls of red and white.
With its red squares and white hexes, Peppermint Pinwheels is perfect for everyday wear. But, layer it over the right color and it works great for holidays like Christmas and Valentine's Day. :)
For a simple Valentine's Day mani, I used a base of Sally Hansen Pink Blink and a thin coat of Peppermint Pinwheels. You may remember Pink Blink from my recent haul. I couldn't ask for a better color. I think this is the most perfect V-Day pink ... actually, I think this is the most perfect pink EVER!! This is definitely the color of pink I think of when I think of my favorite color. :)
Here is a second, thicker coat of Peppermint Pinwheels.
More Valentine's Day manis will be coming soon. There are definitely a few I have sketched up that I want to try. :)
So, what do you gals think of the Candy Coated Collection so far? Have a favorite?
Thursday, January 24, 2013
Candy Coated Collection — Plum out of Chocolate
Hello lovelies! I'm here with another swatch from my Candy Coated Collection. This seems to be the most popular of all my new polishes. Meet Plum out of Chocolate. :)
Update: This polish and the rest of the collection are now up for sale in my Etsy shop.
Update: This polish and the rest of the collection are now up for sale in my Etsy shop.
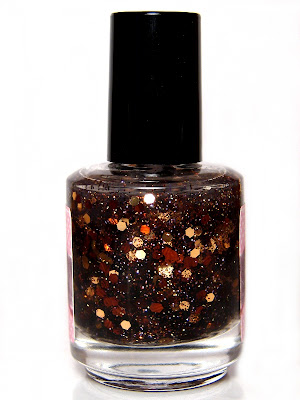
Forgot to get a picture before I slapped on the labels. :(
Plum out of Chocolate is filled with large bronze and gold hex glitters and bronze micro glitters. You'll also find gorgeous holographic purple micro glitters.
My very first swatch after mixing up this glitter was two thin coats over Wet n Wild I Red A Good Book.
My most recent swatch was one fairly thin coat over OPI Tickle My France-y. I tried everything to get a good picture of this stunning combo but nothing I tried put everything in a good light. I would either lose the large glitters, the base color, or the micro glitters. This was the closest I could get to showing everything.
One last picture. One of these bottles belongs to one lucky US winner of my 1st Blogiversary Giveaway. If you haven't entered yet, there's still time. You can't win if you don't enter!!
Wednesday, January 23, 2013
T is for ...
Yay, with this post I am finally caught up in the ABC Challenge!! I really hated being behind. What I don't hate is this mani. Too cute!!
T is for ... Toadstools + Tutorial.
I search high and low every week for ideas to do for this challenge. For some reason, T was hard! Everything I found simply didn't spark an idea I felt happy doing. My inspiration came from the strangest place. Wii games. I wanted to borrow a Wii game from my niece and had to go through her completely disorganized collection. I saw Mario and there it was — the illusive idea. The mushroom power-ups and the adorable Toad race.
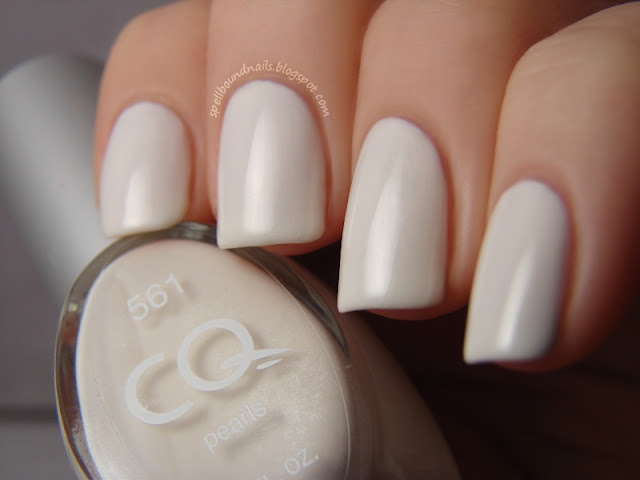
I was going to use white for the base color until I remembered Sunday's haul. Using CQ Pearls would create an interesting base and would give me the perfect chance to try this new polish.
Pearls is so pretty. Lightly shimmery and not streaky at all ... well, it wasn't until I rushed adding a top coat. I think this is the most perfect pearly white.
I told you I would try to start creating some easy tutorials. I was going to do a picture tutorial but, as always, I forgot to get pictures while I was doing the designs. So, I decided to just draw one up. I wish I had made this bigger; I stretched it a bit so forgive the slight blurriness. It's not perfect, but it works. At least now I know to make the next one bigger! :)
I used Avery Binder Reinforcement Labels for this mani and this is how it should look. Be very careful of the holes in the center; you can see my nail peeks out through this. You don't want to accidentally drag polish into this hole. I didn't have any on hand, but I prefer using DG Office Color Coding Labels. They're a bit wider, so cover more of your nail, and have no hole in the center.
So, what do you think? Ready to try them for yourself?
S is for ...
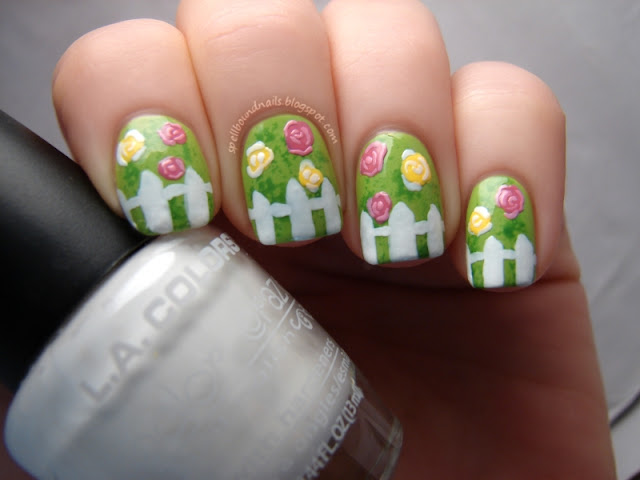
I was really inspired this weekend; I've really missed doing nail art! This is actually a design I sketched up and then realized that it worked perfectly for S in the ABC Challenge.
S is for ... Spring Scene.
You should be expecting this by now, but I used my eyeshadow applicators and Revlon Garden and Sinful Colors Exotic Green to create a leafy texture as a base. The white picket fence came next, hand drawn with a nail art brush, and the flowers were started with a dotting tool and finished with a nail art brush.
With recent temperatures reaching into the single digits, I'm really longing for some flowers!
Be on the lookout tonight for another ABC Challenge mani as I finally get caught up. :)
Tuesday, January 22, 2013
Gradient Fail
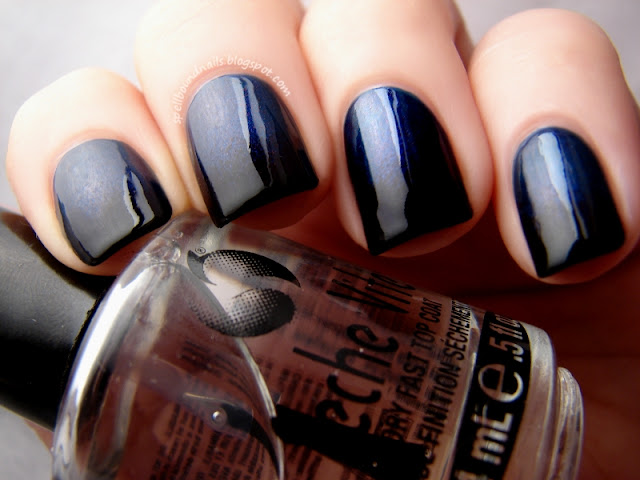
Welcome to my gradient fail. This isn't a full fail, but under any light except very direct sunlight and my lightbox these colors are just too dark to show the gorgeous fade between them.
Even with my lightbox I had a very hard time capturing this gradient. I used two polishes from the OPI Best of the Best mini collection. I got this collection as a gift Christmas 2011, and I love it to pieces.
The first polish I used, and the base of my gradient, is Russian Navy. Wow! I can see why this was one of the Best of the Best. Originally from the OPI Russian Collection, Russian Navy is now an OPI Classic shade. From the outside, Russian Navy looks purple. However, once you untwist that cap you're in for a shock! This polish is a deep indigo blue and all that purple you saw from the outside fades into a subtle shimmer.
Next, I used Lincoln Park After Dark, originally from the Chicago Collection. Alone this polish is a very deep, dark purple, but turned black when layered over Russian Navy. I was hoping once I got it sponged on and added a top coat that the beauty of this purple would shine through but I couldn't get a hint of purple on my nails no matter the light I put it under ... though some of the purple color did show in the bottle.
Lastly, I added a small amount of black to the very tips, reminiscent of a French tip.
One coat of Seche Vite Dry Fast Top Coat sealed the colors together and gave my nails an amazing amount of shine. This is my very first bottle of Seche Vite, bought and paid for with a free gift card I earned with my Swagbucks account. Sign up for an account of your own and use the code JANTASTIC (before 11:59 PT tonight) and you'll start with 100 Swag Bucks. Hint: A $5 Amazon gift card is 450 Swag Bucks.
So, overall, if I was going to walk around with my hands in a lightbox this would be a perfect gradient. I don't think that idea would work very well though and, sadly, neither does this mani anywhere except these pictures. :(
Monday, January 21, 2013
Rite Aid Haul
I was very lucky to visit Rite Aid yesterday as I was told they were switching out their stock, trading old polishes for new ones. The old stock took a huge drop in price and were placed in a clearance bin! I seriously cannot resist a sale, and I grabbed nearly every polish I could get my hands on.
Here are all the clearance polishes.
First up are the polishes I paid full price for. In the center is Sally Hansen Breezy Blue and Pink Blink. On the ends are Revlon Girly and Enchanting.
Girly and Enchanting are new shades from Revlon. I vow to buy more of these new shades because they are so, so pretty. I chose Girly first because I'm a sucker for glitter, especially glitter suspended in a pinky purple-ish base. Being a fairly sheer base though I knew this glitter would need some undies. That's why I picked up Enchanting and Pink Blink. I think Girly will look gorgeous over both!!
Seriously, look at that glitter!! How can you possibly resist??
The first things I found in the clearance bin were $0.74 Color Fever petites in their rounded bottles. I had color fever and picked out all of these! Peach Blush, Periwinkle, Creme Blue, and Vintage Gray.
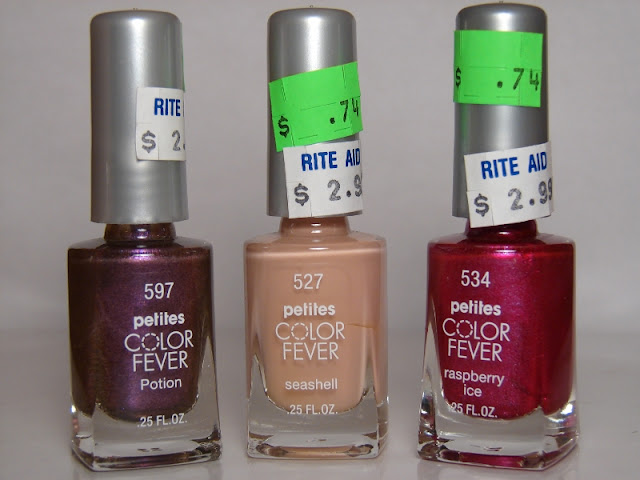
I also picked out the three square bottles of Color Fever. These ones in Potion, Seashell, and Raspberry Ice. I'm loving Raspberry Ice in the bottle, but am unsure just how great it will look on my nails.
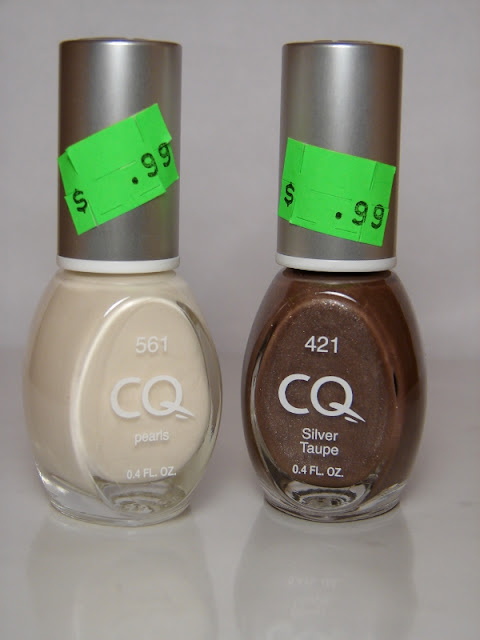
I found two CQ next. I removed the original $3.99 price tags since they covered the front of the bottle. Silver Taupe looks a good deal lighter in person and seems to be an actual shade of taupe when not placed next to such a light color as Pearls.
Last but not least are these three Scherer Chameleon polishes in Tiny Dancer, Fandango, and Mist. They are all so very, very pretty!!
What do you think of my haul? I think I'm going to need a bin for all my untried polishes soon. The list just keeps getting longer.
Here is my complete haul. On top of the sale polishes I grabbed four others.
First up are the polishes I paid full price for. In the center is Sally Hansen Breezy Blue and Pink Blink. On the ends are Revlon Girly and Enchanting.
Girly and Enchanting are new shades from Revlon. I vow to buy more of these new shades because they are so, so pretty. I chose Girly first because I'm a sucker for glitter, especially glitter suspended in a pinky purple-ish base. Being a fairly sheer base though I knew this glitter would need some undies. That's why I picked up Enchanting and Pink Blink. I think Girly will look gorgeous over both!!
Seriously, look at that glitter!! How can you possibly resist??
The first things I found in the clearance bin were $0.74 Color Fever petites in their rounded bottles. I had color fever and picked out all of these! Peach Blush, Periwinkle, Creme Blue, and Vintage Gray.
I also picked out the three square bottles of Color Fever. These ones in Potion, Seashell, and Raspberry Ice. I'm loving Raspberry Ice in the bottle, but am unsure just how great it will look on my nails.
I found two CQ next. I removed the original $3.99 price tags since they covered the front of the bottle. Silver Taupe looks a good deal lighter in person and seems to be an actual shade of taupe when not placed next to such a light color as Pearls.
Last but not least are these three Scherer Chameleon polishes in Tiny Dancer, Fandango, and Mist. They are all so very, very pretty!!
What do you think of my haul? I think I'm going to need a bin for all my untried polishes soon. The list just keeps getting longer.
Subscribe to:
Comments (Atom)


