Showing posts with label Yellow. Show all posts

Thursday, April 18, 2013

Disney Challenge: Beauty and the Beast

I'm almost embarrassed about this one, but here it is. My Beauty and the Beast mani for the Disney Challenge.


Disney nail art Challenge Beauty and the Beast yellow Sally Hansen Lightening music notes white rose magic magical wilting Princess nails Spellbound

Nothing went right with this design. I realized quickly that I need new yellow polish because the Sally Hansen Lightening was insanely hard to work with! Then I knocked over TWO bottles of polish, one of them almost ending up in  my lap (while I was wearing my favorite pants). My nail art brush is in major need of a good clean ... or maybe I just need a new brush. Yikes!

So yeah, a bit embarrassed about this mani. I used yellow to match Belle's infamous dress, drew random music notes across my nails, and then finished with the magical wilting rose.


Up next: Bambi. Thankfully, I think I have an idea for this one!

A small update on my polish. I am working like a crazy person for a huge release of new polish and a restock of old. :)

Wednesday, March 6, 2013

Y is for ...

I am so sad to see the ABC Challenge end. Especially since I am running behind. Still, I'm looking forward to the start of the new nail art challenge: Inspired by Time Periods. This challenge will be hosted in the same group as the ABC Challenge so don't think you're in the wrong place when you click the link! Still, until then, I have Y and Z left to do. Thankfully, this post takes care of Y.

Y is for ... Cracked Eggs and Dripping Yolk.

nails nailart nail art polish mani manicure Spellboud Lacquer ABC Challenge Y is for Cracked Eggs and Dripping Yolk texture sponge L.A. LA Colors White NYC New York Color Matte Me Crazy Sally Hansen Lightening Sun Kissed Seche Vite

I really wanted to finish this challenge the way I started ... by doing the unusual and being different. So I went with yolk.

nails nailart nail art polish mani manicure Spellbound Lacquer ABC Challenge Y is for Cracked Eggs and Dripping Yolk texture sponge L.A. LA Colors White NYC New York Color Matte Me Crazy Sally Hansen Lightening Sun Kissed Seche Vite

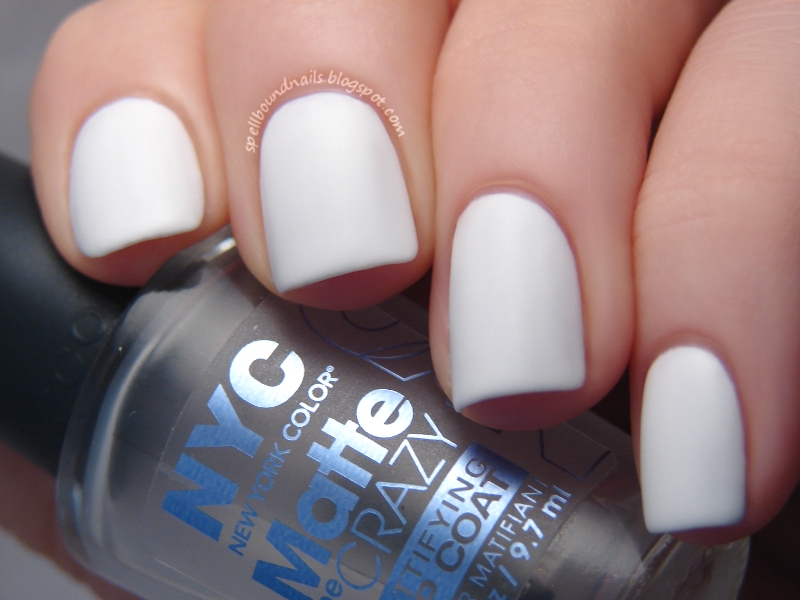
I started with two coats of L.A. Colors Energy Source and put a coat of NYC Matte Me Crazy over it to give it a very awesome smoothly matte look. I think this alone would be a totally wearable look!

nails nailart nail art polish mani manicure Spellbound Lacquer ABC Challenge Y is for Cracked Eggs and Dripping Yolk texture sponge L.A. LA Colors White NYC New York Color Matte Me Crazy Sally Hansen Lightening Sun Kissed Seche Vite

Still, we all know eggs aren't really smooth. They're kind of speckled and dimpled if you look close enough. So I took a piece of makeup sponge and dabbed on a bit more white. I know! So much different from my usual eyeshadow applicator.

nails nailart nail art polish mani manicure Spellbound Lacquer ABC Challenge Y is for Cracked Eggs and Dripping Yolk texture sponge L.A. LA Colors White NYC New York Color Matte Me Crazy Sally Hansen Lightening Sun Kissed Seche Vite

After that, I drew on the egg yolk drips with Sally Hansen Lightening and outlined them with a mix of Lightening and Sally Hansen Sun Kissed. I kinda wish I had added a bit of fake light reflection with this mixture too, but I really like the finished look. To make the yolk really shiny and keep the matte look of the egg I actually used a nail art brush to put Seche Vite on just the drips.

Monday, March 4, 2013

X is for ...

I'm back!! My new computer arrived Saturday, and I spent the weekend getting it set up. The actual setup was easy and took minutes, but the little details of everyday use are a bit harder. You don't realize all the little things (like font, text size, saved passwords, desktop icons) about your computer you take for granted until they look almost right but are just wrong enough to really bug you. I'm still working on getting those little things fixed, but it feels so great to be back!! :)

Being back means I have some nail art to catch up on — like ABC Challenge posts. The challenge is coming to an end this Wednesday, and I still haven't posted my X mani.

X is for ... X-Men.


nails nailart nail art mani manicure polish Spellbound Lacquer design freehand ABC Challenge X-Men character First Class uniform costume black yellow L.A. LA Colors Sally Hansen Lightening comic comics Marvel

I knew immediately I wanted to use X-Men for X. I just wasn't exactly sure what kind of design I wanted to do for X-Men. I went searching and found the X-Men: First Class comics ... and the uniforms.

nails nailart nail art mani manicure polish Spellbound Lacquer design freehand ABC Challenge X-Men character First Class uniform costume black yellow L.A. LA Colors Sally Hansen Lightening comic comics Marvel

The uniforms were weird enough to catch my eye; bright yellow and black create an interesting contrast. I'm oddly reminded of Bumblebee from Transformers. The First Class uniforms have an odd black circle around the bellybutton area that has a yellow X cut straight through that I replaced on the chest area (or at least what I imagine is the chest area) with simple black letters to spell XMEN.


Challenge Inspired by Time Periods Jurassic Era Neanderthal Stone Age Ancient Egypt Mayan Greece Rome Medieval Imperial China Renaissance Victorian Industrial Roaring 20s 1950s 1960s 1970s 1980s 1990s Futuristic

The hosts of the ABC Challenge have decided to start a new challenge once this one is over. It will be Inspired by Time Periods so be sure to check out the group if you'd like to join. It will certainly be challenging! :)

Also, what do you guys think of the new St. Patrick's Day layout? I went to change the header and buttons to something more festive like always and everything went wonky! I had to rearrange and recode almost everything. I think it looks much better though, neater and more organized ... at least for me. How's it look for everyone else? No overflow or anything weird like that?

Wednesday, February 20, 2013

Rainbow Gradient

Today is supposed to be my X nail art for the ABC Challenge, but I'm stumped on what to do for this letter. I'll think of something by next challenge ... hopefully. For now, check out the rainbow gradient I wore last weekend.

nails nailart nail art polish mani manicure Spellbound Lacquer fun cute sweet rainbow gradient eyeshadow applicator sponge sponged sponging red orange yellow green blue purple colorful Rimmel English Rose Sinful Colors Hazard Sally Hansen Lightening Green with Envy Wet n Wild I Need a Refresh-Mint On a Trip

I hate the claw, but it's pretty much the only position in nails that need to include the thumb. Some of you may remember the sideways rainbow gradient from my NOH8 nails. I wanted to try something different this time so I did them as a normal gradient. I found the lightest rainbow colors from my collection to use for this.

nails nailart nail art polish mani manicure Spellbound Lacquer fun cute sweet rainbow gradient eyeshadow applicator sponge sponged sponging red orange yellow green blue purple colorful

Here are my nails before clean-up. So messy!!! I usually tape around my nails before doing something this messy, but I forget. Isn't that the way things usually go? You only forget something that would speed things up when you're in a hurry!

nails nailart nail art polish mani manicure Spellbound Lacquer fun cute sweet rainbow gradient eyeshadow applicator sponge sponged sponging red orange yellow green blue purple colorful Rimmel English Rose Sinful Colors Hazard Sally Hansen Lightening Green with Envy Wet n Wild I Need a Refresh-Mint On a Trip Rimmel English Rose Sinful Colors Hazard Sally Hansen Lightening Green with Envy Wet n Wild I Need a Refresh-Mint On a Trip

I took this picture in the car. It was snowing so hard and then a little bit of sunlight peeked through, and I couldn't resist snapping a few pics. It's not up to my usual standard, but there's something I really like about this picture.

 Rimmel English Rose Sinful Colors Hazard Sally Hansen Lightening Green with Envy Wet n Wild I Need a Refresh-Mint On a Trip

I couldn't resist getting a picture of my cotton ball after I removed the gradient. I'm reminded of a clown's wig, lol.

Colors Used: Rimmel English Rose, Sinful Colors Hazard, Sally Hansen Lightening, Sally Hansen Green with Envy, Wet n Wild I Need A Refresh-Mint, Wet n Wild On a Trip

Saturday, January 26, 2013

Candy Coated Collection — Lollipop Princess

The only polish from this collection inspired by a character and not a location. Lollipop Princess was inspired by Princess Lolly, resident of the Lollipop Woods and princess of Candyland.

Update: This polish and the rest of the collection are now up for sale in my Etsy shop.
  
nails nailart nail art polish mani manicure Spellbound Nails Nail Lacquer Candy Coated Collection Color Swatch Candy Land Candyland inspired Lollipop Princess Lolly Woods glitter hot light pink purple yellow holo holographic Wet n Wild I Need A Refresh-Mint Revlon new Enchanting pastel LA Colors Black NYC New York Color Matte Me Crazy

Lollipop Princess has pink, purple, and yellow hex glitters. And, since every princess needs some bling, small purple holo glitters.


nails nailart nail art polish mani manicure Spellbound Nails Nail Lacquer Candy Coated Collection Color Swatch Candy Land Candyland inspired Lollipop Princess Lolly Woods glitter hot light pink purple yellow holo holographic Wet n Wild I Need A Refresh-Mint Revlon new Enchanting pastel LA Colors Black NYC New York Color Matte Me Crazy bling

I'm going to have to try to get some better pictures. The colors are slightly off in this close-up and in the bottle picture.

nails nailart nail art polish mani manicure Spellbound Nails Nail Lacquer Candy Coated Collection Color Swatch Candy Land Candyland inspired Lollipop Princess Lolly Woods glitter hot light pink purple yellow holo holographic Wet n Wild I Need A Refresh-Mint Revlon new Enchanting pastel LA Colors Black NYC New York Color Matte Me Crazy bling

Lollipop Princess over Wet n Wild I Need A Refresh-Mint.


nails nailart nail art polish mani manicure Spellbound Nails Nail Lacquer Candy Coated Collection Color Swatch Candy Land Candyland inspired Lollipop Princess Lolly Woods glitter hot light pink purple yellow holo holographic Wet n Wild I Need A Refresh-Mint Revlon new Enchanting pastel LA Colors Black NYC New York Color Matte Me Crazy bling

In an effort to really showcase the holographic glitter I layered one coat of Lollipop Princess over Revlon Enchanting with a black accent nail. I think I caught the holo at just the right angle and light to make it flare. Mostly I caught the bright blue flares but it also turns a white/purple and a bright pink. You can see one small flash of pink on my pinky nail.


nails nailart nail art polish mani manicure Spellbound Nails Nail Lacquer Candy Coated Collection Color Swatch Candy Land Candyland inspired Lollipop Princess Lolly Woods glitter hot light pink purple yellow holo holographic Wet n Wild I Need A Refresh-Mint Revlon new Enchanting pastel LA Colors Black NYC New York Color Matte Me Crazy bling

I have been dying to see this glitter matte since I first mixed it up so I decided to add a layer of NYC Matte Me Crazy. Wow! I don't ever want to take this off!!!

Wednesday, January 23, 2013

S is for ...

I was really inspired this weekend; I've really missed doing nail art! This is actually a design I sketched up and then realized that it worked perfectly for S in the ABC Challenge.

S is for ... Spring Scene.

nails nailart nail art polish mani manicure Spellbound ABC Challenge S is for Spring Scene flowers roses texture green leaf leafy white picket fence pink yellow LA Colors Wet n Wild Candy-licious Sinful Colors Exotic Green Revlon Garden eyeshadow applicator sponge sponged sponging

You should be expecting this by now, but I used my eyeshadow applicators and Revlon Garden and Sinful Colors Exotic Green to create a leafy texture as a base. The white picket fence came next, hand drawn with a nail art brush, and the flowers were started with a dotting tool and finished with a nail art brush.

nails nailart nail art polish mani manicure Spellbound ABC Challenge S is for Spring Scene flowers roses texture green leaf leafy white picket fence pink yellow LA Colors Wet n Wild Candy-licious Sinful Colors Exotic Green Revlon Garden eyeshadow applicator sponge sponged sponging

With recent temperatures reaching into the single digits, I'm really longing for some flowers!

Be on the lookout tonight for another ABC Challenge mani as I finally get caught up. :)

Thursday, January 3, 2013

Q is for ...

I am a sick, sick woman and, in a totally different way, so is the little guy on my nails today. What could I do for Q in the ABC Challenge? Queen, quilt, or maybe even quiz? Of course not! You know me, I have to think outside the box with this challenge. Brace yourself!

Q is for ... queasy. And I'm getting a little queasy just looking at them.

nails nailart nail art polish mani manicure Spellbound ABC Challenge Q is for Queasy Sally Hansen Mellow Yellow Revlon Garden green splatter face vomit sick

Yes, that is what it looks like ... 'sick up' splatter using Revlon Garden over Sally Hansen Mellow Yellow.

Are you feeling a little queasy now too?

Wednesday, January 2, 2013

P is for ...

Hello everyone. Welcome to 2013!! :) Today's post was supposed to be for the letter Q in the ABC Challenge but, after the Christmas rush, I felt like doing nothing, so I'm a little behind in my posts. I don't feel right moving onto Q before posting P so ...

P is for ... Phoenix.

nails nailart nail art polish mani manicure Spellbound ABC Challenge P is for Phoenix Harry Potter Fawkes flames red yellow orange black Wet n Wild I red a good book Sally Hansen Sun Kissed Lightening white L.A. Colors fire

I cringe a little looking at this design. I was cleaning my usual nail art brush and the bristles came out. I was stunned because I was cleaning it like I always clean my brushes. I wasn't any more or less rough/gentle or pulling on the bristles excessively. I'm really not pleased because I pay an outrageous price for these brushes—4 brushes for about $15! I think I'll be ordering my brushes online from now on; for my usual price I can probably get a full set.

So, all brush rants aside, this design is a little messier than my usual since I had to use a thicker brush for the line work. Still, I felt very Harry Potter creating this phoenix ... though it's not as stunning as Fawkes. :)

Monday, September 17, 2012

My Coffee Obsession

My not-so-well kept secret is that I love coffee. I would drink it all day, every day if I could. And to me, the cup is just as important as the coffee. I can't just put my coffee in any cup. My family knows this and they are nice enough to get me some of the prettiest cups. Today's nail art is inspired by one of these cups.


nails nailart nail art Spellbound mani manicure gingham checkers checkered yellow white blue Konad stamping stamp stamped stamper tape taping taped Coffee cup inspired inspiration obsession

Here are the (not so perfect) finished nails. I can't for the life of me get my stamper to work consistently. Though it hardly ever stamps this bad. This likely had something to do with the fine and delicate etching for the flower petals.


nails nailart nail art Spellbound mani manicure gingham checkers checkered yellow white blue Konad stamping stamp stamped stamper tape taping taped Coffee cup inspired inspiration obsession

And here is the cup that inspired these nails. I started with three coats of Lightening from Sally Hansen's Insta-Dri line of polish.


nails nailart nail art Spellbound mani manicure gingham checkers checkered yellow white blue Konad stamping stamp stamped stamper tape taping taped Coffee cup inspired inspiration obsession

 It's one of the most perfect yellow polishes, in my opinion. I have owned light yellows and sheer yellows but before Lightening I have never owned an actual, true yellow.


nails nailart nail art Spellbound mani manicure gingham checkers checkered yellow white blue Konad stamping stamp stamped stamper tape taping taped Coffee cup inspired inspiration obsession

To get the yellow gingham pattern from the cup I used tape and China Glaze's White on White.


nails nailart nail art Spellbound mani manicure gingham checkers checkered yellow white blue Konad stamping stamp stamped stamper tape taping taped Coffee cup inspired inspiration obsession

I used three strips of tape from cuticle to nail tip and three strips of tape from side to side before painting over the nail with white. This is such an easy design to do and creates such an amazing affect!!


nails nailart nail art Spellbound mani manicure gingham checkers checkered yellow white blue Konad stamping stamp stamped stamper tape taping taped Coffee cup inspired inspiration obsession

My coffee cup has such gorgeous flowers in various colors, but the ones that catch my eye most are definitely the blue morning glories. To complete this design there just had to be flowers. Sadly, the only flowers I can do without a good deal of time are swirly roses and daisy-like flowers using a dotting tool. I had to use my stamper. I want so much to be good at stamping ... but I'm just not. :( I did manage to get one nearly perfect flower and it really did make the design come to life! It makes me all the more longing of a deft stamping hand.

I could definitely see this gingham pattern being used in a picnic nail art. Use red in place of the yellow and a dotting tool with some black to create an ant or two scuttling their way over the picnic blanket. If you have fimo fruit slices it would certainly add life to the design. :)

Monday, August 27, 2012

Neon Sunbeams

I'M BAAACK!!! Well, I've been back for a week but I needed time to mourn the loss of the beach. I missed it horribly this week. Gasp, I didn't even want to do my nails this week! However, that's over with, and I'm ready to get back into my usual posting schedule. I have a few nail designs saved up for you but I want to share my beach nails in this post. The design for this post was inspired by Neon Rays by Chloe's Nails. I thought they were the perfect nails to arrive at the beach with. And these nails are amazingly easy to do. The hardest part was actually cutting the tape since I don't own any striping tape.

nailart nail art nails mani manicure Spellbound Neon Sunbeams Rays Sunrays China Glaze Funky Fingers Color Club Taped Taping Tape orange green yellow pink hot black white Sun Worshiper Kingston Yell-Oh!

I'm not sure where the idea came from, I remember reading it on a blog somewhere, but the easiest way to cut the tape is to take a strip of the tape and place it on a sheet of wax paper. That way the tape doesn't stick to your scissors and you can get nearly perfect 'beams' every time. Simply peel them off once your base polishes are dry and create the beam pattern. I used the fairly standard beam pattern but you could turn the beams around, do different beam patterns on different nails or even do something else like zigzags.

nailart nail art nails mani manicure Spellbound Neon Sunbeams Rays Sunrays China Glaze Funky Fingers Color Club Taped Taping Tape orange green yellow pink hot black white Sun Worshiper Kingston Yell-Oh!

Speaking of the base polishes, you gals should know by now that I always use two (or more) coats of white to make the neons pop. This time I used two coats of China Glaze White on White. The neon polishes are China Glaze Sun Worshiper, Color Club Yell-Oh! (which looks slightly green to me and these pictures agree), and Funky Fingers Kingston. I didn't do or use anything special to get the polishes lined up on my nails. I tried using a nail art brush but they were simply too small to work with so I used the polish brush and carefully painted stripes on either side of my nail and finished with a stripe down the middle. These colors took two coats and I was extra careful with the final coat to touch up any mistakes I made with the first. It may sound daunting and there is a moment of panic before you begin (how could such a large brush make three lines without overlapping horribly?) but it's really not once you start! Trust me! You will want to be careful with the wider brushes such as some of the Sally Hansen brushes and the Wet n Wild Pro brushes. If you just have to use one of these brushes try tipping the brush in it's side. That will give you a slimmer brush to work with.

nailart nail art nails mani manicure Spellbound Neon Sunbeams Rays Sunrays China Glaze Funky Fingers Color Club Taped Taping Tape orange green yellow pink hot black white Sun Worshiper Kingston Yell-Oh!

Let your base polishes dry. You can add a top coat before taping for extra protection against chips and bleed through and also to give a smoother finish if you like. After your polishes are dry simply tape your pattern. Make sure the tape lays flat and remember to fold the ends of the tape over your nail tips and work it into the creases of your fingers. Coat your nail (and the tips of your nail between the tape) in your top polish. I chose black but again it doesn't have to be black. Once you have your top polish on immediately remove your tape. I use a pair of tweezers to grasp the tape (less messy and a smaller chance of smudging already completed nails) and get best results when I pull the tape slowly and smoothly back over my nail from the tip ... much like waxing in slow motion. :)

Wednesday, July 11, 2012

Emote Nails

Wow! I didn't realize just how close I am to 100 GFC followers. You guys are amazing!!! So, for being such amazing followers I will let you in on a little secret. I will be having a super awesome giveaway soon. I have an order in for one of the prizes and I am so close to being able to order the other prize. This will be a giveaway with 2 winners and many ways to enter. I'm hoping to have everything together for August, so tell everyone you know! Now, onto the actual post.


Today's (short) post is Emote nails. Emote: to show emotion. I think these nails certainly do that, don't you? :)


They show love, anger, happiness, boredom/tiredness and ...


Sadness on the thumb. I love this little guy. He's just so cute and definitely my favorite.


What do you gals think of emote nails? Are they something you would try? What emotions would you have your nails express? ... How excited are you for a giveaway??

Monday, July 9, 2012

Neon Splatter

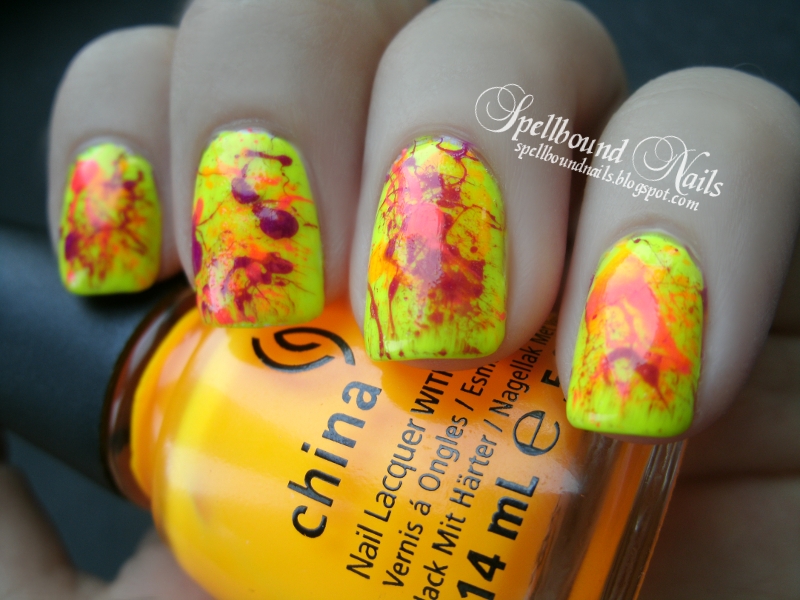
If there's one thing I love it's neon nail polish. I really don't think there's much better ... except maybe neon splatter nails!!!

splatter neon nails nailart nail art mani manicure orange yellow purple pink Funky Fingers China Glaze Color Club Spellbound

Splatter nails create such a unique look for your nails. You'll never get the same design twice even if you use the same polishes. And, all told, they're really not that hard to do. All you need is polish, a piece of paper, some tape (for easier cleanup), and a straw. Tape around your nails, drop some polish onto a piece of paper, dip your straw into the polish and blow in one hard puff over your nail. Be sure to keep the piece of paper under your hand so you don't ruin your workstation. This may not always get a splatter but just keep trying until your straw picks up enough polish.

splatter neon nails nailart nail art mani manicure orange yellow purple pink Funky Fingers China Glaze Color Club Spellbound

My problem with splatter nails? I don't know when to quit! I just keep adding more and more splatters until my base polish is practically covered and the splatters are everywhere. I think I managed to reign myself in more than usual with this splatter, but there's still a lot of them.

splatter neon nails nailart nail art mani manicure orange yellow purple pink Funky Fingers China Glaze Color Club Spellbound


My right hand is less covered with splatter, but I did have a major drip on my middle finger and couldn't manage to get very many on my ring finger. Also, I somehow managed to smudge the polish on my index nail. I have no idea how. One moment it was fine and then next it was bunched. There was simply no fixing it.


splatter neon nails nailart nail art mani manicure orange yellow purple pink Funky Fingers China Glaze Color Club Spellbound

And here you can see the thumb of my right hand. It has a good splatter pattern and managed to get a good splatter of each color.

splatter neon nails nailart nail art mani manicure orange yellow purple pink Funky Fingers China Glaze Color Club Spellbound


Overall, I think this turned out really great. I definitely want to do more neon splatter nails. I'm thinking Sun Worshiper would make an amazing base color.

Polishes Used
Color Club - Yell-Oh!
Color Club - Mrs. Robinson
Funky Fingers - Kingston
China Glaze - Sun Worshiper

Monday, June 25, 2012

Quidditch is Dirty Work

Today's post is my very first Harry Potter mani. I have dozens of Harry Potter designs sketched in my nail art book, but I've never felt confident enough to complete any. So, when I was completely stumped on what to do with my nails last week I figured it was past time to do something Harry Potter.


nail art nails mani manicure Harry Potter Gryffindor Slytherin Ravenclaw Hufflepuff Hogwarts Houses striped Golden Snitch wings red gold green silver yellow black blue bronze


I went through all my sketches and realized I didn't want to do any of them. I thought briefly about doing something for each book but there are seven books ... too many for one hand and too few for both. I could have also done something for my favorite parts of the books but ... well, I have too many. :)


nail art nails mani manicure Harry Potter Gryffindor Slytherin Ravenclaw Hufflepuff Hogwarts Houses striped Golden Snitch wings red gold green silver yellow black blue bronze


I finally settled on Quidditch as my inspiration. When I think of a Quidditch uniform all I can think of is stripes. I'm not sure why, but I think it has something to do with the Hogwarts striped ties. I tend to imagine the house colors as stripes now. And as all the muddy Quidditch training in the books tells us Quidditch is a dirty job! With this in mind I sponged on some deep brown over the uniforms to create a muddy, dirtied look.


nail art nails mani manicure Harry Potter Gryffindor Slytherin Ravenclaw Hufflepuff Hogwarts Houses striped Golden Snitch wings red gold green silver yellow black blue bronze


Last but not least ... what Quidditch game is complete without the Golden Snitch??


Polish Used
Hufflepuff: Pure Ice Excuse Me & Beauty Concepts unnamed shimmery black
Slytherin: Sally Hansen Emerald City & Sally Hansen Celeb City
Gryffindor: Maybelline Bold Gold & Wet n Wild I Red a Good Book
Ravenclaw: Bon Bon Blue & Petites Bronze Baby
Snitch: Revlon Blue Lagoon, LA Colors White, Maybelline Bold Gold, Wet n Wild Goldmine, Funky Fingers Platinum Record, and a mix of black and white to create the gray used for outlining the wings.


Before beginning this mani I used 2 coats of white polish on all my nails so I could get the brightest colors possible.

Thursday, June 7, 2012

The Dalek Rule This Galaxy

The Dalek Rule This Galaxy


nails nail art polish manicure mani Dalek Doctor Who Galaxy stars glitter shimmer


I mentioned on my Facebook page last week that I was doing my first galaxy nail. I also mentioned that I had to put my own spin on them. I left you all in the dark on just what kind of spin. Well, it's a Doctor Who spin. Most of you probably won't recognize the Doctor Who reference, but I hope you enjoy the nails anway. I thought of using the Tardis but I decided to go the road less traveled and do a Dalek ... or maybe just Dalek inspired since it's not a perfect replica.


nails nail art polish manicure mani Dalek Doctor Who Galaxy stars glitter shimmer


What galaxy is complete without a Dalek or two? None, I tell you, none! The Dalek nails aren't something just anyone would recognize, but it's a nice in-joke among fans. I'm just curious, how many of you recognized the nail right away or got excited when you read the title?


nails nail art polish manicure mani Dalek Doctor Who Galaxy stars glitter shimmer


Some of you may recognize this gold nail from last post's Golden Twilight nails. Not only is the color Bold Gold ... it's the same nail! I took off the Twilight Rays color but kept Bold Gold. It has held up very nicely, hasn't it? I just added the Born Pretty gold nail studs and a few layers of top coat to keep them in place. The nail studs are a great match in color for Bold Gold and make for a near perfect Dalek!


nails nail art polish manicure mani Dalek Doctor Who Galaxy stars glitter shimmer


I was utterly terrified of doing galaxy nails after hearing all the horror stories, but I think these turned out really well being my first try and all.


nails nail art polish manicure mani Dalek Doctor Who Galaxy stars glitter shimmer


I decided to use a creme black for space but stuck to shimmer polishes for the galaxies. The stars dotted on are a white creme. I also used this white for the galaxy base. The galaxies are made up of shimmer yellow, orange, and peach for the lighter shades and a deep shimmer metallic purple and a shimmer blue for the darker shades. I used a purple glitter, a blue holo glitter, a silver holo glitter, and a simple fine glitter for the stars not dotted on. It was all very shiny and glittery!

nails nail art polish manicure mani Dalek Doctor Who Galaxy stars glitter shimmer

I couldn't resist bringing out my blue/white light and seeing what they looked like under that. I think it was one of my better ideas to use only shimmer and glitter polishes.


nails nail art polish manicure mani Dalek Doctor Who Galaxy stars glitter shimmer gradient eyeshadow applicator brush sponge
Image from Alibaba.com


For those looking for simpler solution to using a sponge, whether for galaxy nails or gradients or any other nail where a sponge would come in handy, use an eyeshadow applicator. I found this worked so much better for me than any kind of sponge. Not only did I pick up a pack of 12 (60mm) applicators for cheap at my local dollar store, I had better control while using them. They are made to fit in your hand so they keep a wet mani intact while you do the opposite hand and are small enough to move around your entire nail easily. I can also use and reuse these. For these nails, I only used one side of an applicator! Not even the front and back of one side, just one side.


So, what do you guys think of galaxy nails? I know I will definitely be doing these again! 


Polish Used
LA Colors - Black
Sally Hansen - White On
Pure Ice - Unzip Me
Pure Ice - Twinkle
Revlon - Tangerine
Funky Fingers - Power Chord
China Glaze - Blue Year's Eve
L.A Girl Glitter Addict - Eutopia
Funky Fingers - Flashing Lights
Wet n Wild - Kaleidoscope
LA Colors - Glitter

Thursday, May 31, 2012

A Parliament of Owls

Hello girlies! I don't know about you but I've been seeing owl nails everywhere. Sometimes just colorful owls like SuPa Nails Oh Oh Owls! Sometimes not so colorful like JawsOfKita-LoveHim's Owl Nails. There's also those with one owl like cutepolish's Cute Nail Art tutorial. Or those with designs that incorporate all nails like Chalkboard Nails Valentine's Owl Nail Art or Unhas da *micktuti*'s owl nails.

With all these awesome owl nails I wanted to try some of my own. I saw this design on Pinterest first and just had to recreate it. It's originally from Chalkboard Nails and was then recreated by Let them have Polish as part of a challenge—inspired by a tutorial.

Parliament of Owls Owl nail art nails


I couldn't have chosen a worse time to do this design though. It was very hot and humid; the kind of heat that nail polish doesn't dry well in. I also had very little time to do my nails before I had to start getting ready for my niece's dance recital. I thought I could do it though. How hard could they be? Well, I'll admit they weren't that hard. I didn't think out the color choices very well. I mostly just reached into my nail drawer and grabbed the closest colors.


Parliament of Owls Owl nail art nails


The base colors worked well together but once I started lightening it for the chest, dotting on the chest spots, and adding the beak everything just kind of blended together.


Parliament of Owls Owl nail art nails


The spots and beak look nearly perfect on the mint and purple, shows up slightly less on the pink and red, but really just blends completely on the orange. If I had more time I'm sure I would have tested each color on paper before using them, but I was in a rush.

Parliament of Owls Owl nail art nails

How much of a rush you ask? So much of a rush that I didn't realize I had scraped the eye off my thumb owl and dented the tip of the middle finger owl until I was in the car and far away from my nail supplies. I told my nieces that the orange owl was evil and attacked the pink owl. *giggle* I'm so mean. :)

Parliament of Owls Owl nail art nails


I'm actually pretty proud of how well my right hand turned out all told. I'm right handed but through much practice I've gotten my left hand able to do much of the fine detail work. Still, it's never as good as doing nail art with my right hand. However, besides the googly eyes on the red owl I think everything came together very well.


For those who are wondering ... a groups of owls is called a parliament, hence the title. Yeah ... I had to look it up too. ;)


Polish Used

  • Revlon - Base Coat
  • Wet n Wild - I Red a Good Book
  • Wet n Wild - I Need a Refresh-Mint
  • Wet n Wild - Club Havana
  • Wet n Wild - Bite the Bullet
  • Wet n Wild - Tropicalia
  • Sally Hansen - Mellow Yellow
  • Sally Hansen - Sun Kissed
  • LA Colors - Black
  • LA Colors - White