Showing posts with label Borghese. Show all posts

Tuesday, June 5, 2012

Golden Twilight

Maybelline New York Color Show Bold Gold Twilight Rays black glitter shimmer nails nail art polish


Today's post puts Maybelline New York's new Color Show nail polish in the spotlight. Color Show is part of Maybelline's collection of runway colors. The Color Show collection comes in, get this, 40 new shades!! 30 hot colors and 10 statement pieces. The hot colors are mostly bright, bold neons and deep shimmer filled polishes while the statement pieces encompass crackle like polishes they call shredded, denims, and metallics. These polishes are priced to sell as well. I picked these two up for about $2.97 a bottle. I read somewhere that the top price is likely to be $3.99, but check your local shops to be sure. With the price and multitude of shades you can always have nails like a supermodel.


Maybelline New York Color Show Bold Gold Twilight Rays black glitter shimmer nails nail art polish


I felt myself very lucky to find these polishes in stores already. My town is usually the last to receive new products. With this in mind I immediately grabbed Twilight Rays and Bold Gold. Twilight Rays is a black polish filled with a gold glittery shimmer. I found the gold glitters nearly disappeared into the black with three coats of polish. Even in sunlight they didn't really pop like I thought they would. Nice to be sure, but not what I was expecting.


Maybelline New York Color Show Bold Gold Twilight Rays black glitter shimmer nails nail art polish


Bold Gold is a shade I have been looking for for what seems like forever. I've tried handfuls of gold polishes looking for this exact shade and texture. I'm ecstatic to finally own this color after so long. Bold Gold is a gorgeous yellow gold metallic. It has a very fine shimmer effect to it that doesn't overpower the delicate color like some other polishes. This is a perfect gold in my opinion! While Twilight Rays left me slightly disappointed, Bold Gold really stepped up.


I will say I had some major trouble getting Bold Gold to stay on my nails while painting them. The brush kept swiping the polish right off. The polish itself looked to be separating, oddly enough. When it was swiped off it left behind a watery oil with no color. I had to start over after my first attempt. I have reason to believe the polish was reacting to my base coat since I used a different base coat on my second attempt and things went smoother. There were still a few problems but no separation. A second coat of Bold Gold took care of that.


That said, Bold Gold stayed on my nails for about a week. I'm sure it would have lasted longer if I hadn't removed it myself. It had absolutely no chips and not even any wear on the tips when I took it off last night. Amazing!


Maybelline New York Color Show Bold Gold Twilight Rays black glitter shimmer nails nail art polish

Here is a close up of Twilight Rays. You can see the shimmer is actually a combination of tiny flecks of micro glitters and larger, yet still very small, hexagonal glitters.

Maybelline New York Color Show Bold Gold Twilight Rays black glitter shimmer nails nail art polish

And here is a close up of Bold Gold. You can see the shimmer really well here.


No matter what you think of the two colors I picked out of this collection you should definitely check it out for yourselves. With so many shades to be found in this collection you're sure to find a color created just for you.

Tuesday, May 22, 2012

Kickin' Converse

I am so sick of my broken nail. It has been years since I've had a nail this short, but I've decided to make the most of it by doing designs that can be worn on nails that are long as well as short. I'm hoping to let those with short nails, by choice or not, know that you don't need long or squared nails to still have pretty nails! With this in mind I bring you pictures of Saturday's Converse mani worn to a niece's birthday party — my short nail is uncovered in these pics so look away if this bothers you.

Kickin' Converse Shoes nail art

I decided to start with a partial Skittles mani, my thumb is done in red, done with the help of tape. Two coats of each color before I added two coats of white to the tips.

Kickin' Converse Shoes nail art


After that it was fairly simple to use my dotting tool to add small dots of silver for the lace holes and my smallest nail art brush to add the black half circle and laces.

Kickin' Converse Shoes nail art

With this design, I think the short rounded nail somehow works better. It gives a more realistic 'shoe' look. So if you have short nails don't be afraid to give this mani a try!!


Also, if you're as easily amused as I am ... I got a kick out of 'kicking' people while wearing these nails or doing the finger walk. It looked so weird with little shoes on my fingers!

Polish Used
Red: Borghese 'Che Bella Red C'
Orange: Wet n Wild 'Club Havana'
Pink: Wet n Wild 'Tropicalia'
Blue/Green: Wet n Wild 'I Need a Refresh-Mint'
Purple: Wet n Wild 'Bite the Bullet'
Black & White: LA Colors
Silver: Sally Hansen 'Celeb City'

Sunday, May 20, 2012

Caged

'ello lovelies! I'm kind of embarrassed to post today. These are nowhere near my best nails. They just look so messy to me. Also, I decided not to use a smiley with this mani. The broken nail on my left hand isn't so noticeable in the two pics I got of that hand.


I tried something new and then used another stamp over top. I loaded a large brush with four colors and attempted to do a one-stroke nail. Things didn't work out as I hoped.


Since I was only allowing myself one stroke I used a white base in hopes the colors would really pop.


Sadly, the one stroke is much harder than it looks. The polish got everywhere except my nails! It flooded my cuticles and smeared all over my fingers but would not stay on my nail. One stroke turned into many as I attempted damage control.


It was all so messy that I looked for a stamp to cover some of the mess. I decided to use this stamp, Born Pretty m64. Even after all that I still wasn't satisfied and was really glad to take this mani off.


Here's an attempt to explain the title of this mani. The finished nail makes me think only of bird as it looks out through the bars of its cage at the setting sun wishing more than anything to fly free. I tried to think of a title that would make more sense but that's all that I could think of.

Sunday, May 13, 2012

The Mommy Mess

Happy Mother's Day  to the mothers out there. Today's post is for my own mommy.


I thought long and hard about this design. I didn't want a generic Mother's Day design. What I really wanted was something personal to my mother. Well, my mom's favorite flower is the lilac. Best of all? Her favorite color is also purple! Talk about perfect.


Sadly, I found the lilac flower almost impossible to recreate into something people would look at and think, "Oh, that's a lilac!" In my opinion, it's a bit of a mess.


However, my mom was kind enough to point out that her knowing what it was was all that should matter. This mani was created for her after all, and she loves it.


I started with these nails. I'm not usually one for a French mani. I always end up with streaks when using a 'natural' polish, which was no different with this mani. But I became pretty fond of these. I used two coats of OPI Bubble Bath with one coat of OPI Alpine Snow on the tips. I was feeling very steady handed that day so I went ahead and free handed the tips.


These last two pictures are of my left hand. This is the hand I usually use for my pictures, but I found myself liking the nails of my right hand better. But, I guess the lack of precision worked better for this mani. Go figure.


Polish Used
Borghese - Brilliante
OPI - Bubble Bath
OPI - Alpine Snow
OPI - Uh-Oh Roll Down the Window
Sally Hansen - Green with Envy
Sally Hansen - Lacey Lilac
Pure Ice - New Lilac
LA Colors - Purple
Sally Hansen - Insta-Dri

Thursday, May 10, 2012

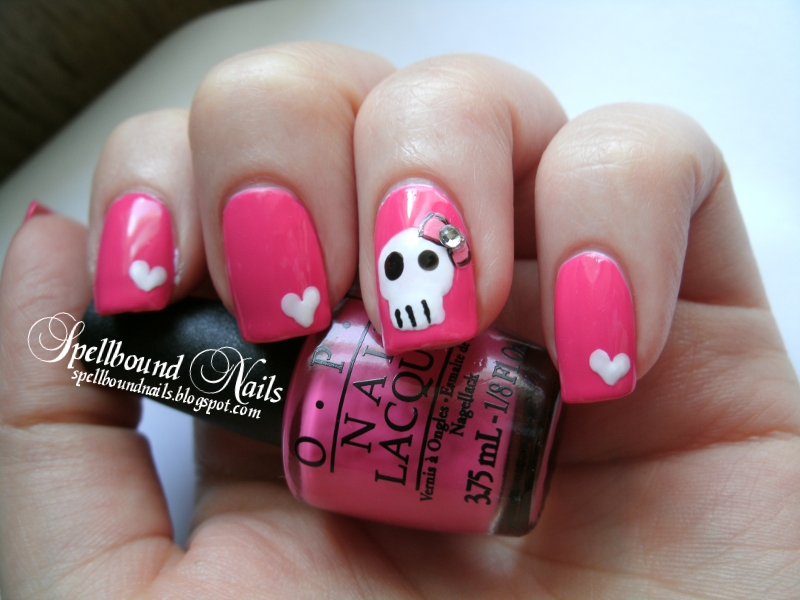
Bowed Skulls and Hearts

'ello, Girlies! It's been a really busy week. I've barely had time to do my nails let alone post anything. But that's why I'm here now, isn't it? To post something!


Today's post is a mani I absolutely adore, but am very sad about. I'll explain in a moment. For now, gaze upon the awesomeness.


I was going to do this mani using my nails studs right up until it came time to add them and I panicked. It just didn't feel right. The hearts were a last minute decision but worked so much better.


Think you've seen this mani before? Well, you just might have if you follow MixedMama! I honestly had no idea that I was doing an almost exact replica of another blogger's work. And I would have posted this with no idea if I hadn't stumbled across a picture of her mani while tagging the Bite the Bullet nails on my Facebook page. I was absolutely stunned and completely crushed to know this design was already done, but I guess that's the way nail art goes. You win some and you lose some.


I would also like to lay some credit at the feet of ProfessionalDQ over on Youtube. I first got the idea of bowed skulls there.


So, if you don't follow MixedMama or haven't watched some of ProfessionalDQ's nail art in action I definitely recommend heading over there next. :)


Polish Used

  • Borghese - Brilliante
  • LA Colors - White (2 coats)
  • OPI - Strawberry Margarita (2 coats over white)
  • Sinful Colors - Beautiful Girl (bow)
  • LA Colors - Black
  • Sally Hansen - Insta-Dri

Saturday, May 5, 2012

Bite the Bullet

Hello girlies! First off, I want to say sorry for the sparsity of my posts. While the teabag and nail glue holding my torn nail together are still holding up nicely I don't want to push my luck until the nail grows out a bit more.

Still, I'm happy to post a new color swatch today. I'm sure you all know by now that my go to color is purple. Well, this purple is so pretty! It's a good deal lighter than my usual purples but still matched well with my skin tone. This is Wet n Wild, Bite the Bullet.


I tried something new with the pictures this time. While running them through my art program to resize them I also 'oilified' then blurred my skin. It gave it a really weird look!


I'm not exactly sure how to describe this shade. It has so many different 'looks'. In some lights it looks fairly dark, in others it's a beautiful cool purple, but there were times it had a hint of gray. This was completely opaque in two coats, but I'm sure if I went slightly thicker on the coats I could have gotten away with just one. I still adore the new ManiCurve Pro Brush. It gives me so much more control. This mani needed no clean-up! It was so perfect.


It also held up magnificently! I'm hard on my polish so if it lasts past day two I think of it as something of a miracle. Well, Bite the Bullet was on day four with only one or two small chips on the very tips of my fingers that could probably have been prevented with periodic re-coats of my top coat. Most of my nails still had the ends capped.

A lovely color that holds up well? What more could you ask for? Not much, in my opinion.

Friday, April 27, 2012

Pretty Camo

Hello, girlies! I tried my hand at stamping again today. I still haven't got it down yet, but I might be getting better. What do you think?


I think of this mani as deconstructed camo or my attempt at 'pretty camo'. While doing this design, I kept in mind the camo that uses various shades of green and tan to create leaves and a wood texture. I think it turned out very nice with this flowery, girlish stamp.


For some reason the middle nail smudged horribly when I stamped the design. Can you push too hard while stamping?


The two polishes used come from the Revlon Colorstay collection which just arrived in my small town. They are Bare Bones and Spanish Moss. I picked them up with a slightly different mani in mind but they looked far too much like camo colors to do anything else with them. :)


I'm still not sure how other bloggers get such perfect and whole stamps, but I'm just happy to see more than half the stamp on my nails this time!

Wednesday, April 25, 2012

Twinkling Hot Tamales


First off ... whoa, what is up with the new posting feature?? Was anyone else horribly confused and panicking a bit? I thought I pressed the wrong button or something!!


Right, onto the post. I'm not sure how long I can keep this daily posting up. Maybe another day or so if I'm not too lazy to paint my nails today, so enjoy it while you can! Today, I bring you Twinkle and Hot Tamale both from Pure Ice.


This alternating mani is two coats of Hot Tamale, the darker polish, and two coats of Twinkle, the lighter polish. I'm just noticing now the slightly visible nail line on some of them. They could probably use another coat or three. I guess this means they're more sheer than I thought.


Twinkle showed up fairly dark in most of the pictures I took. I managed to find a handful of true to color. Twinkle is a simply lovely shade of coral pink or maybe a salmon. It contains a slight hint of orange but I'm not sure if that's just the gold shimmer playing tricks on my eyes or not.


Hot Tamale is a darker color that I think nearly overwhelms the delicate Twinkle. The closest I can come to describing Hot Tamale is an off shade of vermilion, sometimes known as cinnabar. I think this shade works best because vermilion is described as being similar to scarlet but with more orange and less red. Hot Tamale certainly has it's fair share of orange and mixes nicely with the gold shimmer the polish contains.


 Twinkle and Hot Tamale close-up shots.
You really get to see the true shades of these colors up-close in direct sunlight.


Hot Tamale shows it's gold shimmer much less than Twinkle. The gold shimmer blends too well with Hot Tamale's metallic finish to really pop. That certainly doesn't mean Hot Tamale doesn't pop all on its own. While pink is my favorite color I don't think I can wear a shade as delicate as Twinkle ... at least not without Hot Tamale to carry it along.


What I didn't know while buying this polish was how closely Hot Tamale resembles Riveting from the China Glaze Hunger Games collection. Riveting has slightly more depth to its color; the metallic finish of Riveting shifts subtly darker than Hot Tamale. However, Riveting leaves Hot Talame in its gold shimmering dust. Riveting has a much, much more present shimmer. The gold flecks are also bigger and brighter; they really shine out of the polish. As you can see from the picture below, Hot Tamale is not an exact match to Riveting but you might be able to make a fairly passable fraken dupe out of it by adding a thicker shimmer.


Will any of you be trying Hot Tamale in place of Riveting? What about Twinkle? Will it work better with your skin tone than it does mine?

Sunday, April 22, 2012

Earth Day

Hello, my lovelies! I'm getting this post out a bit later than I was hoping. I went to the circus with family yesterday and overslept this morning. I woke up to a rainy, cloudy, just plain yucky day so pictures took longer too. However, I have pictures of my circus nails for tomorrow to look forward to. Yay!


For today though, it's Earth Day nails. I had so many ideas for this design but then I stumbled across the Earth Day Network Philippines 2011 logo and it was perfect. 


It combined everything I thought of when I thought of Earth Day. The sun, the trees, the water, and the air. I changed the design very slightly slightly to make it work on my nails.


Cloud nails were something I've been dreaming of doing, and I'm happy I finally got my chance. Of course, I used my new favorite color for the sky: I Need a Refresh-Mint. You guys are probably getting sick of it!


I also used China Glaze, Blue Year's Eve. I use this whenever I need water. The shimmer floating in the sea of gleaming blue just screams water to me, like a deep refreshing pool of water. ♥


Did you gals do anything special for Earth Day? Paint your nails? Plant a tree? Hold a fundraiser?

Friday, April 20, 2012

Sun Rays

Another post already?? Yes! And you'll be getting one tomorrow too and maybe the next day! Are you excited? I know I am.


I'm pretty proud of these nails. It is my first time doing a design like this. I wasn't sure of it at first but I came to enjoy the overall look. I do wish I had gone with my first thought and used brighter under colors, but it is what it is. :)


I started off with two coats of a white polish over my base coat. Then I used a flat nail art brush to paint on each color, beginning with a dabbing motion and using a clear polish to blend them together. After the polish dried I used tape to create a sun ray design. I think this was the hardest part because I don't own striping tape. This meant I had to cut pieces of tape to the correct size. I went through a lot of tape before I finally got the hang of it!


Once everything was taped up, I used one coat of black over the tape, let it dry for a moment and peeled the tape off. It left behind a near perfect sun ray design. Be very careful not to leave the tape on for too long! I did this very thing on my right hand and the tape peeled off a strip of not just the under colors but the two coats of white and my base coat!! Thankfully I was able to touch them up but you could totally ruin your entire mani this way!


The first three pictures were taken in the shade and brightened with my camera's light filter. (My first time using this filter. Let me know what you think.) The last picture was taken in full sunlight. The colors are truer with the last picture.


Polish Used

  • Borghese - Brilliante
  • LA Colors - White
  • LA Colors - Black
  • China Glaze - First Mate
  • China Glaze - Secret Peri-Wink-Le
  • Revlon - Blue Lagoon
  • Funky Fingers - Sugarplum Fairy
  • Sally Hansen - Insta-Dri

Thursday, April 19, 2012

Chessur Disaster

Not all my nail designs work out. I, like everyone else, have off days and disasters. I call today's post the 'Chessur Disaster'.


For those who don't know, Chessur is the Cheshire Cat of Tim Burton's, Alice in Wonderland. This is one of my favorite movies and I dream of one day having a Cheshire tattoo complete with the Mad Hatter's top hat. I love any Alice in Wonderland but Burton always adds a certain flair to everything he touches that I simply adore.


In addition to being a simple tribute to such a wonderful movie, it is National Pet Month. I have my own pets that I adore, but I would love a Cheshire Cat of my own. Who wouldn't??


As you can see, this isn't my best mani. I tried something a bit different and it didn't work out. It happens to all of us. The thing to remember is: don't dwell. Seriously! Pick yourself back up, mop up those tears (if there are any), and move on. Thankfully, I realized what a disaster this was before I completed more than this hand. Yes, this turned into a one-handed design! The polish stayed on only long enough to take these pictures and then I moved on. C'est la vie!


Polish Used

  • Borghese - Brilliante
  • New York Color - Sidewalkers
  • New York Color - East Village
  • LA Colors - Black
  • LA Colors - White
  • Sally Hansen HD - Resolution
  • Sally Hansen - Fuchsia Power

Tuesday, April 17, 2012

Cracked Neon

Hello all you lovely followers! I hope everyone is doing okay. I was going to have this posted sooner but I got horribly sick this weekend. I'm happy to say that I'm feeling much better now though.


Today's post is a very simple mani, but one that I think is so perfect for summer.


Summer is the perfect time to catch the eyes of those around you, and what better way than with such of burst of color?


The thing to remember with neon polish is that you get the most color when it is layered over white. That's why, for this mani, I used two coats of white polish under two coats of neon before adding one coat of white crackle. This makes the neon color really pop.


Polish Used

  • Borghese - Brilliante
  • LA Color - White
  • Funky Fingers - Kingston
  • Funky Fingers - White Scales
  • Sally Hansen - Insta-Dri

Wednesday, April 11, 2012

Ocean Sunrise


I am so excited for today's post!! The women of my family started what we hope is a yearly tradition last year by going on vacation together. My mom, my sister, her three girls, and myself went to the beach for a few days. We're going for a full week this year!


My favorite part of being at the beach (besides everything!) was sitting on our hotel balcony every morning with a cup of coffee watching the sunrise over the ocean. I think I got more pictures of that than nearly anything else.


I don't think this is a design you look at and immediately think beach, but I'm getting a gym membership soon in hopes of toning up a bit for the beach. I needed motivation!! I look at my nails and see the overwhelming beauty of every sunrise I saw over the ocean. It's just what I need.


Thumb

I had such fun doing this mani. It was like truly painting on tiny canvases. I mixed up my own colors and swirled them around on my nails to get just the right look. I put the sun on my ring finger and edged the sunrise out to the purple and blue of a night sky just being touched by the sun's rays.


So, what do you guys think of my motivational beach nails?