Saturday, June 30, 2012

Birds of a Feather

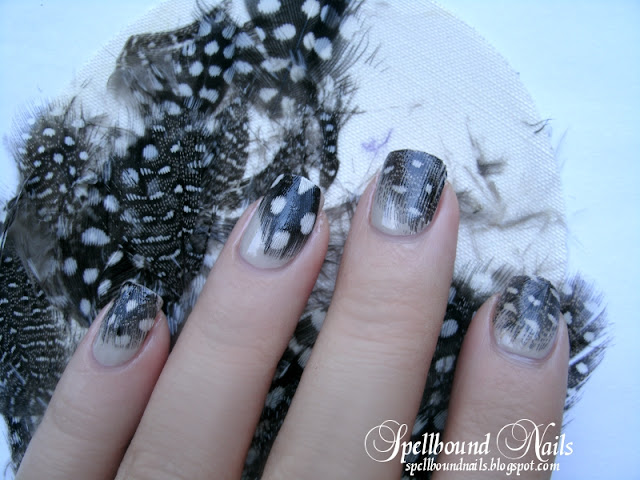
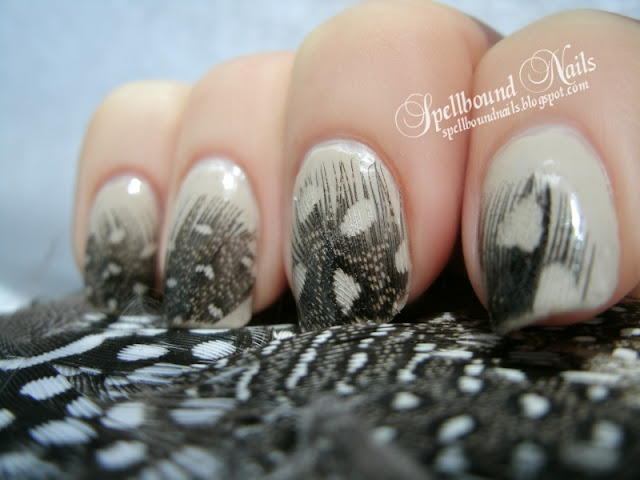
I am very excited about this post. It's feather nails! I've been wanting to try these for months. I picked up the feathers a day or two before my last nail break though so doing these nails was put on hold. My nail has since grown back nicely so I figured it was past time to try feather nails for the first time. 

Birds of a Feather nails nail art nailart mani manicure Spellbound feathers neutral beige spots dots


Before attempting these nails I scoured the internet for blogger tutorials and youtube videos. What I learned is that while everyone has their own quirks, it's all basically done the same way. With this in mind, I set out to complete my own nails keeping the feather tutorials in mind.

Birds of a Feather nails nail art nailart mani manicure Spellbound feathers neutral beige spots dots

I started with two coats of Revlon's Bare Bones. I thought of buying brightly colored feathers or using a bright polish but I wanted these nails to be slightly more classic. I wanted them to look more realistic for my first try. So I went for the realistic feathers and a neutral base color.

Birds of a Feather nails nail art nailart mani manicure Spellbound feathers neutral beige spots dots

What I quickly realized is that the nails were very easy to do. Time consuming, yes but hard, not so much! I would recommend buying the bagged loose feathers. The only realistic feathers my craft store had though was a feather pad . I have no idea what this is used for originally but whatever it's meant for ... I don't think the feathers are meant to be just plucked and pulled off like I was doing. Some of them wouldn't come off at all and those that did left pieces behind. Still, I got more than enough of the feather to work with, so I guess the feather pad worked well enough.

Birds of a Feather nails nail art nailart mani manicure Spellbound feathers neutral beige spots dots

Putting the feathers on was also a fairly simple task. I used the glue-like polish that comes in gem packages. I figured if it can hold on my gems for days it should be no problem to hold on a feather.

The first thing to remember when putting feathers on your nails is that you don't want to trim them too much before you have them practically glued to your nails. They will fall apart! Get them laid on your nails over a layer of clear polish, nothing quick drying because you need time to work, and then trim them around your nail. You'll want a small pair of scissors to do the trimming. I found it easier to trim because mine were both small and sharp tipped. After you get them trimmed around your nail you'll likely find you have some small, sharp pieces hanging over your nail. I recommend turning your scissors at an angle to lay over your nail and trimming the tips this way. Get the bottom blade under the pieces of feather hanging over your nail and use the top blade (still at an angle) to skim the very tip of your nail. Be very careful you don't cut your finger or your nail, just the feather! Anything you can't get with a pair of scissors can be lightly filed with a soft file.

I used three or four coats of a thick, quick dry top coat over the feathers. It took about that many before the polish stopped settling around the feather and the nail got smooth.

Birds of a Feather nails nail art nailart mani manicure Spellbound feathers neutral beige spots dots

Here is the last picture I have to share. It's a natural part of the feather I used on this finger. I didn't even realized one of the spots formed into a heart, but I was ecstatic to see this!! It was like a little bit of love from the feathers themselves.

These feathers stayed on my nails for 5 days, and they only came off because I removed them! This is a very lasting manicure. This might have something to do with the feathers adding some protection to the tips of your nails or simply because you use so much top coat to seal them. Whatever it is, this mani lasts and looks amazing! The reactions you get when you say they're real feathers is also pretty darn cool.

Friday, June 29, 2012

Feature Friday

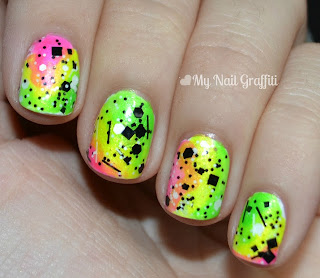
It's been a very busy week around here so I haven't had much time to browse other blogs. However, I did stumble across this in my feeds. It was love at first sight, and I knew instantly it was this week's feature. :)


nail art nailart nails mani manicure neon tie dye My Nail Graffiti Spellbound Feature Friday Sticks n Stones

This is Neon Tie Dye + Sticks 'n Stones by Amber (and Dustin) over at My Nail Graffiti. First off, I love the colors. I'm a big ol' neon fantic! (I actually have neon on my nails as I'm typing!) Neons are the perfect summer colors in my opinion.


Next, I definitely love how the colors swirl and blend together. Can you believe no orange was used?? Amber says it's just the pink and yellow mixing together. So cool!! Lastly, I just love how all the swirls are in different places on each nail. It doesn't make me want to compare them or pick out flaws. My eyes just follow the swirls and enjoy. I'm also enjoying the addition of Sticks 'n Stones. Personally, it's not something I would have added since I'm always scared of doing too much and ruining the design I've worked so hard on. But, I really like how it looks over the neon. It was a good choice. :)

As always, these are not my nails! I had no hand or say in their creation. This is simply a feature post in an attempt to give another blogger some love. Take a moment, follow the links, and leave a nice comment or two for the featured blogger.

Thursday, June 28, 2012

Swimsuit Shopping

Hey everyone. I went swimsuit shopping yesterday! I got my first swimsuit in years for vacation last year after losing about 15-20 pounds. Well, I lost another 10 or so this year. That brings my total to just over 30 pounds lost. Yay for me! However, I'm still not at my goal weight so swimsuit shopping is a fairly trying experience, but I guess that's true for almost anyone, isn't it? Are any of us truly happy with every feature of our bodies? Isn't there something, small or large, each of us wants to change? With the horrors of swimsuit shopping in mind I did a quick swimsuit manicure for luck.


I've seen bikini nail art before but I don't think I'll ever look or feel good in a bikini so I decided to do a combination of swimsuits. The first is a sexy pink one shoulder. Next is a sporty blue and white striped swimsuit. Then a red and white polka dotted one-piece that I fell in love with while shopping online (it was $160 though), and then a shiny purple bikini.


And on my thumb is a bright orange and yellow polka dotted tankini. I must have done something right with these nails because I came home the proud new owner of a sexy (and slimming) black one-piece suit at a great price!


Here's a picture of my new swimsuit, front and back, taken from the JCPenney website. I will look nothing like this in my swimsuit of course, but I'm thinking of sewing some of those pushup bra swim cup things into mine in an attempt to give myself something on top since it has such a deep neckline but don't want to ruin a $40 suit. Has anyone, or do you know anyone, who has done this? How did it work for you or them?

Monday, June 25, 2012

Quidditch is Dirty Work

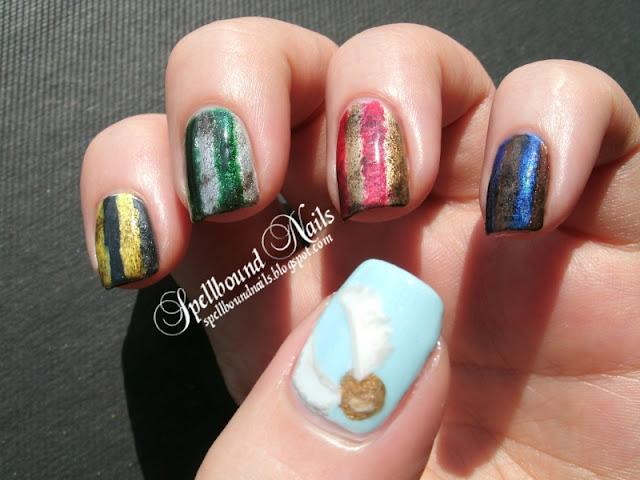
Today's post is my very first Harry Potter mani. I have dozens of Harry Potter designs sketched in my nail art book, but I've never felt confident enough to complete any. So, when I was completely stumped on what to do with my nails last week I figured it was past time to do something Harry Potter.


nail art nails mani manicure Harry Potter Gryffindor Slytherin Ravenclaw Hufflepuff Hogwarts Houses striped Golden Snitch wings red gold green silver yellow black blue bronze


I went through all my sketches and realized I didn't want to do any of them. I thought briefly about doing something for each book but there are seven books ... too many for one hand and too few for both. I could have also done something for my favorite parts of the books but ... well, I have too many. :)


nail art nails mani manicure Harry Potter Gryffindor Slytherin Ravenclaw Hufflepuff Hogwarts Houses striped Golden Snitch wings red gold green silver yellow black blue bronze


I finally settled on Quidditch as my inspiration. When I think of a Quidditch uniform all I can think of is stripes. I'm not sure why, but I think it has something to do with the Hogwarts striped ties. I tend to imagine the house colors as stripes now. And as all the muddy Quidditch training in the books tells us Quidditch is a dirty job! With this in mind I sponged on some deep brown over the uniforms to create a muddy, dirtied look.


nail art nails mani manicure Harry Potter Gryffindor Slytherin Ravenclaw Hufflepuff Hogwarts Houses striped Golden Snitch wings red gold green silver yellow black blue bronze


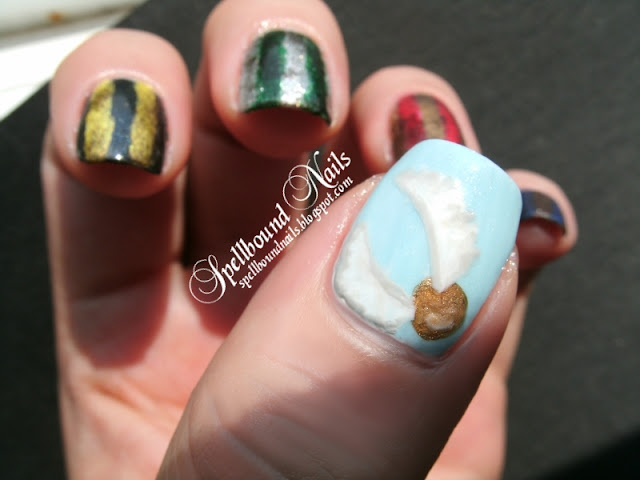
Last but not least ... what Quidditch game is complete without the Golden Snitch??


Polish Used
Hufflepuff: Pure Ice Excuse Me & Beauty Concepts unnamed shimmery black
Slytherin: Sally Hansen Emerald City & Sally Hansen Celeb City
Gryffindor: Maybelline Bold Gold & Wet n Wild I Red a Good Book
Ravenclaw: Bon Bon Blue & Petites Bronze Baby
Snitch: Revlon Blue Lagoon, LA Colors White, Maybelline Bold Gold, Wet n Wild Goldmine, Funky Fingers Platinum Record, and a mix of black and white to create the gray used for outlining the wings.


Before beginning this mani I used 2 coats of white polish on all my nails so I could get the brightest colors possible.

Friday, June 22, 2012

Feature Friday

'ello everyone! The heat around here has been insane! It makes nail painting nearly impossible, but it makes getting a tan so easy. Why pay for a session in a tanning booth when I can lay out everyday and tan quicker? Still, even with the heat horrors I have a few posts ready for next week, but today is Friday and you know what that means. It's Feature Friday again.


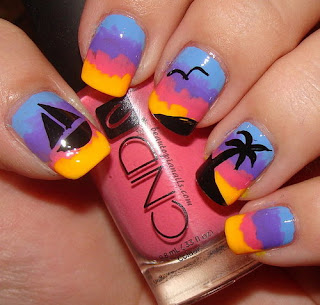
Today's Feature is Sunset Palm Nail Art by Beautopia Nails. This is an old post but it recently came up in one of the Tumblrs I follow. That makes it new again, right?


Sunset Palm tree sail boat water sun vacation nails nail art mani manicure Beautopia Nails bird

These nails have me wanting my own vacation to come sooner. They also leave me wanting to recreate them, mostly to show off on vacation, but I'd also be happy just to sit in my room and gaze at them because they're just so pretty!!!

So, if you like these nails even half as much as I do go take a browse through Beautopia Nails and see what other pretties you can find. ♥

These nails are not mine. This is simply a feature post in an attempt to give another blogger some love.

Wednesday, June 20, 2012

NOH8 (Contest Entry)

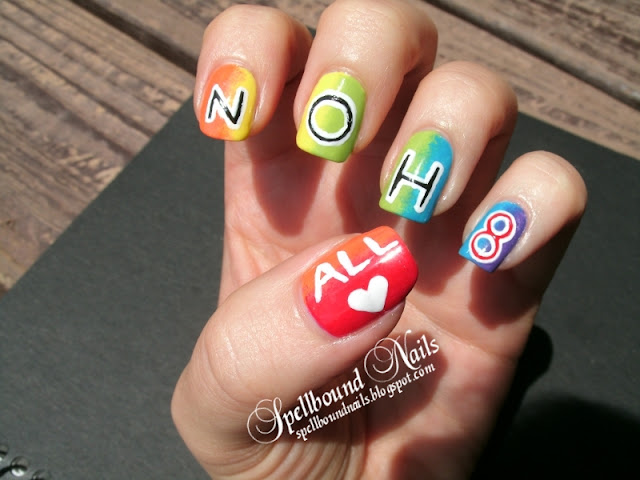
Hey girlies. I don't have much to share today since I completely failed a nail design yesterday. I know, I know. I'm usually a few days ahead with my nail designs but I was working on something for a nail art contest! So, that's what I'm going to share with you today. First off, I'm sorry for the zombie claw I have going on in this picture ... I had to get my thumb since it was part of the design. I promise not to bite!!

gay pride LGBT nail art contest entry NOH8 NO H8 campaign rainbow all love heart Kyoti's Nails


These nails were done for an LGBT nail art contest hosted by Kyoti's Nails. This contest runs until June 30th so you still have time if you want to enter. The rules are pretty simple. They include (check here for full rules): It has to be your own work, and you have to do your nails for this contest. The idea can be old but you have to repaint it specifically for this contest. There has to be some form of nail art used; you can't use full nail stickers or one color (rainbow ombre, for example, is acceptable). And there will be two winners!! One for 'amateur' and one for 'advanced'.


To see all the entries and vote on your favorite go to Kyoti's Facebook page: look in the photos ... there's an album just for the entries. Voting on the Facebook page will not decide the winner but will be taken into account during judging. Go check out the entries! There are so many great nail artists entered so hopefully you'll find someone worth voting for. :)

Sunday, June 17, 2012

Happy Ugly Tie Day

Hey everyone! Happy Father's Day ... or rather ugly tie day.

fathers day ties nails nail art manicure happy

We don't do much for Father's Day in our family since we're a bit ... different. I have my mom and my bonus dad. That's our family's word for step.


So, my bonus dad gets a card and a gift. We also go to my bonus grandparents house for lunch. Today we're having hotdogs on the grill with homemade Chili sauce and sides.


With such a simple day I decided to keep my nails simple too.


I started out with three coats of white polish and drew the 'shirt collar' on with black. For the ties I used a dotter and my thin nail art brush. It is such a simple design that my family really enjoys.


That's it for this post. I hope you all have a great day if or however you celebrate.

Friday, June 15, 2012

Feature Friday

Hey everyone! I hope you guys are having a great day. I think I have finished moving things around on the blog for now but if there's anything you'd like to see different let me know. :)


I can't believe how quickly this week has flown passed, but it's Feature Friday again! Today I bring you an awesome gradient mani by Holy Manicures.


lime sideways gradient Holy Manicures feature Friday neon yellow green bling gems glitter

Holy Manicures does some really great nails. I was actually going to feature her Cow Nails, but I've been in love with this gradient from the moment I saw it. I'm obsessed with neons, and I don't think you can ever go wrong with glitter. I'm also becoming increasingly fond of gradients manicures, so these nails hit on all my favorites.

I think I've done everything possible to express my love of these nails. I have them in my favorite nails bookmarks, I've pinned them, I've even shared them with my family, and now I've shared them with you!

So, please take a moment and visit Holy Manicures' blog and gaze upon her awesomeness. Leave some nice comments and let her know she's loved!!

These nails are not mine. This is simply a feature post in an attempt to give another blogger some love.

Thursday, June 14, 2012

Fashion Inspired

'ello girlies. Check out the Under Construction post if you're wondering if you found the right blog. I'm just making a few changes. However, that's not what today's post is about. Today's mani is fashion inspired.


I caught a glimpse of a dress on television last month or maybe the month before. I can't find a picture of it sadly, but I'll do my best to describe it. It was a black and white striped dress that had a sort of veed slit up the back. The vee was filled with this beautiful red fabric. I was immediately hit with inspiration and sketched out both the dress and a nail design.


Don't mind the claw. I didn't want to take the chance of smudging my nails by holding anything.

I finally remembered to get a work in progress picture. I always forget these pictures since I zone out while doing nails. It's almost a form of meditation for me. For these nails, I used three coats of white polish before using a 'V' cut piece of tape. Once they were taped, I used black polish to draw the stripes. After that it was simple to use three coats of an awesome shimmery red polish to fill in the vees after removing the tape. Before adding the red you can touch up your stripes if they're jagged. I was feeling shaky while doing these so I used a small flat brush to dab on the stripes. This left the edges slightly jagged in places but going back through and touching up what I could, filling in what I couldn't with more white, fixed that right up!


That's all I have for you today. I saved my favorite picture for last. Not sure why I like this one so much, but I do. It might be because I took it at a different angle than usual. Variety is always good. :)


Polish Used

  • China Glaze - White on White
  • LA Colors - Black
  • Orly - Star Spangled

Wednesday, June 13, 2012

Under Construction

Some of you may be noticing a few changes around the blog. While I adore the template I started this blog with, I want to change a few things to finally make it my own. Things may be a bit messy for a few days as I get everything settled. I'll be trying out a few different headers, getting rid of some of the sidebar clutter, and giving the blog a sleeker design ... I hope.


I'm not the only one who has to look at this blog, so any thoughts you might have on these changes is welcome! You can use the comments section or email me if you don't feel comfortable leaving your thoughts in the comments. I hope we can settle on something we all can enjoy. :)

Tuesday, June 12, 2012

Purple Cameo

Hello girlies. I was set not to post today as I was supposed to be in Connecticut by way of New York and the Statue of Liberty but those plans have been put off to a later time. So, I bring you what I think of as Vintage Inspired: Take Two.


I bought Sally Hansen's Lacey Lilac for my Mother's Day nails, but I've become pretty taken with it. It's such a great shade of light purple, exactly the shade I reach for when I go for a lilac. Everything loses its shine after a time, so using NYC's matte top coat, Matte Me Crazy, really turns these nails vintage.


The cameo is hand-painted using the 'DIY nail art stickers' method. It's something I found on Youtube a year or more ago but only used a few times. I prefer hand-painting straight onto my nails but with something like this that needs a lot of precision it's a good fallback. I definitely recommend it if you have trouble painting your non-dominant hand or even if you're not too artistic, because you can print out a small design and trace it with this method.


The peals used in this mani come from the Born Pretty store. This is where I buy most of my nail art 'pretties': things like pearls, beads, studs, and rhinestones. My very first order through the store included these pearls. They are great because they come in three sizes: 4mm, 3mm, and 1.5mm. The pearls used in this design are the 1.5mm pearls. You can also buy a wheel of 1.5mm pearls in various colors. I have yet to try them, but they look so pretty! The Born Pretty store doesn't just carry nail art decorations or even just things dealing with nail art either. You can find cosmetics, really awesome contact lenses that I intend to buy at some point, hair decorations, jewelry, and much more. The prices are stunning and all with free shipping!!! If you haven't checked them out yet I definitely recommend taking a browse through. I'm sure you'll find something you just have to have. I know I do! So much that I keep a list of things I want between orders so I don't forget something.


Be sure to check out their specials for sales. Also, look into their Rewards Program. You earn points for each order, posting reviews, and uploading photos. These points translate to money that you can use in your orders. Use up to 1000 points ($10.00) with each order. Depending on your order you might just get it completely free!!

Saturday, June 9, 2012

Sun Worshiper

Hello girlies! I hope everyone is having a great day. I know I am. I'm so excited to share this polish with you today.


China Glaze nails nail polish neon Sun Worshiper Poolside summer


Today's post is a China Glaze color swatch for Sun Worshiper. I'm not sure how I missed Sun Worshiper or the Poolside collection the first time around but Sun Worshiper was recently posted for sale on Sally Beauty. I've been longing for this polish for weeks, even ordered it at the end of April but it was cancelled due to sell out. I was so, so disappointed when I got the email that my order had shipped without Sun Worshiper. However, I saw it was back in stock last week and hurriedly tossed a few things into my cart and placed another order. Well, it arrived last Monday and I couldn't be happier!


China Glaze nails nail polish neon Sun Worshiper Poolside summer


I was stunned speechless when I saw Sun Worshiper in person. It was even more amazing in person than any of the blog pictures I found could ever show!


China Glaze nails nail polish neon Sun Worshiper Poolside summer


The first thing I noticed is that it is so bright! I knew it was neon but this is beyond amazing. It's like some kind of radioactive material contained in a polish bottle. Sun Worshiper is a stunning neon orange. It has a tint of yellow to it though like the bright yellow orange of a marigold.


Marigolds
I found this picture on Flickr and I think it just captures the color beautifully.


China Glaze nails nail polish neon Sun Worshiper Poolside summer


I'll say again, neons are always brighter over white. My pictures of Sun Worshiper are over two coats of China Glaze White on White. And I still needed three coats of Sun Worshiper.


China Glaze nails nail polish neon Sun Worshiper Poolside summer


Sun Worshiper is very sheer! I know I read this on many blogs before I purchased the polish, however I didn't understand just how sheer. Most bloggers aren't like me. When they do a swatch they use just the featured polish on their nails. I never use a neon until I have two to three coats of white down first, so I thought it would work a bit better. And it did ... with two coats of white as a base I didn't get a VNL. However, it still took three fairly thick coats of Sun Worshiper to cover the white. I couldn't be happier though. Over white Sun Worshiper is ten times brighter!! I didn't get a bad picture of these nails. It took forever to choose which ones I wanted to use.


China Glaze nails nail polish neon Sun Worshiper Poolside summer


Another thing to remember is that neons usually dry fairly matte. Sun Worshiper is no exception, so you'll want to have a high shine top coat on hand when using this polish. Remember to add a coat of top coat every other day to keep your nails shiny and chip resistant.


Will Sun Worshiper be on your list of must have neons for this summer?

Friday, June 8, 2012

Feature Friday

Hey girlies. I'm calling today 'Feature Friday'. I'm thinking of making this a regular thing where I feature a blog or a blog post that caught my interest during the week.


I love reading other blogs, and I'm certainly not ashamed of it! What I also love is give those bloggers some love and helping other readers find those blogs, so I thought this was the perfect thing for me to do. I'm just hoping the bloggers I feature don't mind a little extra traffic. Is it blog etiquette to ask first? If it is, I'm sorry. I'll ask next week, I promise. I just don't want to miss my chance to feature this post today.


That said, I want to feature a post by Manicurator today. It's a splatter nail and it's definitely one of the better, more eye-catching splatters I've seen to date. The colors work so well together. Manicurator also did a wonderful job with her splatter technique. The splatter isn't too crowded and there aren't too many larger splatters. Like she said in her post, they give these nails character. They're a perfect splatter in my opinion.


So, gaze upon this awesomeness. Then go to her blog to see more pictures of these nails and her other manis. Give her a follow or a nice comment on one of her posts, she totally deserves it!! :)

What do you gals think of Feature Friday becoming a regular thing?

These nails are not mine. This is simply a feature post in an attempt to give another blogger some love.

Thursday, June 7, 2012

The Dalek Rule This Galaxy

The Dalek Rule This Galaxy


nails nail art polish manicure mani Dalek Doctor Who Galaxy stars glitter shimmer


I mentioned on my Facebook page last week that I was doing my first galaxy nail. I also mentioned that I had to put my own spin on them. I left you all in the dark on just what kind of spin. Well, it's a Doctor Who spin. Most of you probably won't recognize the Doctor Who reference, but I hope you enjoy the nails anway. I thought of using the Tardis but I decided to go the road less traveled and do a Dalek ... or maybe just Dalek inspired since it's not a perfect replica.


nails nail art polish manicure mani Dalek Doctor Who Galaxy stars glitter shimmer


What galaxy is complete without a Dalek or two? None, I tell you, none! The Dalek nails aren't something just anyone would recognize, but it's a nice in-joke among fans. I'm just curious, how many of you recognized the nail right away or got excited when you read the title?


nails nail art polish manicure mani Dalek Doctor Who Galaxy stars glitter shimmer


Some of you may recognize this gold nail from last post's Golden Twilight nails. Not only is the color Bold Gold ... it's the same nail! I took off the Twilight Rays color but kept Bold Gold. It has held up very nicely, hasn't it? I just added the Born Pretty gold nail studs and a few layers of top coat to keep them in place. The nail studs are a great match in color for Bold Gold and make for a near perfect Dalek!


nails nail art polish manicure mani Dalek Doctor Who Galaxy stars glitter shimmer


I was utterly terrified of doing galaxy nails after hearing all the horror stories, but I think these turned out really well being my first try and all.


nails nail art polish manicure mani Dalek Doctor Who Galaxy stars glitter shimmer


I decided to use a creme black for space but stuck to shimmer polishes for the galaxies. The stars dotted on are a white creme. I also used this white for the galaxy base. The galaxies are made up of shimmer yellow, orange, and peach for the lighter shades and a deep shimmer metallic purple and a shimmer blue for the darker shades. I used a purple glitter, a blue holo glitter, a silver holo glitter, and a simple fine glitter for the stars not dotted on. It was all very shiny and glittery!

nails nail art polish manicure mani Dalek Doctor Who Galaxy stars glitter shimmer

I couldn't resist bringing out my blue/white light and seeing what they looked like under that. I think it was one of my better ideas to use only shimmer and glitter polishes.


nails nail art polish manicure mani Dalek Doctor Who Galaxy stars glitter shimmer gradient eyeshadow applicator brush sponge
Image from Alibaba.com


For those looking for simpler solution to using a sponge, whether for galaxy nails or gradients or any other nail where a sponge would come in handy, use an eyeshadow applicator. I found this worked so much better for me than any kind of sponge. Not only did I pick up a pack of 12 (60mm) applicators for cheap at my local dollar store, I had better control while using them. They are made to fit in your hand so they keep a wet mani intact while you do the opposite hand and are small enough to move around your entire nail easily. I can also use and reuse these. For these nails, I only used one side of an applicator! Not even the front and back of one side, just one side.


So, what do you guys think of galaxy nails? I know I will definitely be doing these again! 


Polish Used
LA Colors - Black
Sally Hansen - White On
Pure Ice - Unzip Me
Pure Ice - Twinkle
Revlon - Tangerine
Funky Fingers - Power Chord
China Glaze - Blue Year's Eve
L.A Girl Glitter Addict - Eutopia
Funky Fingers - Flashing Lights
Wet n Wild - Kaleidoscope
LA Colors - Glitter

Tuesday, June 5, 2012

Golden Twilight

Maybelline New York Color Show Bold Gold Twilight Rays black glitter shimmer nails nail art polish


Today's post puts Maybelline New York's new Color Show nail polish in the spotlight. Color Show is part of Maybelline's collection of runway colors. The Color Show collection comes in, get this, 40 new shades!! 30 hot colors and 10 statement pieces. The hot colors are mostly bright, bold neons and deep shimmer filled polishes while the statement pieces encompass crackle like polishes they call shredded, denims, and metallics. These polishes are priced to sell as well. I picked these two up for about $2.97 a bottle. I read somewhere that the top price is likely to be $3.99, but check your local shops to be sure. With the price and multitude of shades you can always have nails like a supermodel.


Maybelline New York Color Show Bold Gold Twilight Rays black glitter shimmer nails nail art polish


I felt myself very lucky to find these polishes in stores already. My town is usually the last to receive new products. With this in mind I immediately grabbed Twilight Rays and Bold Gold. Twilight Rays is a black polish filled with a gold glittery shimmer. I found the gold glitters nearly disappeared into the black with three coats of polish. Even in sunlight they didn't really pop like I thought they would. Nice to be sure, but not what I was expecting.


Maybelline New York Color Show Bold Gold Twilight Rays black glitter shimmer nails nail art polish


Bold Gold is a shade I have been looking for for what seems like forever. I've tried handfuls of gold polishes looking for this exact shade and texture. I'm ecstatic to finally own this color after so long. Bold Gold is a gorgeous yellow gold metallic. It has a very fine shimmer effect to it that doesn't overpower the delicate color like some other polishes. This is a perfect gold in my opinion! While Twilight Rays left me slightly disappointed, Bold Gold really stepped up.


I will say I had some major trouble getting Bold Gold to stay on my nails while painting them. The brush kept swiping the polish right off. The polish itself looked to be separating, oddly enough. When it was swiped off it left behind a watery oil with no color. I had to start over after my first attempt. I have reason to believe the polish was reacting to my base coat since I used a different base coat on my second attempt and things went smoother. There were still a few problems but no separation. A second coat of Bold Gold took care of that.


That said, Bold Gold stayed on my nails for about a week. I'm sure it would have lasted longer if I hadn't removed it myself. It had absolutely no chips and not even any wear on the tips when I took it off last night. Amazing!


Maybelline New York Color Show Bold Gold Twilight Rays black glitter shimmer nails nail art polish

Here is a close up of Twilight Rays. You can see the shimmer is actually a combination of tiny flecks of micro glitters and larger, yet still very small, hexagonal glitters.

Maybelline New York Color Show Bold Gold Twilight Rays black glitter shimmer nails nail art polish

And here is a close up of Bold Gold. You can see the shimmer really well here.


No matter what you think of the two colors I picked out of this collection you should definitely check it out for yourselves. With so many shades to be found in this collection you're sure to find a color created just for you.

Saturday, June 2, 2012

French Hearts

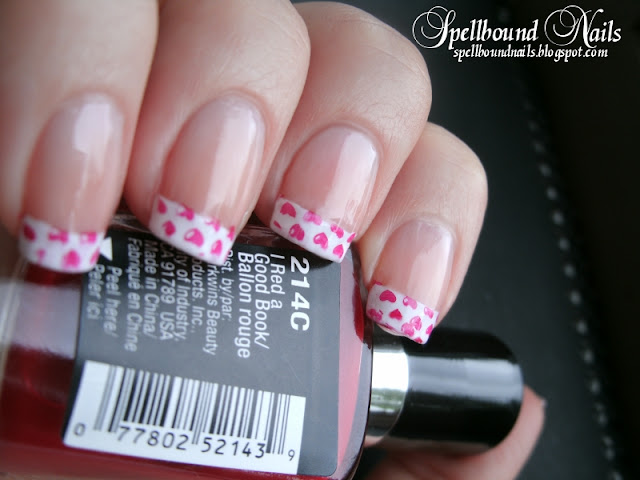
I've given myself something of a challenge. I want to see how many ways I can spice up a simple French manicure. I will keep the standard French white as a base for these manis as an added challenge.


French tips manicure stamped hearts nail art nails


You've seen the standard French manicure in Mother's Day post, 'The Mommy Mess', and you've seen the Mother's Day design I created over those nails. Now, I bring you French Hearts. :)


French tips manicure stamped hearts nail art nails


I used my new Born Pretty image plate m56 for this design. I adore this image plate. It's a plate full of tip stamps. It's the same plate that contained the bow from my 'All Wrapped Up' nails


French tips manicure stamped hearts nail art nails


I only had one problem with stamping this design. I didn't push enough near the tip of my index nail and lost the hearts from the very tips. You can see that I went back and tried adding them. Well, I didn't line them up well enough and overlapped them slightly. I like to think I'm getting better though. The other nails are almost perfect!! Yay!


French tips manicure stamped hearts nail art nails


I used OPI Alpine Snow and Bubble Bath as the base again. The hearts are done with Wet n Wild's 'I Red a Good Book'.