Friday, March 29, 2013

Blogs to Love #8

Hello everyone. Sorry for the late post. I thought I had it to post automatically but I got back from girl's night out and found it was only saved as a draft. Better late than never? Anyway, get ready for a long post! Since I missed last week and since Easter is this weekend I thought I'd do a huge Easter link-up. :)

Blogs to Love Friday linkup
 

Since this post is so big I'm going to split the links into sections.

Nails
Hair
Makeup
  • Want to add a little color to your eyes, but don't want to go wild? Try this Easter Look by Simply Beauty. It's a very fresh and feminine look using yellow, white, and pink.
  • If you're looking for a lot of color and really want to pop try this Easter Makeup from Jessie Blush on Facebook.
  • Don't want to pop that much? Try a pastel look (also from Jessie Blush).
Fashion
Food
Crafts
  • This one is part food, part craft. These Cute Printable Carrot Cones found on The Red Thread will make the perfect addition to any Easter basket and can be filled with candy or even healthy treats.
  • What a cute idea for the little ones and it takes very little effort from you! Sew your little ones or someone else's little ones a Sweet Bunny with this tutorial by Lifeologia.
  • Don't have a basket for Easter yet? Don't rush out to buy one this weekend — create your own with this Easter Bunny Basket Tutorial from Lizzie Florence!
Easter Eggs
  • My favorite part of Easter (besides making myself sick on candy) was always the Easter eggs! I never liked eating them; I just wanted to decorate them!! Sharpie Tie Dye Easter Eggs by Housing a Forest are something I wish I knew about as a kid. They are so fun!! They remind me of peeling paper mache.
  • If you want something a little more elegant to sit around you should try Golden Marbled Easter Eggs. It takes a bit of work but your friends and family are sure to ooh and ahh over them.
  • Neither of these your style? Here are 40 other Creative Ways to Decorate Easter Eggs compiled by Brit + Co. Seriously, the Message in an Egg is genius. It leaves me wishing I had a sweetie to give one to.
My Contributions to Easter

Easter Spellbound Nails nail polish nailart art fashion beauty shoes hair makeup outfit

I have big plans for making this my Easter outfit. I have nearly everything needed to complete this outfit. Simple makeup, messy hair (in blonde instead of red), pastel polish for an Easter skittles mani, the purse, the shoes and a blazer nearly like this one. The key piece however is the pink pants and I don't have them. If I can't find a pair that fit in the color I want this weekend this whole outfit will fall to pieces. :( Keep your fingers crossed for me.

Skittles Spellbound Nails nailart art nail polish pink green purple yellow blue speckled Easter

My other contribution to this Easter post are my Easter nails! I plan to wear my nails like this Sunday instead of doing a fancy design. However, for this post I couldn't resist doing a little something extra.

Easter eggs polish nail nailart art polish Spellbound Nails speckled dyed pink purple yellow blue green

Speckled Easter eggs nails!! I used an old eyebrow brush that was fraying to dab on the base color mixed with some white and then I used some brown polish to create the speckled look. I adore how the blue nail looks here and the purple and green nails looked really awesome in person. Sadly, the pink and yellow nails were so light on their own that mixing the polish with white didn't really add any definition. Still, I think this looks really awesome overall.

And yes, that is a brown chicken egg I'm holding. It was the next best thing since I didn't have any speckled eggs ... or even any dyed Easter eggs. :(

Forgive me for any errors or typos. It's late, and not only am I so tired I can't see straight I have a headache to contend with so I didn't do my usual ten-thousand read throughs looking for errors.

Wednesday, March 27, 2013

Time Periods Challenge: Ancient Egypt

Hello everyone! You'll notice a bit of a difference in my nails with this post. Three of my nails broke last week. I filed them down pretty short and found out the hard way a few hours later that they weren't filed enough. One of them caught and broke again! My nails had to be filed shorter than I've had them in a good long while — so short that the tips of my fingers actually hurt where the extra length of my nails usually protected them.

But enough about that. Here is my post for the Time Periods Challenge. Today is Ancient Egypt. I've seen so many hieroglyph nails and the rarer death mask inspired nails that I wanted more than anything to do something different. Here's my attempt to think outside the box.


I'm not an expert, but I've always been slightly fascinated with Ancient Egypt. The pharaohs, the Gods, their way of life — it's all so interesting to me. Did you know cats were highly revered by the Ancient Egyptians? Some cats of royalty were dressed in gold jewelry and allowed eat from their owners' plates!

What better way of thinking outside the box than to do a cat nail for Ancient Egypt? I used a saran wrap base of Color Show Bold Gold and Funky Fingers Platinum Record. The cat is a representation of Bast/Bastet — most often shown as a black cat with gold jewelry or a woman with the head of a black cat.

I couldn't find my nail art brush so the cat was done with a combo of dotting tool and sewing needle (for the ears, tail, and collar).

Tuesday, March 26, 2013

Weekend Haul

*All products in this post were purchased by me.

Hello everyone! I picked up a few things this weekend at some really awesome prices so I thought I'd do a haul post. :)


First up: L.A. Colors neons. I adore these!! I stopped in at the local Dollar Store to pick up some rolls for Sunday dinner and couldn't resist taking a browse through the nail polish. I found Mint, Hottie, Pink Bubbles, In A Flash, and Tangerine. I was in a hurry or I would have dug out the neon purple I'm sure I saw at the bottom of the bin too. See Pink Bubbles on my toes in the picture collage below. Having a neon polish on my toes is a must for spring and summer!


Saturday, I picked up these pretties from the Rite Aid sale bin ... well, all but the NYC polish; it, and a few other products, were marked at 75% off!! The sale bin seems to be drying up sadly, but I hold out hope that more polishes will be moved there soon. From left to right: Battery Park Purple, Tahitian Green, Strength of Pink, Figi, and Corduroy.


Also on for 75% off was this gorgeous NYC Lip Plumper in Plum Tart. I got this for $0.99!!! I didn't get it for the plumper ... okay, I didn't get it only for the plumper. The color is just so pretty! It's actually much lighter in person. I think of a nude gloss with a drop of plum color mixed in to give your lips a very natural shimmery flush of color. I didn't notice any real plump to my lips but it did have a slightly minty scent and did cause some tingling to my lips. Almost like getting toothpaste on your lips while brushing your teeth; I found it causes nearly the same amount of tingling for me. I found it almost refreshing to be honest.


Also on Saturday I found some really awesome sale items in Boscov's. This white sweater was an amazing find. It is so very, very comfy and is light enough to last in my wardrobe through Spring. And was a steal at $5.99! I also picked up a lovely gray blazer (no pics yet). I love blazers!! They are an essential part of my wardrobe! To find one for $9.99 was brilliant, but to get up to the checkout and have the sale's women scan it up as $5.99 was stunningly brilliant!

The one thing I didn't get on sale was the shoes. I saw them two weeks ago and fell in love — which is odd because I can't stand flats. I've been told many times that I must have been born with my heels because the only time I'm without them is when I'm not wearing any shoes at all. When I saw them this weekend I couldn't let them go again. Especially after trying them on and seeing how comfortable they are. I honestly expected to try them on and have them fit like all the other flats. They would surely feel weird and hurt the backs of my feet, but these lovelies didn't hurt at all and they fit perfectly! They are so me. An oddly fitting combo of nude and neon color with an awesome spiked toe. They were about $17 — which is a steal in and of itself for a pair of shoes today!

And my new shoes match my new neon pink nail polish! I hate feet, abhor them really, but I wanted to show off my neon toes too much. I kept the picture small and hope it doesn't make anyone cringe too badly. And yes, that is snow between the gaps of my porch. Yes, yes I did stand outside in my bare feet to get this picture. Dedication to my blog at its best ... or worst?

*All products in this post were purchased by me.

Monday, March 25, 2013

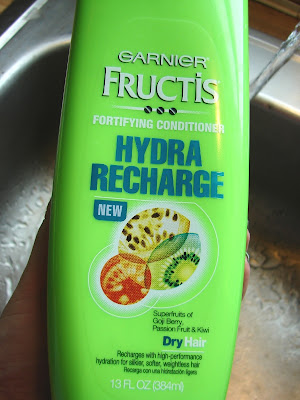
Garnier Fructis Hydra Recharge Review

*The products in this post were provided free for review purposes thanks to BzzAgent. All opinions are my own.


I signed up for BzzAgent last month and was so excited to be offered the chance at a BzzCampaign so quickly. They offered me the chance to try the Garnier Fructis Hydra Recharge system. This includes the shampoo and conditioner and the 1-Minute Moisture-Plenish, a deep 1-minute conditioning treatment. 

According to the BzzAgent campaign: Garnier Fructis Hydra Recharge is infused with superfruits for silky-soft-hydration. Hydra Recharge will recharge your thirsty locks and keep your hair super silky and surprisingly weightless for up to two whole days.
  • Works best on dry to normal hair
  • Keeps hair weightlessly silky for up to two days
  • Is available at grocery stores, drug stores, and mass retailers (I actually saw it at my local Dollar Store the other day)
  • Retails for suggested price of $3.99 to $6.99 each


The three bottles arrived in a plain box with adorable personalized BzzAgent bee logo tape. I opened the box still expecting to find deluxe samples or something, but they were all full-sized bottles!! They were also nicely bagged which I appreciated and which I'm sure the post office would have appreciated if there was a spill.


Just before getting invited to join this campaign I had a hairdresser tell me that my hair was very dry. Of course, I could tell by her tone that very dry was much worse than very. So, while skeptical of all the Hydra Recharge promises, I was really looking forward to this review.

The shampoo (as stated by the BzzAgent Campaign) is a hydration innovator, featuring for the first time thousands of beads that burst on impact.


I took a ton of pictures for this review so to conserve space (and lessen loading frustrations) I've hooked the relevant ones together. Click on them to see the full size image. You can see the texture of the shampoo here and also see the little blue beads. This shampoo has a really nice texture and creates suds very easily. I love this because our water is horribly hard and suds are really hard to come by.


This is me, washing my hair in the kitchen sink so I can get these pictures. I had so much fun with this review, and I wanted that to come across in my pictures. Here you can see the suds. Most of them have dissolved by this point, but even this amount is far more than I usually get with other shampoos.


Between the shampoo and conditioner, you use the 1-Minute Moisture-Plenish Treatment.

The 1-Minute Moisture-Plenish (as stated in the BzzCampaign) is a powerful deep treatment whose revolutionary lightweight creme-gel formula transforms dry hair with a surge of high-performance hydration in just one minute. For best results, use 2x a week.


This is almost like a lotion. It is thick and creamy and oh so smooth. I put on a dollop and massage it into my scalp and down the lengths of my hair paying special attention to the roots and tips. I continue to massage it in for the full minute. I can actually feel this working as my hair turns thick and voluminousness.


You can see here that the lotion-like texture thins down in the water but look closely at my hair. You can see how thick and silky it looks already.


Lastly you use the conditioner. You may be thinking - who has time for this?? But it really doesn't take all that much more time than your regular shampoo and conditioner, and the benefits far outweigh the extra two minutes of putting in and rinsing out of the Moisture-Plenish.

The conditioner (as stated in the BzzCampaign) contains superfruits of goji berry, passion fruit and kiwi to actively replenish without heaviness.

I wish more than anything that you could smell this whole system! Starting with the shampoo and ending with the conditioner the light and fruity scents just explode! I've actually been caught many times sniffing my own hair throughout the day because this wonderful scent lingers throughout the day and into the next as well! I love turning my head to talk to someone and getting a hint of this scent wafting around me. Seriously, stop into the shampoo aisle on your next shopping trip and take a sneak sniff of this!!


The conditioner is slightly thicker than the Moisture-Plenish. I was amazingly happy to see that both the Moisture-Plenish and the conditioner rinse out well and quickly. They leave none of the yucky residue of other brands.


Here you can see the conditioner in. It really isn't heavy at all! It feels light and silky smooth in my hair. And again, in this picture you can see just how soft my hair is looking.


This curtain of hair looks so soft and dreamy, right?? This is just after I washed the conditioner out.


I really couldn't be happier with this system, and would recommend it to all those who have dry hair or just want a bit more soft shininess in their life.

I also want to share that Garnier Fructis lives up to their promise of weightlessly silky hair for up to two days with this system! Thanks to natural genes and hard water, I have to wash my hair everyday or deal with flat, lifeless, and semi-greasy hair. After starting to use this system I noticed that my hair had much more volume the next day and nearly no grease! I can now leave it down if I want to, but I usually prefer to simply back comb it to give it a bit more volume and pull it up into a high pony. It's a classic look that I really couldn't enjoy before BzzAgent and Garnier Fructis.

Just an FYI: there is also a Hydra Recharge Moisture-Whip Leave-In Conditioner that you can purchase and add into this routine. I'm not a fan of leave-in conditioners given my hair's natural lean towards the greasy side, but given how much I love this system I may just give in and purchase it too.

*The products in this post were provided free for review purposes thanks to BzzAgent. All opinions are my own.

Thursday, March 21, 2013

6 New Polishes with Swatches

Hello everyone! I'm really excited about this post. I will be releasing SIX new polishes to my Etsy Shop tomorrow.

To make this really exciting: all orders placed this weekend will be put into a drawing. Winners of the drawing will be given randomly drawn prizes. Prizes could be free full sized polishes, 5% to 50% off your next order, and much, much more. Winners may even win the right to work with me to create a custom polish!! Valid orders are those placed from the moment the polishes post on Friday to 9am Monday morning. Why 9am? Getting out of bed is when I consider my weekend over!


Lollipop Guild is a bright and fun mix of rainbow glitter. Shown here over Sally Hansen Pink Blink. I almost wouldn't have believed this was Pink Blink if I hadn't consulted my notes. Lollipop Guild makes Pink Blink look very coral colored. :)


Marie is one of two polishes my niece chose the glitter for. It's a light and elegant polish filled with teal blue, light pink, and light purple glitter with a heap of holographic glitter to give it some bling. Shown over CQ Pearls.


Napalm Bomb is one fiery girl. A bomb in more ways than one. With a mix of flame colored glitters this is one huge glitter bomb. Shown over China Glaze Stone Cold. Doesn't look so cold now, does it??


Tangerine Tango is the other polish thought up by my niece. I might just have to hire that girl because she has a real knack for choosing just the right glitter to create something gorgeous. Or maybe I'm just biased, lol.


Dipstick got its name because it reminded one of my Facebook followers of the candy. I don't think they call it Dipstick anymore (did they ever or was that just the nickname we all gave it?), but it's what we called it when I was a kid. I loved this candy and thought naming a polish after it was pretty awesome! For those who don't remember the candy: you get a candy stick and some ultra sweet flavored powder that was lightly colored ... sometimes it was white and would change color when wet; I think this was my favorite kind! You were meant to lick the stick and then dip it into the powder which would then turn really brightly colored and was likely to dye your tongue said color for a few hours; using the dip stick as a tool to eat the powder and then finish by eating the stick. Shown over China Glaze First Mate.


Carnival Lights was another named by a follower on my Facebook Page. If you consider yourself awesome at coming up with polish names I would love to have you around my Page!! I'm pretty horrible at naming polishes. I'll have a few zingers here and there but usually my names are kind of ... ho-hum. For this polish I debated heavily over Carnival Lights and City Lights, but felt it more resembled the bright lights of a carnival lit up in the dark. Shown over Petites Night. This polish can also be worn alone in 2-4 coats depending on how thick your coats. I average 3 coats for full coverage, but could definitely see wearing 2 if I was in a hurry.


I placed an order through Amazon hoping to get a fan nail wheel in time for this release but wasn't warned about it coming from an international seller until my expected arrival date made my jaw drop so I'm having to improvise until the wheel arrives. Double-sided tape on mini bottles just doesn't have the same flair as a nail wheel. :(


This is 1, 2, and 3 coats of Carnival Lights respectively. As you can see three coats gets full coverage for me.

Share the news of this release in someway (FB, Twitter, blogpost, etc) this weekend and include a link in the comments of your order, and I will enter you into the drawing twice!!!

Wednesday, March 20, 2013

Time Periods Challenge: The Modern Stone Age Family

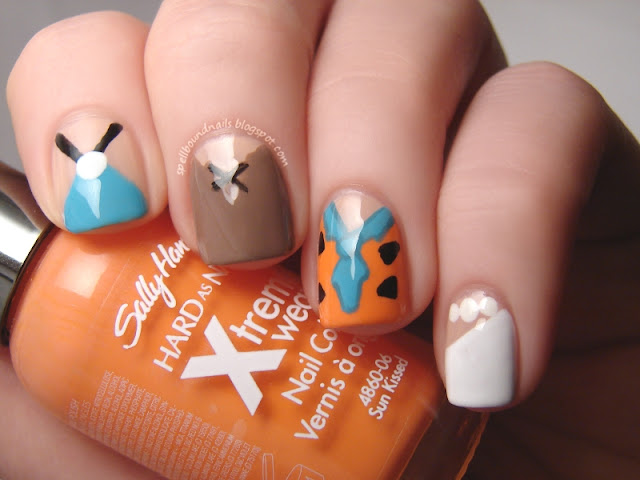
Since we are now on the Stone Age in the Time Periods Challenge I couldn't think of a better nail art idea than the modern stone age family! If you don't know who they are, what rock have you been living under all your life??

nail art freehand polish Spellbound Nails Lacquer Time Periods Challenge Stone Age Neanderthals Flintstones Fred Wilma Flintstone Barney Betty Rubble Rubbles character nails cartoon

It's the Flintstones and the Rubbles: Betty and Barney Rubble and Fred and Wilma Flintstone! I adore the Fred nail. I never realized this shade of blue and orange went together so well.

nail art freehand polish Spellbound Nails Lacquer Time Periods Challenge Stone Age Neanderthals Flintstones Fred Wilma Flintstone Barney Betty Rubble Rubbles character nails cartoon

For the nude polish lovers out there I definitely recommend trying to find Color Fever Seashell. I had someone tell me they also found it in the CQ bottles with the same name and number. Seashell is nearly a perfect match for my skin tone. It's a really beautiful nude that has slightly more than a hint of pink. This is one coat!! There is still a small amount of visible nail line and that's not usually my thing, but I love it with this color.

I think I finally figured out the whole inlinkz thing so check out the other manis by some really lovely artists for this part of the challenge. Hopefully I'll remember to add the coding to each post for the challenge. :)

Tuesday, March 19, 2013

Stripes and Dots

*The products in this post were purchased with my own money.

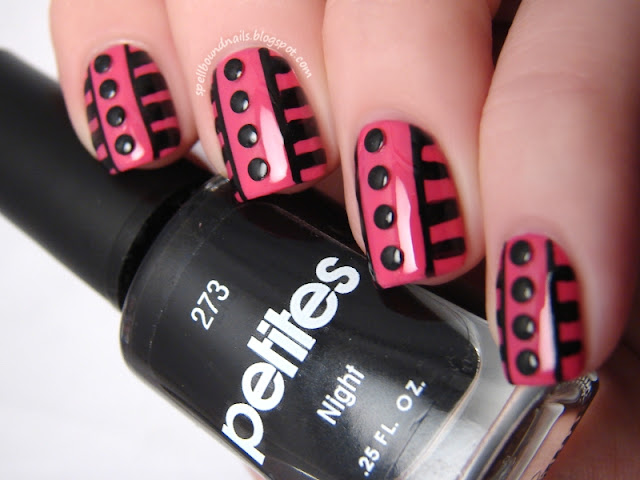
Today's mani came to me in a dream. No, seriously, I woke up with the idea so I must have dreamed it. And it looks really awesome in my opinion.

Spellbound Nails Nail Lacquer Stripes Dots Born Pretty Store metal studs rhinestones black tape taped taping hot pink bright OPI Strawberry Margarita Beach Party Best of the Best mini collection Doctor Who Dalek freehand Petites Night color swatch Seche Vite top coat

What do you think? I'm reminded slightly of Doctor Who Dalek. The stripes on the side don't fit a Dalek, but the resemblance is there.

Spellbound Nails Nail Lacquer Stripes Dots Born Pretty Store metal studs rhinestones black tape taped taping hot pink bright OPI Strawberry Margarita Beach Party Best of the Best mini collection Doctor Who Dalek freehand Petites Night color swatch Seche Vite top coat

I started with two coats of OPI Strawberry Margarita from the OPI Best of the Best mini collection. Strawberry Margarita is originally from the Beach Party Collection, and I can see why. It's such a yummy bright pink — perfect for the beach.

Spellbound Nails Nail Lacquer Stripes Dots Born Pretty Store metal studs rhinestones black tape taped taping hot pink bright OPI Strawberry Margarita Beach Party Best of the Best mini collection Doctor Who Dalek freehand Petites Night color swatch Seche Vite top coat

I used tape to create the thin lines up and down on either side and filled them in with Petites Black. Then I used a nail art brush to create the thicker stripes across. You could also do this with tape, but I found it faster, if less neat and precise, to freehand them.

Spellbound Nails Nail Lacquer Stripes Dots Born Pretty Store metal studs rhinestones black tape taped taping hot pink bright OPI Strawberry Margarita Beach Party Best of the Best mini collection Doctor Who Dalek freehand Petites Night color swatch Seche Vite top coat

I added a coat of Seche Vite and thought it looked bare. It needed something, so I dug out my Born Pretty Store studs. I vowed to use these more often and this was the perfect opportunity. I decided on the black studs. I've never found the perfect mani for these so I've never used them before! Exciting!!

The best way I've found to use these types of studs is to lay them on your nail over dry polish first so you can get the perfect spacing and positioning. Then pick them up one by one with tweezers and lightly dip the bottom in clear polish and set them back down. It gives you more leeway as you can decide you don't like the design and move them around. You can't do this if you just pick them up and slap them on wet polish. There's no changing your mind after that! I really hope this tip helps someone. :)

*The products in this post were purchased with my own money.

Monday, March 18, 2013

Lush Lacquer - Neon Lights

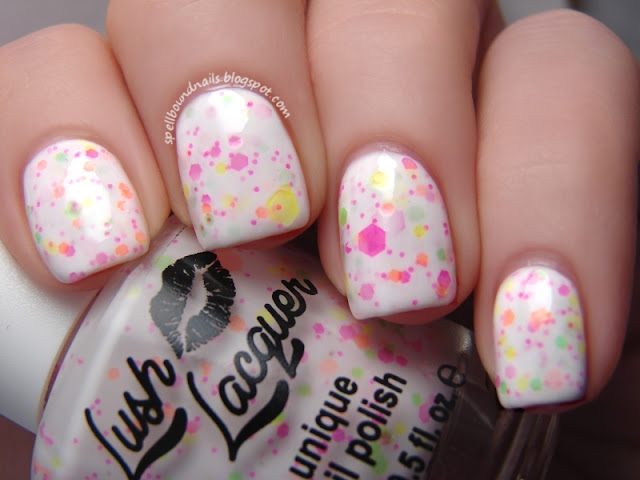
Hello everyone!! I am so psyched to show you the polish I wore all weekend. I was part of a group who recently won their choice of polish from Lush Lacquer's new Neon Collection. I knew immediately which one I would choose. I can't seem to resist neon glitter in a creamy white base.

nails nailart nail art polish mani manicure Spellbound Lush Lacquer Neon Lights white Indie Brand review swatch swatches

And oooOO is Neon Lights made of creamy hotness! Seriously, the milky white base is so creamy and dreamy, and the neon glitter scattered throughout just makes it all the better. The glitter is awesomely chunky; I found my first coat was a bit streaky where the brush dragged some of the bigger glitters, but a small and simple side to side swish with your brushstrokes instead of a straight cuticle to tip drag does wonders! And as you can see, the second coat makes everything perfect even without the side to side motion. This is two coats of Neon Lights with two coats of Seche Vite.

nails nailart nail art polish mani manicure Spellbound Lush Lacquer Neon Lights white Indie Brand review swatch swatches

The glitter in this so, soooo much brighter. I tried everything I could to get these pictures true to color, but nothing worked. :( Check out Crystal's Crazy Combos to really see the amazingness of this glitter and to see the other awesome neon polishes in this collection.

To purchase these polishes for yourself see the Lush Lacquer Etsy Shop. Each polish is $9. You can also find Lush Lacquer on Facebook.

*This polish was won in a giveaway. I was not asked to do a post on this polish, and all opinions are my own.

Sunday, March 17, 2013

Happy St. Patrick's Day - Food Flashback

Hello everyone. Just wanted to drop in and wish a Happy St. Patrick's Day to all those who celebrate.


This is a St. Patrick's Day cake I did about two years ago ... during the beginning of my cake decorating phase (but before my photography phase, so sadly the pics aren't great). It's a simple white cake with some green gel food coloring to get the perfect shade of green without ruining the consistency of the cake. It is a wonderful surprise to those eating it when they cut through the white icing to see bright green cake!! The rainbow is simply M&Ms flipped so the M isn't visible. :)

If I could do this cake again I would grab enough M&Ms to line the entire side of the cake in rainbow. You could also do just about any flavor of cake. I'm not fond of it personally, but a small dollop of some kind of mint extract would be a nice surprise to those who are fond of it in food.

Saturday, March 16, 2013

10% Off + a Chance at Free Polish

Hey everyone! I decided to do a last minute St. Patrick's Day deal with the chance at a free bottle of polish.


Use the code POTOGOLD and get 10% off your order in my Etsy Shop. This code will be valid from now until 11:59 EST Sunday March 17th. This code is good on any order; there is no minimum purchase.

To sweeten the deal: one lucky (randomly chosen) customer will find a free, full-sized bottle of polish from an upcoming collection included in their package.

Friday, March 15, 2013

Blogs to Love #7

Hello everyone! It's Friday again, and you should know by now what that means. Girls Night Out for me and a Blogs to Love post for you. I hope you're looking forward to this post as much as I'm looking forward to fish dinner at one of the local churches. I'm not Catholic; I just like fish. :)


I think I managed to compile some really great blogs for this week's Blog to Love post.
  • I think psycosandra is one of my favorite makeup artists. With a combination of wild and wacky costume makeup (like this Unicorn in the Clouds eye makeup) to soft and elegant (like this Everyday Look in Purple) to a smattering of nail art (such as Like Diamonds) this is definitely a fun blog to follow!
  • I was going to use High Heels and Bubble Gum's Sunday Style Link-Up as my favorite post, but when I got on today to get the link for that post I came across today's outfit of the day - Gap. Talk about a little gem! I love printed pants but have never had to confidence to try them, and there is just something about pink and blue that really gets me! After seeing this adorable outfit I might just take the plunge.
  • These tasty Creamy, Cheesy Chicken Enchiladas from Experimen-taste-ion make me hungry just looking at them! Best of all, the ingredients are so easy to come by. I always seem to fall in love with recipes that have some weird or hard to get items, so to know this one can be made with ingredients I have on hand makes me want to try it even more!!
  • Easter is just around the corner so this Egg Hunt mani should definitely be on your list. It's such a great way of using the spun sugar method! Check out Kat Stays Polised for a tutorial.
  • This post wasn't posted this week BUT tinyheartbeats DID post this week. That gives me a little wiggle room ... I think. Even if it didn't I love this outfit too much not to post. That skirt, that leather jacket, that RING, but most of all the way she pairs it with a concert t-shirt! I don't know how she does it, but she manages to rock this outfit!
  • Google Reader has until July 1st before it goes bye-bye and who know how long GFC will last after that. If you're scared of losing all of the blogs you follow through GFC check out this post by Tiny Paint Pot to find out how to Transer The Blogs You Follow To Bloglovin.
  • Last but not least I would like to welcome a new member to the blogging community family. Welcome John Murray and congratulations to Fab Fatale and her growing family. Check out her post to see pictures of this handsome little man born March 1st!

Manicure March Giveaway!

Some of you may know about the madness going on over at The Lily White English Rose. For those of you who don't, it's Jess's birthday month and in honor of this she started Manicure March. This means lots of nail posts, including some guest posts from some really great bloggers! I'm really excited because I have a guest post coming later in the month too, but until then check out the giveaway Jess is hosting!

The prizes are pretty great if I say so myself. Dotting tools and 2 OPI Pure Nail Lacquer Apps. Plus I, and the other bloggers taking part, contributed some ad space. Some of you may be wondering what good that is. Well, have you ever visited a blog and saw a really cool picture or button along the side? How many times have you clicked on that button and been taken to another site? Now think of all the other people who have clicked on that button too. This is a great opportunity for everyone, but I think it's especially wonderful for small bloggers or those just opening a shop or something of the like. You may not have the extra money to advertise and get your site/shop out there just yet (and this is definitely when you need it the most!), so if you win this giveaway you'll have some really awesome ad space available to you all free of charge!! I don't know about the other bloggers offering ad space, but at this time you will be the ONLY ad on my blog. You'll have pride of place.

This giveaway is open internationally. So go on, enter; you know you want to!


a Rafflecopter giveaway

Thursday, March 14, 2013

Shimmer Polish Swatches and Review

Hello everyone! I am so excited to show off these Shimmer Polish swatches. If you haven't found Shimmer Polish yet I say, "go, go now!" Or wait and see my swatches first so you're just as excited as I am!


Here are the polishes that came in my package. Aren't they lovely?? Yeah, I thought so too. You'll be able to tell by the amount of pictures I took. I'll save you all the loading time and put the rest of this post behind a cut. Continue through to the post because you do not want to miss these polishes!!


Wednesday, March 13, 2013

Time Periods Challenge: Jurassic Era

Welcome to the very first post of the Inspired by Time Periods Challenge! I'm not very good with time periods; I abhorred history only slightly less than math in school, but I'm going to try my best. :)

So, first up: Jurassic Era. That means dinosaurs, right? I've watched Jurassic Park, many times, and seen the sequels too!

nails nailart nail art polish mani manicure Spellbound Lacquer Time Periods Challenge Jurassic Era dinosaur Revlon Garden green


Even having the jumping off point of dinosaurs I was still completely stumped on what I wanted to do with this nail art. I practically lived on Google these last few days hoping for some really awesome inspiration.

That's when I found some really cute dinosaur nail art by Vettelicious and decided to try and put my own spin on it. I'm not sure I accomplished that very well. My little dinosaur nail looks more like a horned troll or something in my opinion. Ah well, every artist has their off days.


Here is the line-up for the Time Periods Challenge. You can take the image and join in if you like. Be sure to join this group and post your manis so we know you're with us for the Challenge!

Come back tomorrow because I have an amazing post for you filled with swatches galore!

Monday, March 11, 2013

Pastel Gradient with Born Pretty Store Studs

Hello again! Gradients seem to be the thing for me lately. I think it's the coming of Spring and Summer; I'm just preparing! So I dug out the most pastel colors I own for a pretty and feminine spring gradient — a little early, but it would be perfect for Easter.

nails nailart nail art polish mani manicure Spellbound Lacquer pastel gradient Born Pretty Store metal studs rhinestones Revlon Enchanting Sally Hansen Pink Blink Petites Color Fever Creme Blue Spring Summer feminine elegant

Those most pastel colors I own just happened to be Sally Hansen Pink Blink, Petites Color Fever Creme Blue, and Revlon Enchanting. I decided to try a makeup sponge with this gradient instead of my usual eyeshadow applicator. I like the smooth fade between colors, but I didn't like the extra work it took to get the colors built up. I also thought it was beyond time to break out my Born Pretty Store gold metal studs. I received these by mistake with an old order and they were nice enough to let me keep them while also shipping out the ones I did order. It's been too long since I played with these studs. ;)

I'm thinking it's also been too long since I ordered anything from the Born Pretty Store. I forgot how awesome their nail decorations are! And they've come out with so much more since my last order. I'm dying for the hearts ... and the squares ... and the stars ... and ... well, I think you get the idea! I'll definitely be ordering something. 


You can use the code MLE10W21 at checkout for 10% off your order if you decide to purchase something from the Born Pretty Store too!

Friday, March 8, 2013

Blog to Love Friday #6

Welcome to another Blogs to Love Friday post! I would love to have you guys join me and the other lovelies in this linkup. If you're interested read this post and use the picture below in your Friday posts. :)


I really think I managed to get a good variety this week. I tried so hard to search out new and varied posts. If you have a blog you'd like me to check out you can post a link in the comments below.

  • Gradients are gorgeous, but neon gradients are 100 times more awesome! Like these Neon Gradients (complete with glitter and bling!) from Sonnela.
  • We eat with our eyes. Isn't that how the saying goes? Having fun and interesting foods is a must for children, and  I don't think adults are any better. Getting children to eat the necessary servings of fruits and vegetables can be hard. And again, I don't think adults are much better! That's why this Fabulous Fruits post from Stephanie over at Spoonful makes it into my Blogs to Love today. She compiled a slideshow of 20 snack recipes using fresh fruits, and they're all so darn cute everyone will want to eat them!
  • Bad hair day? Take a deep breath and CALM DOWN because bellaMUMMA is here to help with this DIY Join the Band & Hide a Bad Hair Day post.
  • Miss Ladyfinger has an awesome blog that manages to blend fashion and nail art seamlessly twice weekly! One of her recent manicure muses was Clements Ribiero Fall '13.
  • I am sometimes absolutely stunned and amazed by the creativity of some artists. They just blow my mind! The Sweet Adventures of a Sugar Belle has quickly become one of these artists. I stumbled across her post You're the Peanut Butter to My Jelly on Pinterest the other week. These are some of the cutest decorated cookies. She also has a photo of the rest of the We Belong Together series which includes: the cheese to my pizza, the milk to my cookies, the salt to my pepper, the ketchup to my french fries, and the butter to my popcorn. I recommend checking out these cookies. You can also see the adorable (and creative use of cookie cutters used to create) Baking Theme Cookies!
  • Am I the only one who loves this Doll Face Tutorial by Kittenmoustache?? It's all big eyes, blushed cheeks and doll pink pout! The closeup is amazing!! Any part of this look could be worn alone but transforms into something weirdly special when put together.
  • There is one last thing I want to share. I adore this button bowl found on Pinterest. I've tried like crazy to track down the original source, but I'm coming up empty. There are other button bowls to be found, some more elegant than others, but for some reason it's this one I like best.
I hope you enjoyed, and I'll see you next week. ♥