Showing posts with label Halloween. Show all posts

Saturday, October 31, 2015

Happy Halloween

*Some products were sent to me for testing and review, completely complimentary, from OPI, Preen.me, and Barielle.  All thoughts and opinions are my own.

Hello lovelies!! I know I'm not around much anymore, and I definitely recommend following me on Instagram (@spellbound_nails) to keep more up to date than following my blog. Buuuttt Halloween is my favorite holiday so I did two nail art designs to celebrate, and I thought I'd post them here too.


The first I want to show you is actually the second design I did and what is on my nails right now. I started with a base of white and used the fingerprint stamp on Vivid Lacquer's VL009. I added lots of blood drops to my accent nail and a few to my index and thumb. A few highlights and shadows on the blood drops and this design was done. Easy peasy.


The second design I want to share is so fun! I started with a base of OPI Cosmo with a Twist and added blobs of Barielle Hawaiian Sunset. I painted my accent nail with Barielle Hawaiian Sunset and painted the jack-o-lantern in white and then went over that with a yellow tinted glow pigment mixed with clear polish. I loved how it had the lit pumpkin look in the day and really lit up at night! Like I said, so fun!!! 


This wasn't done for Halloween but it reminded me of something very Halloween before cleanup ... like frost bite gone bad or the fingertips of some evil witch so enjoy. ;) Colors used are OPI Colors of the You-niverse and OPI By the Light of the Moon.

Happy Halloween,
Ashley

*Some products were sent to me for testing and review, completely complimentary, from OPIPreen.me, and Barielle.  All thoughts and opinions are my own.

Friday, October 31, 2014

Happy Halloween!!! Candy, Nail Art & My Halloween Costume - Image Heavy

*Post contains affiliate links. Purchases made via affiliate links provide small commissions to me but do not affect the purchaser's end of the transaction.

Hello lovelies and happy Halloween. This is my favorite time of year so boy do I have a post for you! It has candy and nail art and my Halloween costume! Are you ready?


Candy is essential to Halloween. No matter if you're manning the door for the hordes of fairy and monster (or Anna and Elsa this year) dressed trick or treaters, going out and knocking on doors yourself (with or without kids), or turning off your lights and gorging yourself on it while vegging with a night of horror movies this holiday kinda revolves around candy. So I thought, besides chocolate covered candy bars, that I would share one of my favorite candies with you.


I am being completely serious when I say Torie & Howard have some of the best, most amazing hard candy - and it's organic too if that makes a difference to you. The d'anjou pear & cinnamon candy (as seen in the Halloween bowl above) is my favorite of favorites.

How did I get enough to fill a Halloween bowl ... and still have some left over you ask? Is this a sponsored post where you get free candy to feed us a line? NO! I was subscribed to the Love with Food monthly box and got a sample in last year's Halloween box. Love ... there's no more to say. I searched and searched but couldn't find them around here and couldn't talk myself into paying shipping for candy (yet). I was at my breaking point when Love with Food had a sale on their website. I immediately used my referral and review points ... and bought a 5 pound bag. Yes, you read that right - a 5 pound bag.


Image Credit: Torie & Howard

Torie & Howard were so nice. They sent me my 5 pound bag of candy, a handwritten letter, a sample bag of all their flavors and an info packet that told me they were getting a new flavor! Meyer Lemon & Raspberry. How will I ever live without trying this new flavor? I don't know. If you can't live without trying these hard candies (and believe me you really can't!) head over to the Torie & Howard website and pick up some of your own or use their store locator to see if they're being sold near you. ;)


Halloween (at least for us nail people) is about what Halloween inspired nails we're wearing. Mine used a base of Instant Primordial Soup Mix from my Casper inspired Give Up The Ghost Collection.


Very simple to do with the right tools. I used my Silhouette machine to cut out spooky pumpkin faces and used the outside shape as a guide to sponge into instead of using the vinyls themselves. I just like the smoother feel this gives my nails better than painting over vinyls. As for the pumpkin faces ... I'm seeing Jack Skellington, Oogie Boogie ... and oddly The Snowmen from Doctor Who. Not sure about any others ... what do you see in the faces?


But the very best part of these nails ... they glow in the dark!!! And since I painted black over the glow you can see the faces perfectly when they glow. :)


And what Halloween is complete without a costume? For me - no Halloween! It's a tradition of mine to dress up and hand out candy and last night was the night for our community. Sadly, we live on the outskirts of a small town and the kids around here have pretty much outgrown trick or treating. We got one trick or treater and they came early so I wasn't fully in costume. :( So I'll share with you in hopes of curbing my disappointment.

I was a deer/faun this year. And I spent a few days and a few dollars crafting my leafy headband and my own ears. And then I took a day earlier in the week to test my makeup (if you follow my instagram @spellbound_nails you've already seen this test) so I'm very very happy with how I looked.

What did you or will you be getting up to this Halloween? Did you dress up? Leave me comments and/or pictures in the comments section below. ;)

As always, have a safe and haunting Halloween.
Until next time,
Ashley

*Post contains affiliate links. Purchases made via affiliate links provide small commissions to me but do not affect the purchaser's end of the transaction.

Friday, October 3, 2014

Haunted Nighttime Nail Art

Hello lovelies! I'm excited to bring you my very first Halloween mani. I did this one for the 1st and I'm sad to say I only managed to get one good pic and it's not completely color accurate. :(


I started with a base of Crisp Morning Air from my 2014 Fall Collection and used an eyeshadow applicator to dab a few splotches of Autumn Sunset. Autumn Sunset is a gorgeous purple polish with a blue shift and that just doesn't show here. It created such an amazing nightime-y effect for this creepy Halloween scene. :( If you're like my mom and you just don't see it ... my index nail has a spindly tree, bats on my middle finger, a haunted mansion on my ring, and a graveyard on my pinky finger with Happy Halloween written on my thumb complete with a raven perched on it. :)


I topped the sponged base with a coat of Seche Vite top coat and once the whole thing was completely dry I used some homemade Halloween vinyls to create the designs. Unlike my maple leaf nail art I used the outlines of the images this time and dabbed them with black. I apologize for the horrible camera quality pic but this is what I'm talking about when I say outline. I simply dabbed black into the outline and peeled the vinyl off leaving behind a perfect design ... so much easier and less time consuming than trying to hand paint everything. A time and place for everything, right? Be sure to get into the edges of the outline though for nice clean and crisp lines.

And for the thumb I simply used the vinyl image itself, sticking it to my nail and painting over it with two coats of top coat to smooth it all out.

If you want to see these colors as close to accurate as I think pictures can possibly capture head over to Painted Nubbs' blog post on the 2014 Fall Collection. She has some truly stunning swatches.

What kind of nail art are you most looking forward to seeing or trying this Halloween? Let me know in the comments. ;)

Until next time,
Ashley

Thursday, November 14, 2013

The Remembrance Duo - and a sale on Halloween polishes

Hey gals! I bring some really sad news. My family has recently lost a member. My bonus-dad (my dad in all but blood) passed suddenly on October 25th. He was so proud of me for making polish - such an odd thing for a big, gruff guy like him to proud of but he was always telling anyone who would listen that I actually make my own polish ... and sell it too! I wanted to honor the wonderful man he was and the broken hearts he left behind ... and I guess this is the only way I feel I can do that.

I also want you to know that I keep nothing from selling these polishes. ALL proceeds will go to my mom to help her pay bills and funeral costs.

Teal We Meet Again - Teal Holographic and Butterflies and Broken Hearts - Silver Holographic Butterflies, Black Broken Hearts, green glitter, and black and silver holographic micro-glitter

This is The Remembrance Duo. It includes Teal We Meet Again and Butterflies and Broken Hearts. As part of The Remembrance Duo is the only place you will ever be able to buy Teal We Meet Again. However, if you want just the glitter topper Butterflies and Broken Hearts can be about alone.

These polishes are being sold at a slightly increased price ($10 for the glitter topper and $20 for the duo).


Butterflies and Broken Hearts has a lot of meaning to me and my family. My mom taught me early her belief that butterflies are messengers of heaven and that every time you see a butterfly it is simply a loved one's way of waving hello from the great beyond. I couldn't create a memorial polish without including lots of silver holographic butterflies. The black hearts are of course the broken hearts he left us with. You'll also find tons of green (my bonus-dad's favorite color), as well as lots of holographic black and holographic silver glitter.


Teal We Meet Again is a gorgeous teal holographic polish that makes a stunning base for Butterflies and Broken Hearts. I really don't think you could find a more perfect pair.


On a side note, there are still a few polishes from the Halloween 2013 Collection left that can now be bought on sale.

Tuesday, September 24, 2013

Halloween 2013 Collection - Spellbound Nails PRE-ORDER

If you follow me on Facebook you'll know all about my Halloween 2013 Collection. For those who don't, this is for you. :)

I am now taking pre-orders for the Halloween Collections. Head over to my Storenvy and get your order in because pre-sales are only open until 9/27. Pre-orders ship 9/28, and the Halloween polishes go up for normal sales 10/1. Did I mention these polishes come with optional scents? You can buy unscented, but you can also do apple cinnamon, pumpkin pie, candy corn, or a variety!

But first ... keep reading. You don't want to miss seeing these polishes!!!


This is the full Halloween 2013 Collection. 6 of these polishes were inspired by the Halloween movie Hocus Pocus and can be bought separately. And the other 2 are the Halloween Thermals and can also be bought separately.


This is the Hocus Pocus Collection. Hocus Pocus is my favorite Halloween movie; certainly not the only one I love and will watch, but my favorite. And each polish is this collection was inspired by something in this movie. If you're a fan of Hocus Pocus I'm sure you can figure them out. If not, keep reading. :)


Firefly from Hell, the shimmery topper of this collection, shown over Revlon No Shrinking Violet.


Amok (imagine me jumping around chanting amok much as Sarah did in the movie) is an orange based jelly polish with various shapes and sizes of black glitter. Superstitious is inspired by Binx and is a black based jelly with large and micro holographic gold glitter and melon green dots. All that holographic makes it gleam like a cat's eyes in the dark. Firefly from Hell was inspired by the quote "You buck-toothed, mop-riding, firefly from hell." made by Billy the zombie to Winifred. It is a milky, shimmery topper that glows violet in the dark. Be-witching Old Broads was inspired by the bewitching old broads themselves, the Sanderson Sisters, and is like magic on your nails with a deep purple based jelly and tons of purple holographic micro glitter and silver holographic stars and moons. You're a Virgin?? is the basis of this entire collection, much like it was for the movie. This black based jelly with red and holographic red glitter was inspired by the lighting of the Black Flame Candle by a virgin! The movie wouldn't have worked without this and neither could my collection!! And last but not least we have Zombie Guts inspired by Billy Butcherson, a friendly zombie but still a zombie. This is a green based jelly polish with pastel green, red hexes and squares, and black and grey dots.


The Halloween Thermals are coloring changing polishes. These 2 beauties change from orange when cold to green when hot. Unholy Holo is (YES) a holographic thermal! It changes from a burnt orange to minty green and is stunning in sunlight!! It's sibling is Pumpkin Crusher, a bright orange to light green color changer with orange and pastel green glitter. This polish is interesting no matter what color it shifts.


And because I know you're curious, I leave you with these swatches of the thermals. :)


Remember, you only have until the 27th to pre-order these polishes at discount prices. Once they release on October 1st the collection prices will go up. That said, with the October release you will be able to buy single bottles at my normal prices. :)

My Storenvy

Until next time. ♥

Wednesday, October 31, 2012

Nail-Aween Halloween Inspired

Happy Halloween everyone. It was a really busy day, but I managed to get my Halloween inspired mani done for the last day of the Nail-Aween Challenge. My Halloween inspiration is trick or treating. I bet you can guess why. :)

nails nailart nail art polish mani manicure Halloween Spellbound Nail-Aween Trick or Treat sprinkles candy orange black L.A. Colors Wilton

This is my first blog worthy picture taken with my newly constructed light-box  The setup isn't perfect yet but this picture has given me hope that I'll perfect it soon. I'm incredibly happy that I managed to get, if not perfection, something of this quality after full dark. As for the mani, I used a coat of L.A. Colors black and topped it with two coats of Sally Hansen Insta-Dri. On the second coat I dipped each nail (done one at a time) into Wilton Halloween Sprinkles. A candy/sprinkles mani has always been something I wanted to try, so why not now?

After such a hectic month packed full of nail art, I'm going to take a short break ... give my nails a bit of a break and enjoy my upcoming birthday. I'll be back next week with some awesome posts! You won't believe some of the things I bought over the past month. :)

Tuesday, October 30, 2012

Nail-Aween Witches & Pumpkins

Today's post is being turned into a double post. While we are not in the direct path of Hurricane Sandy, we are feeling the effects. We've had rain, snow, and power outages just to name a few. We've spent all night and most of today with no power and no heat. I am beyond thankful that the power is back up and the house is finally getting warm again. All the other people and families experiencing Sandy are in my thoughts. Take care!!


nails nailart nail art polish mani manicure Spellbound Nail-Aween Challenge witch wicked East West The Wizard of Oz stripes black white green pointed hat poppies flowers Sally Hansen Wet n Wild L.A. Colors

I was so excited to see witch inspired nail art in the Nail-Aween Challenge. What better inspiration for witch than The Wizard of Oz?? It's one of my all time favorite movies. With this in mind, I created black and white stripes for the socks worn by the Wicked Witch of the East, shown under Dorthy's house. I did an accent nail using Sally Hansen's Green with Envy to match the Wicked Witch of the West's green skin and added a pointed black hat. I decided to add some red poppies to the striped nails to complete the mani and tie it all into The Wizard of Oz.


nails nailart nail art polish mani manicure Spellbound Nail-Aween Challenge pumpkins orange green leaves Sally Hansen L.A. Colors

For the pumpkin nail art, I thought briefly of doing Jack-O'-Lantern nails but finally decided against that. Jack-O'-Lanterns seemed overdone, and you know how I love thinking differently! I decided to do actual pumpkins. I used Sally Hansen Sun Kissed as the orange base. The shading was done by mixing black and white with Sun Kissed to create the dark and light colors. Green with Envy was used the same way for the leaves. I took this picture slightly from the side in an attempt to trick the eye into seeing width and roundness.


Also, if my Halloween nail art just isn't enough for you, check out this nail art video from Swagbucks to learn how to create some really awesome skeleton nails for Halloween!!

Thursday, October 25, 2012

The Webs We Weave

Hello girlies!! First off, I just want to say thank you guys so much for sticking with me. I don't say it enough but I love all your follows, your views, your comments, and your shares. You keep me going, keep me coming back with better and better nail art. So, thank you; you guys are great!!!

Spider nail art was the challenge for today in the Nail-Aween Challenge. I'm really excited to share these nails with you. I tried something new, and I really like how it turned out.

nails nailart nail art polish mani manicure Spellbound thread black white spider web spiderweb Halloween Nail-Aween Challenge

When I read the challenge for today all I could think of was spiderwebs on my nails with a spider crawling over my hand. I wanted nothing more than to find someone local who owned a tarantula and wouldn't mind me getting some pictures. Sadly, no one I know owns one anymore and I didn't think the local pet shop would be too happy if I wanted to hold their spiders for pictures with no intention of buying. I finally settled on this big guy. He was made with a suction cup on his belly so he could hang in the window but I found a new use for him.

nails nailart nail art polish mani manicure Spellbound thread black white spider web spiderweb Halloween Nail-Aween Challenge

These spiderwebs look even better in person. I used two coats of L.A. Colors black and used white sewing thread to create the webs. It was a little more time consuming than simply drawing them on but not only did I actually enjoy creating these webs I really love how 3D using thread makes them.

nails nailart nail art polish mani manicure Spellbound thread black white spider web spiderweb Halloween Nail-Aween Challenge

Here is a closer look at the thread. Honestly, they aren't the best to look at in macro. A camera catches things your eyes glance right over. I did not actually cut the thread first. I found it easier to control where the thread lay when it was still attached to the spool. I simply ran the tip of the thread through some clear polish and lay it where I wanted. I used my dotting tool and more clear polish to move it into position and attach it to my nail. I cut the end from the spool before I attached the last section. Each line was done separately. As I was doing this, I thought it was oddly like laying tape for a sunbeam mani.

nails nailart nail art polish mani manicure Spellbound thread black white spider web spiderweb Halloween Nail-Aween Challenge

I tried putting a top coat on my pinkie but it caused some slight bleeding into the white thread and also caused a lot of bubbling so I decided not to use top coat on the other nails. After that it was a simple matter of arranging the spider over my nails and snapping some pictures.

What do you think of my thread webs? Will you be trying them before Halloween?

Wednesday, October 24, 2012

G is for ...

The ABC Challenge is up to G today. There were a ton of things I could have done for G, but I decided to go with something morbid and great for Halloween. So, G is for ... Gravestones.

nails nailart nail art polish mani manicure Spellbound ABC Challenge G Gravestone gravestones headstones grave skull RIP moss rock tombstone tombstones headstone morbid grey New York Colors NYC Sidewalkers flocking powder green grass Halloween

The grey of New York Colors Sidewalkers made for a great base color. Then I darkened it with some black and lightened it with some white to create the speckled look. I purposely left off any top coat in an attempt to keep the very rough, textured look of old gravestones. I added a skull to my ring finger and a sharp lettered RIP to my middle finger. The last step was to use some of my just purchased Recollections Lime flocking powder to create a scummy moss growing on the 'gravestones'.

Tuesday, October 23, 2012

Nail-Aween Frankenstein

I can't believe we are on Day 6 of the Nail-Aween Challenge already. With only 10 'days' in this challenge this means we are also coming closer and closer to the end. I plan to finish this challenge on Halloween.


nails nailart nail art polish mani manicure Spellbound Nail-Aween Halloween Challenge Frankenstein Bride of hair black white green stitched stitching stitch Sinful Colors Sally Hansen L.A. Colors

Today's challenge was Frankenstein nails. I decided to do the basic green, stitched Frankenstein nail and added a Bride of Frankenstein accent nail. These are very simple but simple can be good too, and I think these turned out pretty great.

I'm going to be so sad when this challenge is over. I've really come to like them and would love to be part of another. They do have to be flexible enough that I don't have to post daily though. If anyone knows of any upcoming challenges that will let me work on a flexible schedule let me know please.

Also, check out the other wonderful artists doing this challenge with me. They have come up with some really great nails!!


(List includes blogs and FB pages)

Monday, October 22, 2012

Arcadia's Witch's Brew

I wasn't sure what I was going to post today right up until I actually started typing. It's the reason for the late post. I haven't had much luck with my nails this weekend and even less luck in taking pictures. I finally picked up the supplies this weekend to make my light box, but what I haven't managed to find yet is the perfect setup for said light box or the correct setting on my camera. A lot of my pictures turn blurry and the others my camera does some automatic adjustment and turns the picture orange.

However, I do have one picture. It's not one I was planning on posting to the blog but it's all I have that isn't for the ABC Challenge or the Nail-Aween Challenge. So, here goes ...

nails nailart nail art polish mani manicure Spellbound Arcadia YouTube Halloween Witch Witch's Brew potion eye eyes eyeball glitter shimmer China Glaze Sally Hansen bloodshot

I knew the moment Arcadia posted the tutorial, Witch's Brew, to her YouTube channel that I had to do these nails. There were no ifs, ands, or buts about it — this design was totally meant to be on my nails! I was in a hurry so I left off the spiders. In place of the polishes shown in the video, I used Sally Hansen's Green With Envy and Wet n Wild's Party of Five Glitters. I did use China Glaze's Jungle Queen as my base. I love how Arcadia decided on this color because it is so different from the usual black base most use in Halloween nail art. Jungle Queen also adds a lovely shimmer that looks wonderful and unexpected in the sun. I had a woman stop me and positively gush over these nails so I tip my virtual hat to Arcadia and send all that gushing her way — along with my own gushing!

Seriously, if you haven't found her channel on your own ... go! Go now; you won't be disappointed.

Friday, October 19, 2012

Nail-Aween Ghosts

The next in the Nail-Aween Challenge was a choice between ghost or goblin. I chose to do ghost, but I wanted to do something a bit different than simple ghosts on my nails.

nails nailart nail art polish mani manicure Spellbound character Casper Ghosts Stinky Stretch Fatso friendly

With this in mind I did Casper and the Ghostly Trio: Stretch, Fatso and Stinky. What I couldn't manage to get in the picture is the glitter. I used a glow in the dark glitter on the Ghostly Trio, not for the glow, but for the slightly green tinge and the small bits of glitter to give them a ghostly sparkle. I used Sinful Colors Pearl Harbor for Casper.

The other Sinful Colors I used is Snow Me White. I just picked this up in my last shopping trip since my China Glaze White on White has run out. I never seem to be able to get to Sally Beauty to pick up more, so I had to settle. However, settling really isn't a bad thing. I like the texture of China Glaze better but Sinful Colors is a really awesome one coat white. I used two coats just to be extra sure it was perfect since I was just doing lines, but one coat would have worked perfectly. If you are looking for a one coat white, Snow Me White is definitely it.

Tuesday, October 16, 2012

Are You My Mummy? Nail-Aween

Today's post is Day 4, Mummy Nails, of the Nail-Aween Nail Art Challenge.

nails nailart nail art mani manicure Spellbound mummy Doctor Who quote Halloween Nail-Aween Challenge googly eyes stripes string spun sugar

The white stripes were done with a technique I found through Manicurator's blog where she did the most awesome rainbow stripe nails. The technique, sometimes called string nail art or spun sugar nail art, is simple. Put a few drops of polish onto a piece of paper and stir it until it gets goopy and strings start to form. I used a sewing needed to stir and blew across the polish as I was stirring. Lift your tool straight up out of the polish occasionally to see if you're getting strings. Once strings start to form simply put your nail close to the polish and pull the strings across your nail. This technique is messy; it will definitely need some cleanup. However, the finished look is definitely worth it. I actually wore these nails shopping without the eyes and got many a second look.

As for the eyes, I was very disappointed to realize, as I was doing this mani, that the smallest googly eyes I bought were still slightly too big for this mani. I was hoping for just the perfect size so the eyes would look like they were looking out of my nails like a mummy through bandages. I think these nails can go into the 'good idea, bad follow through' folder. Maybe I'll get a chance to try them again next year. :)

Thursday, October 11, 2012

Nail-Aween Bloody Nails

I've done a lot of bloody nails in my time as a nail artist. Splatters and drips and everything in between. I dislike redoing one of my nail art ideas unless I know I can make it better or unless I have a slightly different take on it. So when I saw that the next challenge in the Nail-Aween Nail Art Challenge was bloody nails I was a bit stumped ... until I came up with this.

nails nailart nail art mani manicure Spellbound Nail-Aween Halloween Challenge bloody blood drips shimmer glitter Orly vampire bite bites Just Bitten fangs

I call these Just Bitten. I used a three coat base color of Revlon's Bare Bones. I wanted a paler 'skin tone' like my nails had been drained of blood and were left slightly ashen. As for the rest, I followed the Kayla Shevonne Vampire Bites Tutorial again. I added some blood dripping vampire fangs to her original idea though. I think these are some of the best blood drips I've done yet since I tried to keep these drips very thin and realistic.

Out of the Halloween nails I've done so far, this is definitely my favorite. I didn't want to take these nails off!! What do you guys think?

Tuesday, October 2, 2012

Nail-Aween Water Marble

Hello everyone!! Since Halloween is my favorite holiday I decided to make October the best month yet. Or at least, I hope you guys will like my posts. What do you have to look forward to?

My usual Wednesday posts have been taken over by the ABC Challenge nail art so you should be seeing some pretty creative designs coming from that. I try to think outside the box with every letter.

I've also decided to take part in the Nail-Aween Nail Art Challenge. There are some really great designs, some I haven't tried before, that are part of this challenge. It's going to be awesome!

nails nailart nail art Spellbound mani manicure Halloween water marble October Nail-Aween Challenge black white LA Colors

What does all this mean for you? More posts!!! What does this mean for me? A really busy month. :)

The first design asked for in the Nail-Aween Challenge is water marble. I really dislike water marble. Don't get me wrong. The look of a finished water marble is really pretty (if you don't look too closely) but the time it takes is really not worth it, in my opinion. With this in mind, I debated doing a pin drag mani instead and calling it a 'without water-water marble', but I just couldn't do it. It would have felt like cheating.

nails nailart nail art Spellbound mani manicure Halloween water marble October Nail-Aween Challenge black white LA Colors

Water Marble is actually pretty simple, but it is also very time consuming. You start out by painting your nails with a base color. I used white. Next, you need a bowl of water. This water has to be filtered or bottled and it must be room temperature. I filled an old butter dish with bottled water and left it sit out overnight. By the time I was ready to start, it was the perfect temperature. What wasn't perfect was thinking I could use a butter dish. The inside was too glossy and the polish wouldn't attach to the sides. You think this would be a good thing but you need to stabilize the outer edge of your polish rings before you can start swirling designs. I finally managed to rig up this. I lined the butter dish with saran wrap and poured the water back in. The saran wrap held the polish perfectly and I had no problems creating swirls.
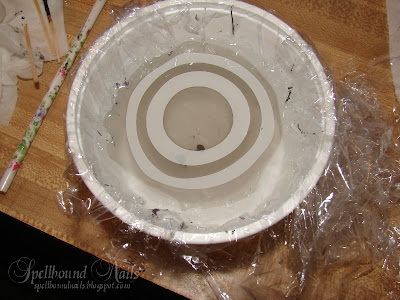
nails nailart nail art Spellbound mani manicure Halloween water marble October Nail-Aween Challenge black white LA Colors

After you set up your water, make sure you have all your supplies on hand. You want to be able to move from one step to the next without having to leave your work space. Work one finger at a time. Tape around your nail but don't get too close. Taping too close to the nail may stop the polish in the water from settling correctly. It's easier to clean up than to start all over. Once your nail is taped, start dropping your polish into your dish one drop at a time. Be careful not to overload the brush with polish. You only need one drop and an overload brush may drop two or three before you can control it. Keep dropping polish into the water until you get a tight bulls-eye pattern. If your polish isn't spreading you can give the dish a few quick taps against the side. Don't do this too harshly or you'll make a mess by splashing water and polish or create bubbles in your bulls-eye. How do I know? I did both.

Once you decide you have enough rings you'll need to attach them to your dish if they aren't already attached. Don't touch the outer ring! This ring will already be dry and touching it can ruin everything! Work from at least two rings in just to be safe. To create your swirls you can use almost anything sharp: a pin, a toothpick, the sharp end of a pencil (just know that the graphite may cause discoloration in the polish). I used an old nail art brush and found this worked even better than my attempts with a pin or a toothpick. You'll need to keep a napkin or paper towel on hand to keep your sharp object clean as you create swirls. Creating the swirls is up to you. Jump right in or spend a few moments trying to plan them out.

nails nailart nail art Spellbound mani manicure Halloween water marble October Nail-Aween Challenge black white LA Colors

Find a swirl you like and carefully sink your finger (nail down) through the polish and into the water. Keep your finger in the water! You need to clean the water of polish first or you'll ruin your design. I used my nail art brush and rolled it through my fingers while I moved it around the water. This rolling motion will gather the polish better than simply swishing it through the water. Rolling will literally roll the polish around the tip of your brush (or pin/toothpick/pencil). This is what you'll need your napkin for. Carefully remove your finger from the water. Don't blow on your nail or flail your hand through the air. Remove the tape around your nail. Carefully! You don't want to bump your nail and you also need to be aware that you'll be flinging water everywhere because there is certainly water caught in and around the tape. After that, pull your brush through the napkin/paper towel and move onto your other nails, repeating the process again and again. :)
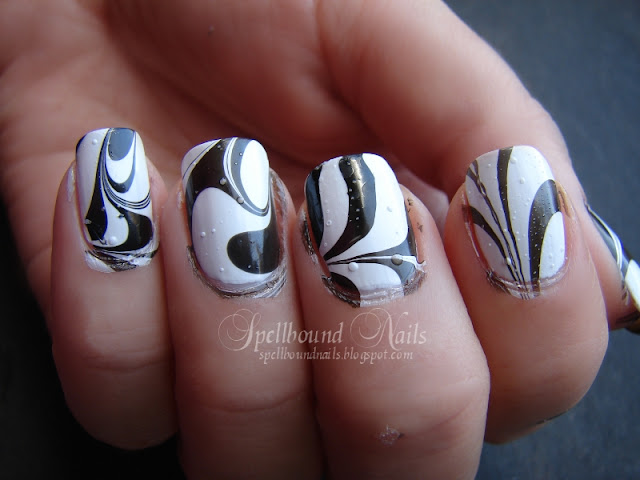
nails nailart nail art Spellbound mani manicure Halloween water marble October Nail-Aween Challenge black white LA Colors

You'll come out with something like this and you'll quickly realize a few other reasons I dislike water marbling besides it being time consuming and a waste of polish. The first thing you'll notice are the bubbles you'll surly have. I'm sure more seasoned water marblers have learned tricks on how to prevent this, but I've found nothing I tried so far worked. Some things I tried made it bubble less and other just caused more bubbles. The other big reason? Polish has settled everywhere that wasn't taped. This means there is polish all over my cuticle and worse still, settled around my nail and under it too! No amount of cleaning will fix all of this. Some will be cleaned and the rest will flake off in a day or so, usually with a little help from some tweezers.

nails nailart nail art Spellbound mani manicure Halloween water marble October Nail-Aween Challenge black white LA Colors

You can see here that I cleaned them as best I could. I also added a layer of top coat. This top coat swiped the bubbles right off and left behind blank spots in the black and dents in the white. While I feel really accomplished for doing this for the Nail-Aween Challenge, and I love the swirls on my pinky and my thumb nails I think this is nail art best viewed from further away ... or just not done at all.

What do you think of water marbling? Have you mastered this art? Or, like me, do you find it a waste of time and polish?